6 Importing and Analyzing Data from Appliances
6.1 Importing Data
Note
Data from appliances can only be imported by a super admin or an operator.
There are two possible ways to import data from OPENVAS SCAN appliances:
- Connected appliances
Appliances can be added on the Risk & Exposure Sources page by connecting them to OPENVAS SECURITY INTELLIGENCE. Scan data can then be imported from them manually or on a scheduled basis.
- Managed appliances
Appliances that are added for remote management via outbound mode (see Chapter 7) can push scan data to OPENVAS SECURITY INTELLIGENCE which can then be imported manually. If the function is enabled on an appliance, the appliance will automatically appear on the Risk & Exposure Sources page.
Important
Importing data from managed appliances is currently available as a technical preview only.
Before it can be used, the feature must be enabled, see Chapter 6.1.3.1.
6.1.1 General Information
There are some restrictions for the scan data that can be imported:
Only data from vulnerability scans should be imported, for example, from scans with the scan configuration Full and fast.
Data from discovery scans, for example, from scans with the scan configuration Discovery, should not be imported. These scan configurations only use tests that provide information about the target system. No vulnerabilities are being detected.
As OPENVAS SECURITY INTELLIGENCE always displays the latest data, an import of a discovery task would result in no vulnerabilities being shown at all for the affected assets.
Data from import tasks cannot be imported into OPENVAS SECURITY INTELLIGENCE.
Vulnerabilities with the severity classes Log and False Positive on the appliance are not imported into OPENVAS SECURITY INTELLIGENCE.
6.1.2 Importing Data from a Connected Appliance
Appliances can be added directly on the Risk & Exposure Sources page to import scan data from them.
6.1.2.1 Preparing the Appliance
6.1.2.1.1 Connection Requirements
SSH (port 22/TCP) and the Greenbone Management Protocol (GMP) must be activated on the appliance that should be connected to OPENVAS SECURITY INTELLIGENCE.
6.1.2.1.2 Tagging Scan Tasks
OPENVAS SECURITY INTELLIGENCE only imports asset and vulnerability data from scan tasks that have a tag with the name openvas-data.
The corresponding tag must be assigned to the desired scan tasks on the appliance.
There are three options for tagging a task on the appliance:
Access the details page of a task, select the tab User Tags and create a new tag with the name
openvas-datafor the task.The instruction for this can be found here in the OPENVAS SCAN user manual.
Create a tag with the name
openvas-data, access the list page of all tasks and link the previously created tag to one or multiple task(s).The instruction for creating a tag can be found here in the OPENVAS SCAN user user manual.
The instruction for linking a tag via the list page can be found here in the OPENVAS SCAN user manual.
Create a tag with the name
openvas-dataand – during creation – directly select the task(s) to which the tag should be linked.The instruction for this can be found here in the OPENVAS SCAN user manual.
Note
It is recommended to create and save a task filter on the appliance with the name “OPENVAS SECURITY INTELLIGENCE” that filters for the tag openvas-data.
With this filter, all data that is synchronized with OPENVAS SECURITY INTELLIGENCE is easily and quickly visible on the appliance.
The instruction for creating such a filter can be found here in the OPENVAS SCAN user manual.
6.1.2.2 Connecting an Appliance to OPENVAS SECURITY INTELLIGENCE
An appliance can be connected to OPENVAS SECURITY INTELLIGENCE as follows:
Select Data Management > Risk & Exposure Sources in the menu.
Click + Add appliance.
Fill in the input boxes (see Fig. 6.1):
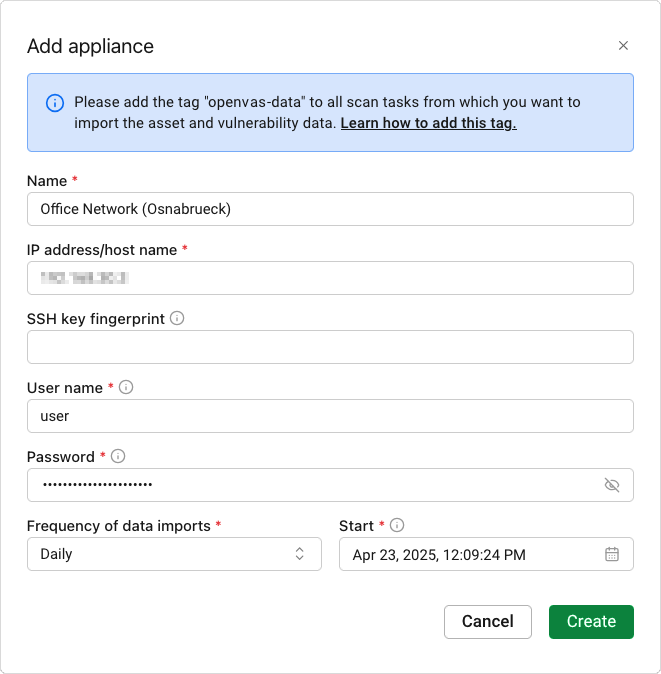
Fig. 6.1 Connecting an appliance
- Name
The name can be chosen freely. A descriptive name should be chosen if possible.
This input box is mandatory.
- IP address/host name
IP address or host name of the appliance.
This input box is mandatory.
- SSH key fingerprint
Fingerprint of the SSH key of the appliance.
This input box is optional. If no fingerprint of the SSH key is provided, OPENVAS SECURITY INTELLIGENCE will retrieve the fingerprint of the SSH key automatically.
Note
Data will only be imported from an appliance when the fingerprint of the appliance’s SSH key is stored in OPENVAS SECURITY INTELLIGENCE and both fingerprints match.
- User name
User name of the web user of the appliance.
This input box is mandatory.
- Password
Password of the web user of the appliance.
This input box is mandatory.
- Frequency of data imports
Frequency of the data imports, for example, Every 12 hours or Daily. The default is Once.
This input box is mandatory.
- Start
Date and the time of the first import. All subsequent import times are calculated based on the specified frequency.
This input box is mandatory.
Note
When selecting the start time, the following must be observed:
It is recommended to schedule the imports when users do not use OPENVAS SECURITY INTELLIGENCE, for example during the night.
The appliance must have finished its regular vulnerability scans, and a certain buffer should be planned in case scan tasks take longer than usual.
Click Create.
If no fingerprint was provided in step 3, check the retrieved fingerprint as described here in the OPENVAS SCAN user manual and click Accept fingerprint (see Fig. 6.2).
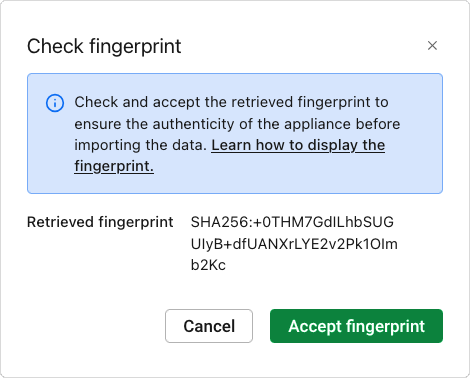
Fig. 6.2 Connecting an appliance
→ The appliance is connected and displayed on the Risk & Exposure Sources page.
6.1.2.3 Importing the Scan Data
OPENVAS SECURITY INTELLIGENCE imports data from a connected appliance based on a schedule (see Chapter 6.1.2.2), or when the import is triggered manually:
Select Data Management > Risk & Exposure Sources in the menu.
Click
 in the Action column and select Import data from the drop-down list.
→ The import of the scan data from the appliance is started.
Note
Depending on the amount of data to be imported, this action may take a while.
6.1.3 Importing Data from a Managed Appliance
Appliances that are added for remote management via outbound mode (see Chapter 7) can push scan data to OPENVAS SECURITY INTELLIGENCE which can then be imported manually. If the function is enabled on an appliance, the appliance will automatically appear on the Risk & Exposure Sources page.
OPENVAS SECURITY INTELLIGENCE receives information if new scan data is available on the appliance. The data can then be imported.
For managed appliances, data import can only be initiated manually and cannot be scheduled.
6.1.3.1 Preparing the Appliance
6.1.3.1.1 Connection Requirements
SSH (port 22/TCP) and the Greenbone Management Protocol (GMP) must be activated on the appliance that should send scan data to OPENVAS SECURITY INTELLIGENCE.
6.1.3.1.2 TLS Certificate Requirements
To send scan data from the appliance to OPENVAS SECURITY INTELLIGENCE, the TLS certificate used by OPENVAS SECURITY INTELLIGENCE must include the web interface address of OPENVAS SECURITY INTELLIGENCE as a Subject Alternative Name (SAN).
If a domain name is specified as the web interface address, the certificate must contain the corresponding DNS name, for example:
X509v3 Subject Alternative Name:
    DNS:example.local
If an IP address is specified, the certificate must contain the corresponding IP address, for example:
X509v3 Subject Alternative Name:
    IP Address:192.168.1.50
If the certificate does not contain the configured web interface address, it must be replaced with a suitable certificate before scan data can be sent.
Information about replacing the TLS certificate in OPENVAS OS can be found here in the OPENVAS OS user manual.
6.1.3.1.3 Enabling the Sending of Scan Data
An appliance can be prepared for sending scan data as follows:
Open the GOS administration menu of the appliance.
Select Advanced and press Enter.
Select Support and press Enter.
Select Shell and press Enter.
Select Continue and press Enter.
→ A shell is opened with the unprivileged user admin.
Run the following commands:
gos-state-manager set enable_osi_export enabled

gos-state-manager save
Switch to the root shell.
Note
Accessing as root requires enabling the superuser and setting a password. Instructions can be found here in the OPENVAS SCAN user manual.
Afterwards, switching to root is possible using the command
su -.Run the following command:
systemctl restart gvmd
Exit the shell and the GOS administration menu.
Open the web interface of the appliance.
Move the cursor over
 in the upper right corner.
Click Settings.
Click
 for Export Reports to OPENVAS SECURITY INTELLIGENCE.
Activate the checkbox.
Click
 .
.
6.1.3.2 Importing the Scan Data
OPENVAS SECURITY INTELLIGENCE imports data from a managed appliance when the import is triggered manually:
Select Data Management > Risk & Exposure Sources in the menu.
Note
When new scan data is available on a managed appliance, the status
 is displayed.
Click
in the Action column and select Import data from the drop-down list.→ The import of the data from the appliance is started.
Note
Depending on the amount of data to be imported, this action may take a while.
6.1.4 Managing All Connected Appliances
6.1.4.1 Viewing All Connected Appliances
All connected appliances can be displayed by selecting Data Management > Risk & Exposure Sources in the menu (see Fig. 6.3).
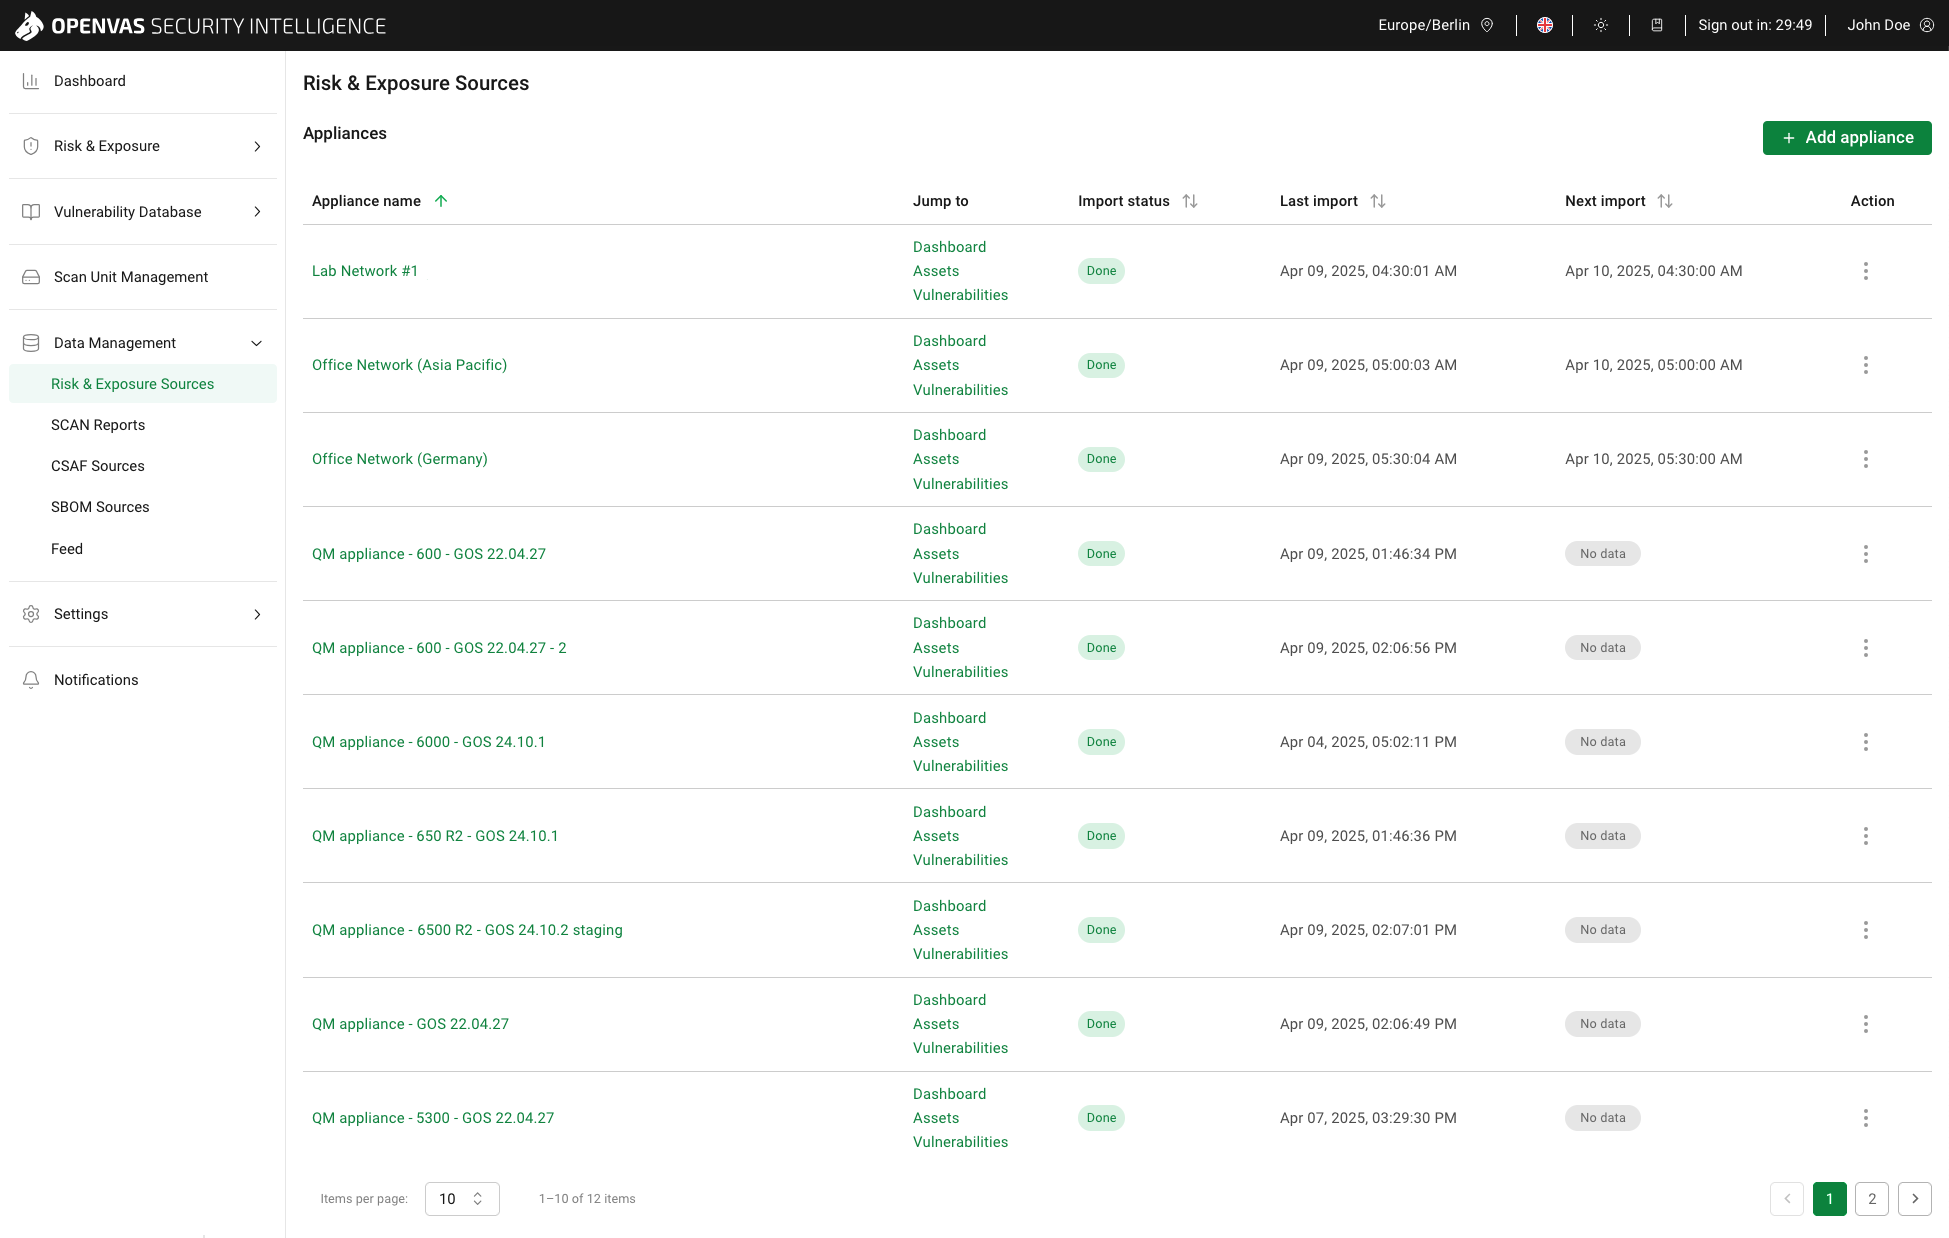
Fig. 6.3 Risk & Exposure Sources page
Tip
In the Column options drop-down menu, the columns to be displayed in the table can be selected.
The columns can be rearranged using drag and drop.
For all appliances, the following information is displayed:
- Appliance name
For connected appliances: name that was specified for the appliance when it was connected to OPENVAS SECURITY INTELLIGENCE (see Chapter 6.1.2.2).
For managed appliances:
Managed Applianceand the appliance’s ID (see Chapter 7).
Clicking on the appliance name opens the web interface of the connected appliance.
- Jump to
Links to the dashboard (see Chapter 6.2.2), the assets overview page (see Chapter 6.2.3.2.1) and the vulnerabilities overview page (see Chapter 6.2.5.1.1). The respective page that is accessed is already filtered to show only the results for the selected appliance.
- Import status
The status of the import can be one of the following:
 There was no import yet.
 An import is currently running.
 The last import was successful.
 The last import was not successful.
Moving the cursor over
The last import was not successful.
Moving the cursor over  displays more information about the reason for the failure:
The appliance could not be reached due to a technical problem like a network outage. If applicable, analyze and fix the problem and then start the import again (see Chapter 6.1).
The authentication failed, for example because the password of the web user of the appliance has changed. Update the user name and/or password in OPENVAS SECURITY INTELLIGENCE (see Chapter 6.1.4.2) and then start the import again (see Chapter 6.1).
The fingerprint of the SSH key of the appliance does not match the fingerprint stored in OPENVAS SECURITY INTELLIGENCE, for example because the SSH key on the appliance has changed. Update the SSH key fingerprint in OPENVAS SECURITY INTELLIGENCE (see Chapter 6.1.4.2) and then start the import again (see Chapter 6.1).
- New data is available for import (only available for managed appliances).
- Last import
Date and the time of the last successful import.
The last import is displayed as
 if there was no import yet.
- Next import
Date and time of the next scheduled import.
The next import is displayed as
if there is no import scheduled in the future.
When clicking the following actions are available:
Import scan data.
Edit the appliance (see Chapter 6.1.4.2) (only available for connected appliances).
Delete the appliance (see Chapter 6.1.4.3) (only available for connected appliances).
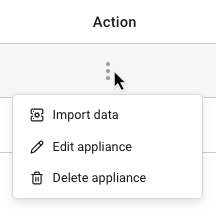
Fig. 6.4 Actions for all appliances
6.1.4.2 Editing an Appliance
Note
Only connected appliances can be edited.
Editing an appliance may be necessary in the following cases:
Changing the appliance name.
Changing the host name when the host name of the appliance was changed.
Changing the user name and/or password when the credentials of the web user of the appliance were changed.
Changing the fingerprint of the SSH key when the SSH key of the appliance was changed.
Changing the frequency and/or time of the data import.
An appliance can be edited as follows:
Select Data Management > Risk & Exposure Sources in the menu.
Click
in the Action column and select Edit appliance from the drop-down list.Update the required information (see Chapter 6.1.2.2).
Note
When renaming an appliance, all imported data for the appliance must be updated as well. This may take a while. It is therefore possible that filters for the new appliance name do not yet work, although the new name is already displayed on the Risk & Exposure Sources page.
Click Save.
→ The appliance information is updated.
Tip
If the SSH key of the appliance was changed, remove the fingerprint in OPENVAS SECURITY INTELLIGENCE and click Save. This will retrieve the fingerprint of the SSH key automatically to check and accept it.
6.1.4.3 Deleting an Appliance
Note
Only connected appliances can be deleted.
When deleting an appliance from OPENVAS SECURITY INTELLIGENCE, all data imported from this appliance will be removed permanently.
Deleting an appliance may be necessary in the following cases:
Data should not be imported anymore, for example test data.
An appliance does not exist anymore, for example when it was replaced by another appliance.
Select Data Management > Risk & Exposure Sources in the menu.
Click
in the Action column and select Delete appliance from the drop-down list.→ A warning dialog is displayed asking to confirm the deletion.
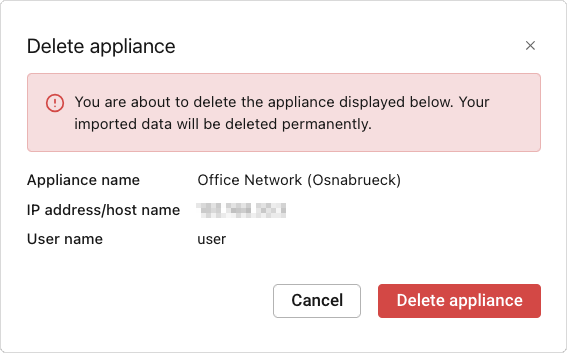
Fig. 6.5 Deleting an appliance
Click Delete appliance.
→ The appliance and its imported data is deleted from OPENVAS SECURITY INTELLIGENCE. The appliance is not displayed in the list of appliances anymore.
6.2 Analyzing Data
6.2.1 About the Permission Principle for Assets
The permission principle follows the “Allow by Default” principle with tag-based access restrictions.
By default, all assets and their associated data (vulnerabilities, overrides) are visible to all users of all roles.
If a super admin or an operator assigns at least one system tag to an asset, that asset and its associated data is no longer visible for users with the User role.
Permissions for system tags can then be explicitly granted to users or groups by a super admin or an operator. This allows users to view, modify, and manage all assets tagged with the corresponding system tags. The permission also applies to associated data.
Note
Instructions for creating tags and tag permissions can be found in Chapter 6.2.4.
6.2.2 Using the Dashboard
The OPENVAS SECURITY INTELLIGENCE dashboard provides an overview of the detected and imported assets and their vulnerabilities.
6.2.2.1 Dashboard Structure
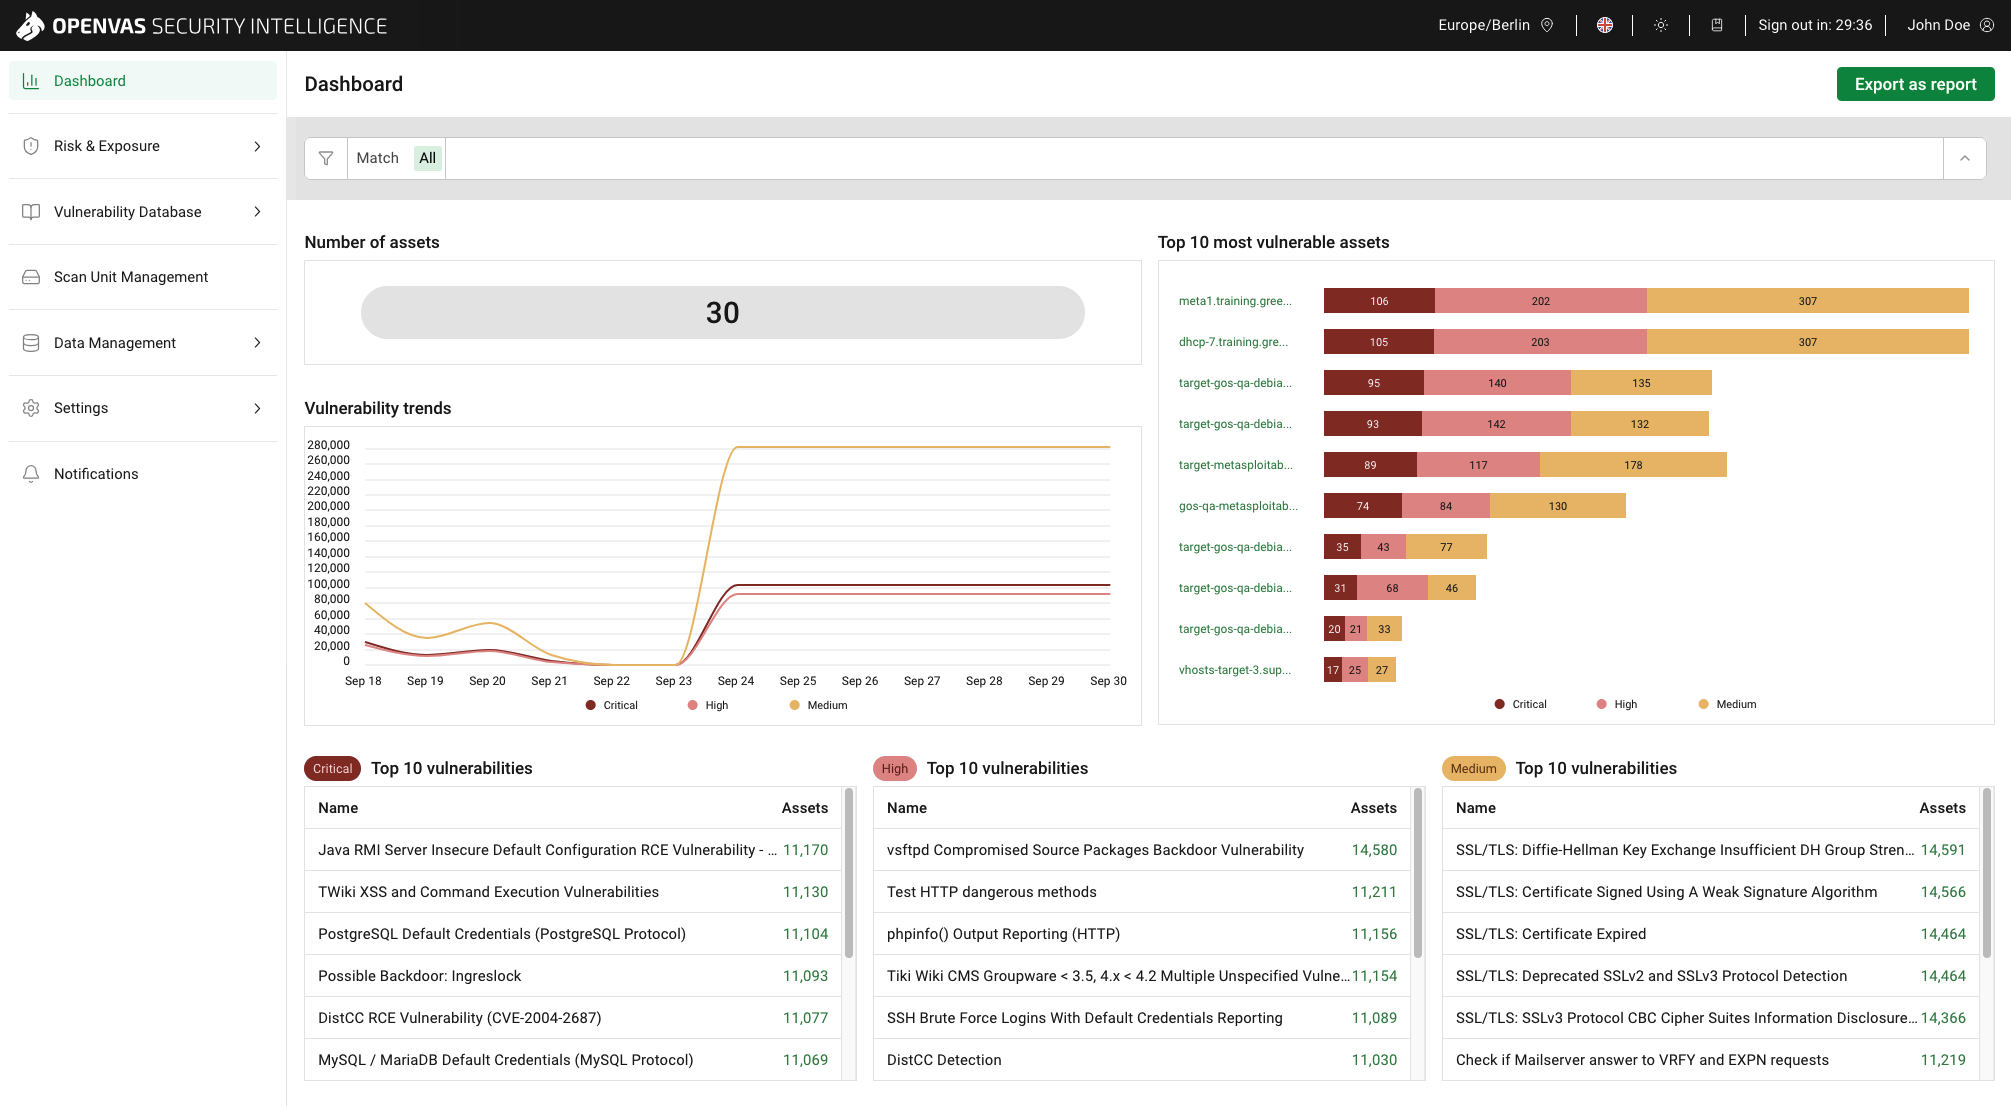
Fig. 6.6 Dashboard
The dashboard consists of the following charts:
- Number of assets
Total number of imported assets.
- Top 10 most vulnerable assets
Names of the ten assets with the highest number of vulnerabilities with Critical severity. Clicking on an asset name opens the asset details (see Chapter 6.2.3.2.2).
The assets are sorted by the number of Critical vulnerabilities, then by the number of High vulnerabilities and then by the number of Medium vulnerabilities.
- Vulnerability trends
Total number of vulnerabilities with Critical, High and Medium severity for up to the last 14 days.
Note
There are various reasons why the number of vulnerabilities change over time, for example:
Vulnerabilities were fixed.
New assets with vulnerabilities were imported from existing appliances.
New vulnerabilities were detected because of new Greenbone vulnerability tests.
Data was imported from additional appliances.
Appliances were removed from OPENVAS SECURITY INTELLIGENCE.
- Top 10 critical vulnerabilities
Names of the ten vulnerabilities with Critical severity that were detected most frequently on assets.
Clicking on the number of affected assets opens the Affected assets page (see Chapter 6.2.5.1.3). If the dashboard is filtered (see Chapter 6.2.2.2), the filter is passed over to the Affected assets page.
- Top 10 high vulnerabilities
Names of the ten vulnerabilities with High severity that were detected most frequently on assets.
Clicking on the number of affected assets opens the Affected assets page (see Chapter 6.2.5.1.3). If the dashboard is filtered (see Chapter 6.2.2.2), the filter is passed over to the Affected assets page.
- Top 10 medium vulnerabilities
Names of the ten vulnerabilities with Medium severity that were detected most frequently on assets.
Clicking on the number of affected assets opens the Affected assets page (see Chapter 6.2.5.1.3). If the dashboard is filtered (see Chapter 6.2.2.2), the filter is passed over to the Affected assets page.
6.2.2.2 Filtering the Dashboard Content
The dashboard can be filtered as described in Chapter 5.4.
When a filter is added, all charts automatically change according to the filter criteria.
Note
If a filter returns no results, the dashboard shows 0 for the Number of assets chart and We did not find any vulnerabilities. Please check your filter. for all other charts.
This can also happen partially, for example when the filter returns no assets with critical, high or medium vulnerabilities.
6.2.2.3 Exporting Reports from the Dashboard View
The dashboard view can be exported as a PDF report. Two report types are available:
- Management summary
This report type includes the following for the selected time frame, taking into account the currently applied filter:
Total number of assets
Vulnerability trends diagram
Top 10 most vulnerable assets bars
Lists for top 10 critical, high and medium vulnerabilities
- Most vulnerable assets with vulnerability details
This report type includes the following for the selected time frame, taking into account the currently applied filter:
Total number of assets
Vulnerability trends diagram
Top 10 most vulnerable assets bars
Lists for top 10 critical, high and medium vulnerabilities
For the selected number of assets, a full list of vulnerabilities detected on each asset. The assets included in the report are selected in descending order of criticality.
A report can be exported as follows:
Click Export as report.
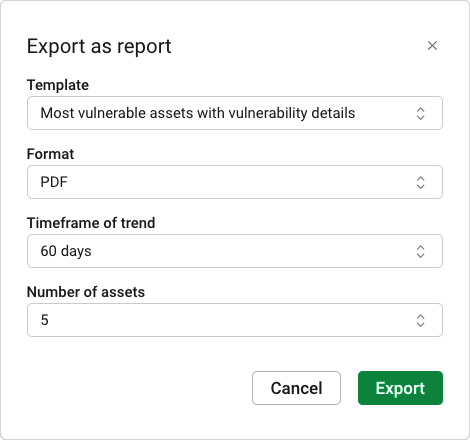
Fig. 6.7 Exporting a report from the dashboard
Select the desired report type in the drop-down list Template.
Select the period to be covered in the report in the drop-down list Timeframe of trend.
If the report type Most vulnerable assets with vulnerability details has been chosen, select the number of assets for which vulnerability details are to be included in the report in the drop-down list Number of assets.
Click Export.
→ The report is generated.
Note
Depending on the number of assets and the selected time frame, the generation may take some time.
→ A print preview of the PDF file is opened.
Save the PDF file.
6.2.3 Managing Assets
6.2.3.1 Creating Assets
Assets are created during the data import from an appliance (see Chapter 6.1).
The following cases are possible:
An asset already exists in OPENVAS SECURITY INTELLIGENCE
If an asset already exists for an appliance, the imported vulnerability data is assigned to the existing asset, and all corresponding changed data is updated, for example the IP address for assets with the same host name and dynamic IP addresses.
An asset does not yet exist in OPENVAS SECURITY INTELLIGENCE
If an asset does not yet exist for an appliance, the asset is created based on the host name/container image name (first criterion), or the IP address (second criterion, for assets without a host name).
Note
It is possible that more than one asset exists with the same asset name. The appliance that provides the asset data is taken into account when creating assets, for example to support assets with the same host name in separate networks.
Assets that have not been updated for more than 180 days, meaning that no new data has been imported for them, are automatically removed from OPENVAS SECURITY INTELLIGENCE.
6.2.3.2 Viewing Assets
6.2.3.2.1 Viewing the Overall List of Assets
All existing assets can be displayed by selecting Risk & Exposure > Assets in the menu (see Fig. 6.8).
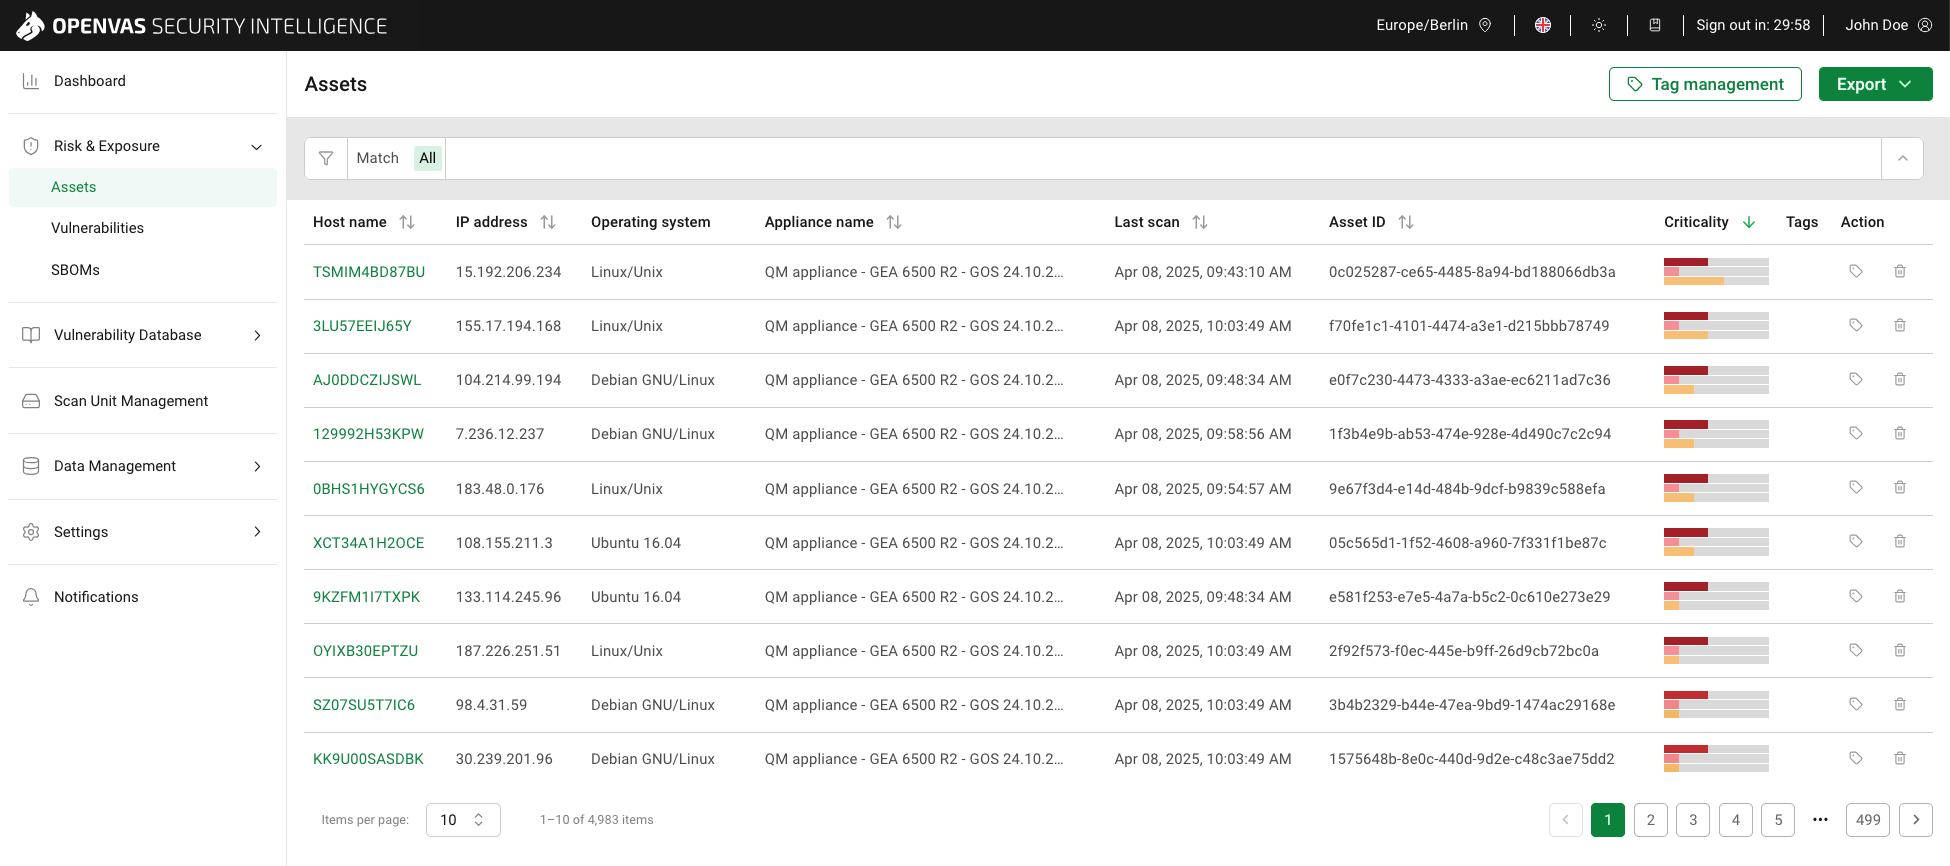
Fig. 6.8 Assets page
For all assets, the following information is displayed:
- Asset name
Host name or container image name of the asset. The name is displayed as
 if the asset does not have a host name or container image name.
Clicking on the asset name opens the details page of the asset (see Chapter 6.2.3.2.2).
- IP address
IP address of the asset.
- Asset type
Host: Assets detected through network-based vulnerability scans.
Container image: Assets detected through container image scans.
- Operating system
Detected operating system of the asset, for example Windows 10 Enterprise 21H2 or FreeBSD 12.2.
- Appliance name
- Last scan
Date and time the asset was last scanned.
- Asset ID
Internal identifier that makes an asset unique. If assets in separate networks have the same asset name, the asset ID can be used to differentiate between the assets.
- Criticality
The bars show the number and distribution of vulnerabilities with critical, high and medium severity.
Moving the cursor over a bar shows the number of vulnerabilities for the corresponding severity class.
When sorting by this column, the assets are sorted by the number of Critical vulnerabilities, then by the number of High vulnerabilities and then by the number of Medium vulnerabilities.
- Tags
Tags linked to the asset (see Chapter 6.2.4). System tags are marked with
 .
Only super admins and operators can see system tags.
.
Only super admins and operators can see system tags.Clicking on the number of additional tags, for example
 , displays all tags (see Fig. 6.9).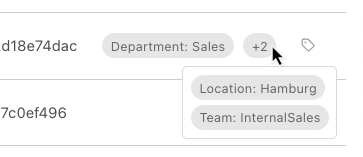
Fig. 6.9 Displaying additional tags
For all assets, the following action is available:
6.2.3.2.2 Viewing Asset Details
In the overall list of assets (see Chapter 6.2.3.2.1), click on the name of an asset to display the details page of an asset (see Fig. 6.10).
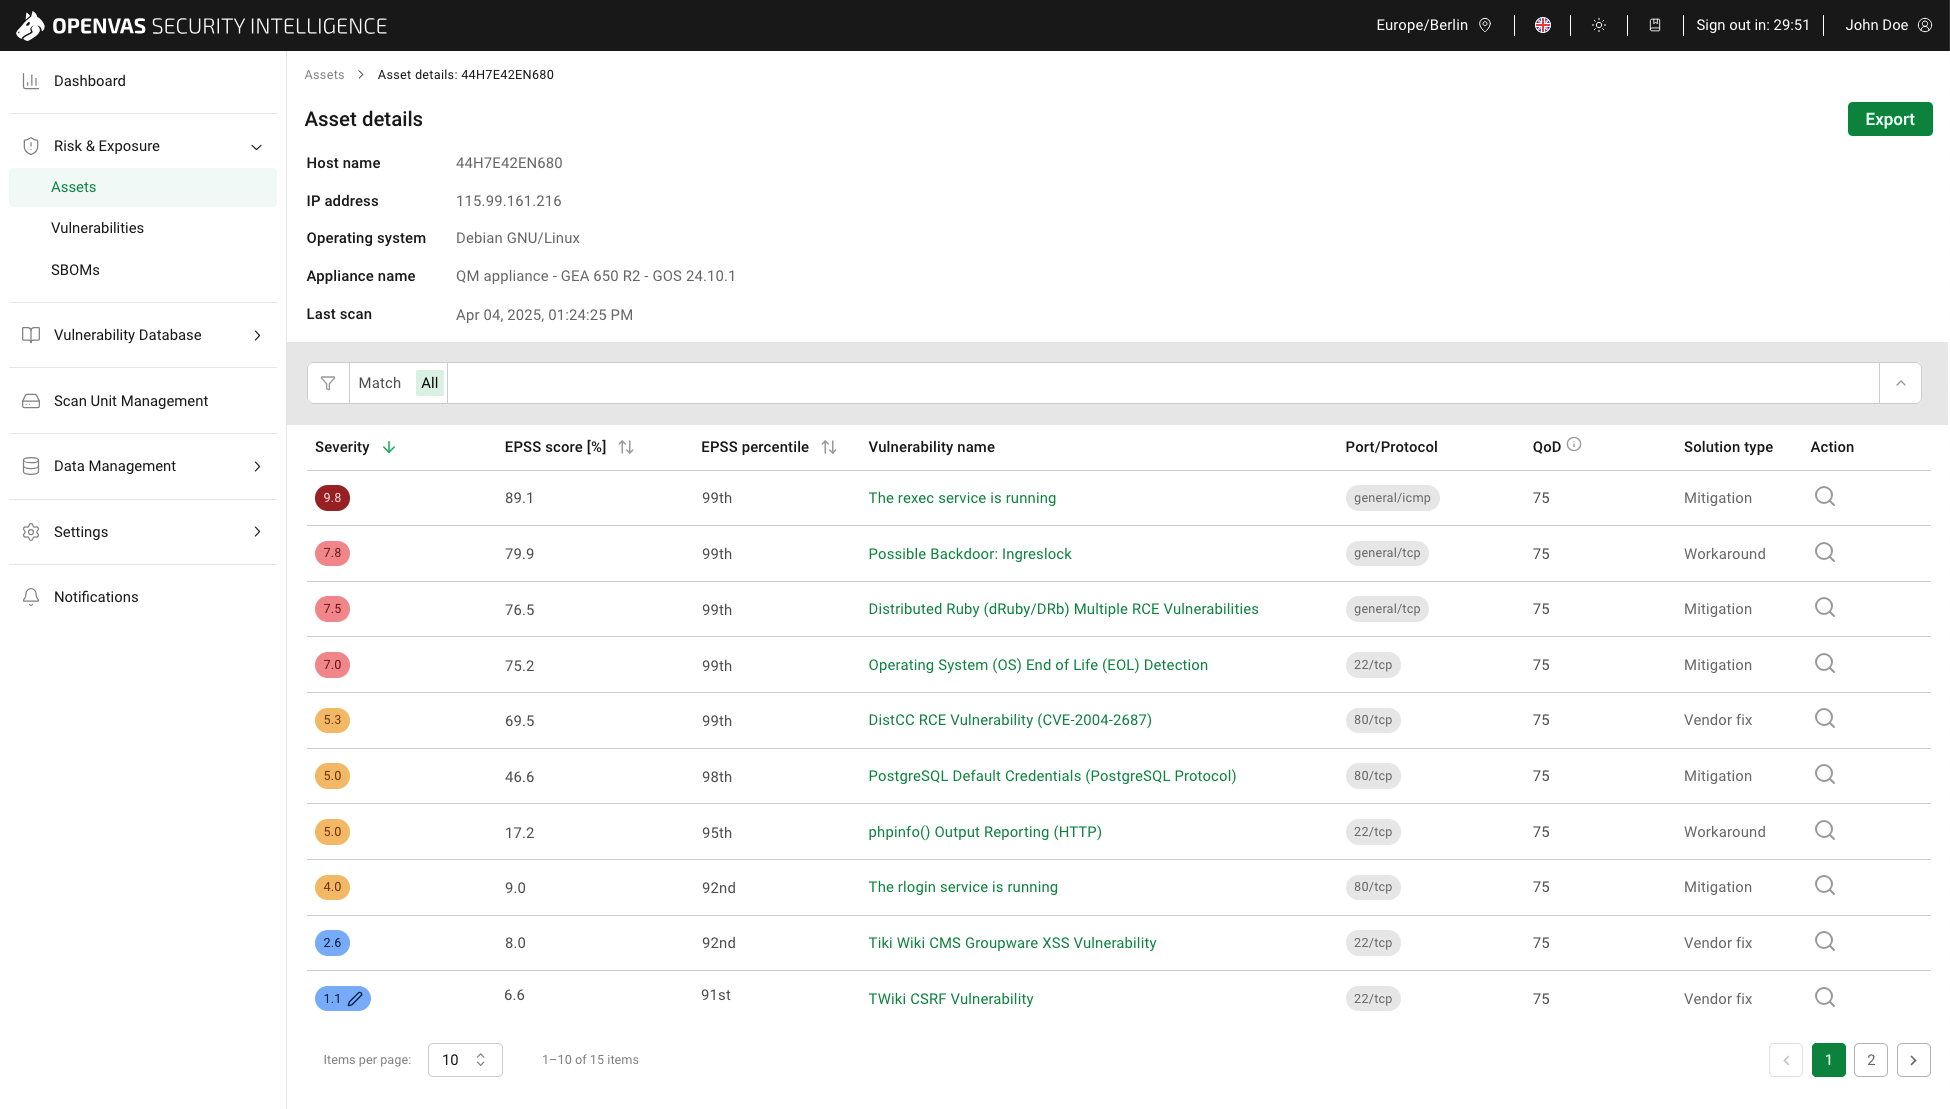
Fig. 6.10 Asset details
The following information is displayed:
- Asset name
Host name or container image name of the asset. The name is empty if the asset does not have a host name or container image name.
- IP address
IP address of the asset.
- Operating system
Detected operating system of the asset, for example Windows 10 Enterprise 21H2 or FreeBSD 12.2.
- Appliance name
- Last scan
Date and time the asset was last scanned.
- Asset type
Host: Assets detected through network-based vulnerability scans.
Container image: Assets detected through container image scans.
A table below displays all vulnerabilities detected for the asset. For all vulnerabilities, the following information is displayed:
- Severity
Qualitative measure of a vulnerability’s severity according to the Common Vulnerability Scoring System (CVSS). CVSS is an industry standard for describing the severity of vulnerabilities.
CVSS v2.0 and CVSS v3.x consist of three metric groups: Base, Temporal, and Environmental.
CVSS v4.0, the current version, consists of four metric groups: Base, Threat, Environmental, and Supplemental.
Note
If a vulnerability contains data of more than one CVSS version, the newest is always used.
The National Vulnerability Database (NVD) provides CVSS assessments of Base metrics since they are the intrinsic characteristics of a vulnerability. Assessments for Temporal, Threat, Environmental, or Supplemental metrics are not provided as they strongly depend on time, on the particular organization in which they occur and on additional context.
Base score metrics rate the exploitability of a vulnerability and its impact on the target system. This includes, among other things, assessing the accessibility of the target system and whether the confidentiality, integrity or availability of the target system is at risk.
The severity includes a severity score, which is a number from 0.0 to 10.0, with 10.0 being the most severe, and a severity class. Regardless of the CVSS version, the severity class is determined using the following grading:
Critical: 9.0–10.0
High: 7.0–8.9
Medium: 4.0–6.9
Low: 0.0–3.9
Existing overrides are imported from the appliance together with the scan results. If an override exists for a vulnerability, this is indicated by
next to the severity.
Moving the cursor over the severity displays the original severity.- EPSS score [%]
Qualitative measure of a vulnerability’s likelihood of exploitation according to the Exploit Prediction Scoring System (EPSS).
The score indicates the probability of attempts to exploit a vulnerability being observed in the next 30 days and is a value between 0 and 100 %. The higher the value, the greater the probability that a vulnerability will actually be exploited.
- EPSS percentile
The EPSS percentile indicates the proportion of vulnerabilities that were rated the same or lower than the vulnerability. This helps putting the score into context.
- Vulnerability name
Name of the vulnerability.
Clicking on the vulnerability name opens the details page of a vulnerability (see Chapter 6.2.5.1.2).
Tip
Clicking
 in the Action column opens the vulnerability details as an overlay on the current page.
- Port/Protocol
Port number and protocol type that was used to find the vulnerability on the host.
Clicking on the number of additional ports, for example
, displays all ports.- QoD
Short for “Quality of Detection”. The QoD describes the reliability of the executed vulnerability detection. It is a value between 0 and 100, with 100 being the most reliable.
For more information see Chapter 6.2.5.4.
- Solution type
Type of measure to remedy the vulnerability. The following solution types exist:
Workaround: Information about a configuration or specific deployment scenario that can be used to avoid exposure to the vulnerability is available. This is usually the “first line of defense” against a new vulnerability before a mitigation or vendor fix has been issued or even discovered.
Mitigation: Information about a configuration or deployment scenario that helps to reduce the risk of the vulnerability is available but that does not resolve the vulnerability on the affected product. Mitigations may include using devices or access controls external to the affected product.
Vendor fix: Information is available about an official fix that is issued by the original vendor of the affected product. Unless otherwise noted, it is assumed that this fix fully resolves the vulnerability.
None available: Currently there is no fix available. Information should contain details about why there is no fix.
Vendor will not fix: There is no fix for the vulnerability and there never will be one. This is often the case when a product has been orphaned, is no longer maintained or otherwise deprecated. Information should contain details about why there will be no fix issued.
For all vulnerabilities, the following action is available:
- View vulnerability details as an overlay (see Chapter 6.2.5.1.2).
6.2.3.3 Filtering Assets
The overall list of assets as well as the details page of an asset can be filtered as described in Chapter 5.4.
Note
If a filter delivers no results, the table with the list of assets shows No data available. Please check your filter.
6.2.3.4 Exporting Assets
6.2.3.4.1 Exporting a List of Assets
The list of assets (see Chapter 6.2.3.2.1) can be exported as a CSV file. If the asset list is filtered, only the filtered assets are exported.
Note
If no data is imported or the filter delivers no results, the export functionality is disabled. Data has to be imported from appliances (see Chapter 6.1) or the filter has to be adjusted (see Chapter 5.4).
A list of assets can be exported as follows:
Select Risk & Exposure > Assets in the menu.
Filter the assets to all those that should be exported (see Chapter 6.2.3.3).
Click Export and select Export from the drop-down list.
→ The list of assets is exported.
The CSV file contains the following information for each asset:
Asset name
Asset type
IP address
Operating system
Appliance name
Last scan
Asset ID
6.2.3.4.2 Exporting a List of Assets with All Their Vulnerabilities
The list of assets (see Chapter 6.2.3.2.1) with details about all their vulnerabilities can be exported as a CSV file. If the asset list is filtered, only the filtered assets are exported.
Note
If no data is imported or the filter delivers no results, the export functionality is disabled. Data has to be imported from appliances (see Chapter 6.1) or the filter has to be adjusted (see Chapter 5.4).
A list of assets with all their vulnerabilities can be exported as follows:
Select Risk & Exposure > Assets in the menu.
Filter the assets to all those that should be exported (see Chapter 6.2.3.3).
Click Export and select Export data with details from the drop-down list.
→ The list of assets is exported.
The CSV file contains the following information for each asset:
Asset name
Asset type
IP address
Operating system
Appliance name
Last scan
Severity (if overrides exist, the CSV file will only show the new severity without indicating the overridden severity)
EPSS score
EPSS percentile
Vulnerability name
Solution type
Solution
QoD
Summary
Impact
Affected software/operating system
Specific result
CVE references
CERT references
6.2.3.4.3 Exporting Asset Details
The details of a specific asset (see Chapter 6.2.3.2.2) can be exported as a CSV file. The exported file contains a list of the vulnerabilities detected for the asset. If the vulnerability list is filtered, only the filtered vulnerabilities are exported.
The asset details can be exported as follows:
Select Risk & Exposure > Assets in the menu.
Click on the name of an asset to display the asset details.
Click Export.
→ The asset details are exported.
The CSV file contains the following information:
Asset name
IP address
Operating system
Appliance name
Last scan
Severity (if overrides exist, the CSV file will only show the new severity without indicating the overridden severity)
Vulnerability name
Port/Protocol
Solution type
Solution
QoD
Summary
Impact
Affected software/operating system
CVE references
CERT references
Note
Asset name, IP address, operating system, appliance name and last scan are the same for all vulnerabilities because they were all detected for the same asset. This allows to make the reference for which asset the vulnerabilities were exported.
6.2.3.5 Deleting Assets
Note
In addition to deleting assets manually, they can be automatically removed if no new data has been imported for them (see Chapter 5.8).
Assets can be deleted manually as follows:
Select Risk & Exposure > Assets in the menu.
Click
 in the Action column.
→ A warning dialog is displayed asking to confirm the deletion.
Note
The asset and all associated data is removed.
If the asset is included in future scans on the appliance, it will be imported again to OPENVAS SECURITY INTELLIGENCE during the next import from the appliance.
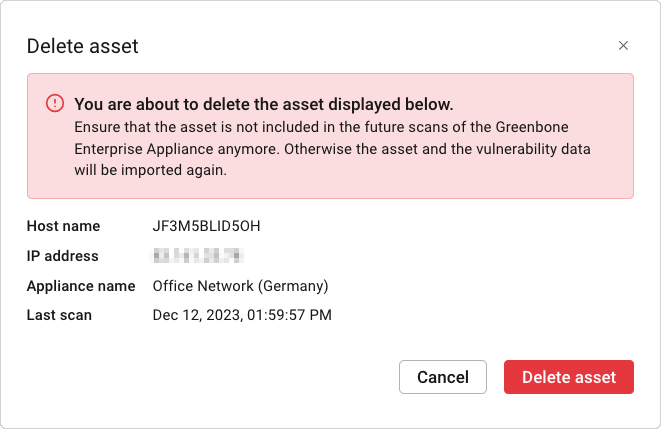
Fig. 6.11 Confirming the deletion
Click Delete asset.
→ The asset is removed from OPENVAS SECURITY INTELLIGENCE.
Note
Since all associated data is also removed, deleting an asset may take a while.
6.2.4 Using Tags
Tags are name-value pairs that can be linked to assets in order to filter them by tags. Tags can only be assigned to assets.
6.2.4.2 Creating Tags
6.2.4.2.1 Assigning a Tag Directly to an Asset
A tag can be assigned directly to an asset as follows:
Select Risk & Exposure > Assets in the menu.
Click
 in the Action column.
→ The Manage tags dialog is opened. If there are already tags assigned to this asset, they are displayed in a list below the asset’s name and IP address (see Fig. 6.12).
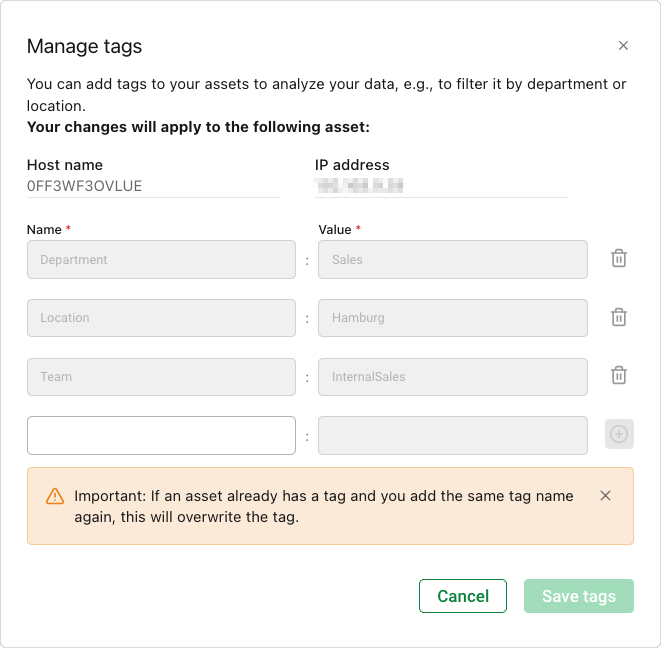
Fig. 6.12 Adding a tag to an asset
At the bottom of the list, enter a name for the tag in the Name input box.
Note
Tag names are case-sensitive and can be at most 128 characters long.
Already existing tag names are displayed in a drop-down list. This can be used for the following use cases:
Existing tags can be assigned (see Chapter 6.2.4.2.3).
Replacing a tag value with a new one. Assets cannot have multiple tags assigned with the same name.
Example: If a tag with the name
Departmentand the valueSalesis already assigned to an asset and a tag with the nameDepartmentand the valueMarketingis also assigned, the tag with the valueSalesis overwritten.
Enter a value for the tag in the Value input box.
Note
Tag values are case-sensitive and can be at most 255 characters long.
Already existing tag values are displayed in a drop-down list. This can be used for assigning already existing tags (see Chapter 6.2.4.2.3).
Click
 .
.→ The new tag is displayed at the bottom of the list of tags.
Activate the checkbox if the newly assigned tags should be system tags.
Note
Only a super admin or an operator can create system tags.
More information about system tags can be found in Chapter 6.2.1.
Click Save tags.
→ The tags are assigned.
System tags are marked with
.
Only super admins and operators can see system tags.
6.2.4.2.2 Assigning a Tag to Multiple Assets
A tag can be assigned to multiple assets as follows:
Select Risk & Exposure > Assets in the menu.
Filter the assets to display all those to which the tag should be assigned (see Chapter 5.4).
Click Tag management.
→ The Tag management dialog is opened.
Select the Manage tags tab.
→ The Manage tags tab is opened. The number of assets to which the tag will be assigned is displayed at the top (see Fig. 6.13).
All tags that are already assigned to some or all of the filtered assets are displayed in a list. The number to the right of each tag shows to how many assets it is assigned.
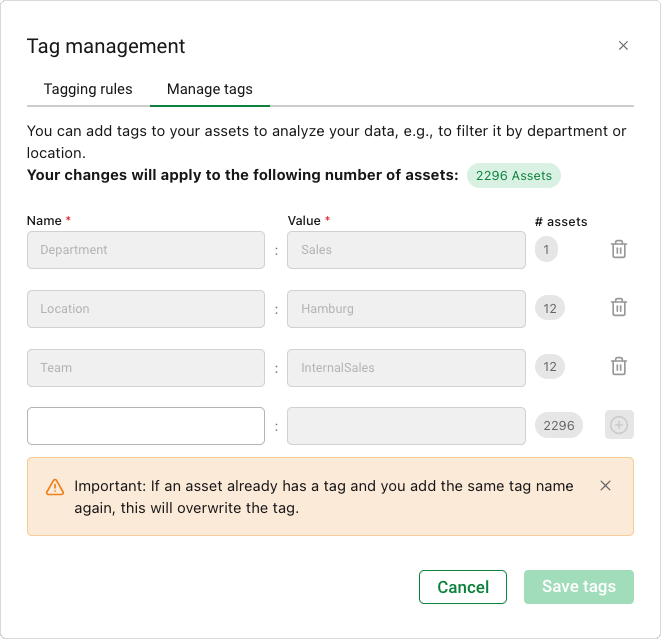
Fig. 6.13 Adding a tag to an asset
At the bottom of the list, enter a name for the tag in the Name input box.
Note
Tag names are case-sensitive and can be at most 128 characters long.
Already existing tag names are displayed in a drop-down list. This can be used for the following use cases:
Existing tags can be assigned (see Chapter 6.2.4.2.3).
Replacing a tag value with a new one. Assets cannot have multiple tags assigned with the same name.
Example: If a tag with the name
Departmentand the valueSalesis already assigned to an asset and a tag with the nameDepartmentand the valueMarketingis also assigned, the tag with the valueSalesis overwritten.
Enter a value for the tag in the Value input box.
Note
Tag values are case-sensitive and can be at most 255 characters long.
Already existing tag values are displayed in a drop-down list. This can be used for assigning already existing tags (see Chapter 6.2.4.2.3).
Click
.→ The new tag is displayed at the bottom of the list of tags.
Activate the checkbox if the newly assigned tags should be system tags.
Note
Only a super admin or an operator can create system tags.
More information about system tags can be found in Chapter 6.2.1.
Click Save tags.
Note
Depending on the number of assets the tag is assigned to, it may take a while until the tag is displayed.
→ The tags are assigned.
System tags are marked with
.
Only super admins and operators can see system tags.
6.2.4.2.3 Linking an Existing Tag
An already existing tag can be added to one or multiple assets.
Follow the instruction in Chapter 6.2.4.2.1 or Chapter 6.2.4.2.2 until the dialog for creating tags is opened.
At the bottom of the list, click in the Name input box and select a tag name from the drop-down list.
Note
Assets cannot have multiple tags assigned with the same name.
Example: If a tag with the name
Departmentand the valueSalesis already assigned to an asset and a tag with the nameDepartmentand the valueMarketingis also assigned, the tag with the valueSalesis overwritten.Click in the Value input box and select a tag value from the drop-down list.
Activate the checkbox if the newly assigned tags should be system tags.
Note
Only a super admin or an operator can create system tags.
More information about system tags can be found in Chapter 6.2.1.
Click Save tags.
Note
Depending on the number of assets the tag is assigned to, it may take a while until the tag is displayed.
→ The tags are assigned.
System tags are marked with
.
Only super admins and operators can see system tags.
6.2.4.3 Using Tagging Rules
Tagging rules allow the automatic assignment of tags to assets. The tags are assigned when the assets fulfill specified conditions.
Example: all assets that have the operating system Linux should get the tag os:linux.
6.2.4.3.1 Creating a Tagging Rule
A new tagging rule can be created as follows:
Select Risk & Exposure > Assets in the menu.
The condition the assets must fulfill to get the tag assigned must be defined as a filter on the Assets page first.
Apply a filter to the Assets page as described in Chapter 5.4.1 with the filter combination that should form the rule conditions.
→ The page content is filtered.
Click Tag management.
→ The Tag management dialog is opened. The Tagging rules tab is shown.
Click Add rule.
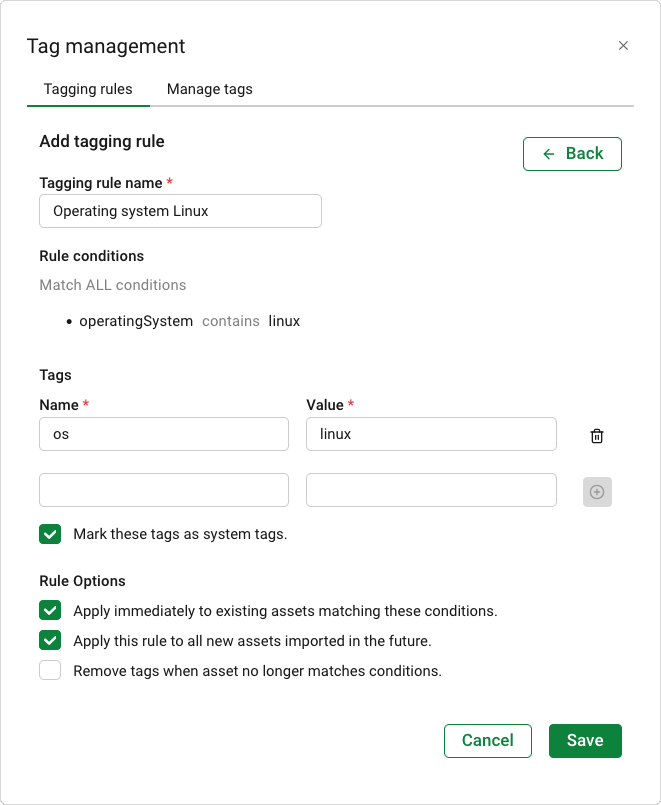
Fig. 6.14 Creating a tagging rule
Enter a name for the tagging rule in the input box Tagging rule name.
Enter a name for the tag in the Name input box.
Note
Tag names are case-sensitive and can be at most 128 characters long.
Assets cannot have multiple tags assigned with the same name. If different tagging rules would assign tags with the same name, only one tag will be assigned.
The hierarchy of tagging rules can be changed as described in Chapter 6.2.4.3.2.
Enter a value for the tag in the Value input box.
Note
Tag values are case-sensitive and can be at most 255 characters long.
Click
.→ The new tag is displayed at the bottom of the list of tags.
Activate the checkbox Mark these tags as system tags if the newly assigned tags should be system tags.
Note
Only a super admin or an operator can create system tags.
More information about system tags can be found in Chapter 6.2.1.
Activate the rule options as desired.
Apply immediately to existing assets matching these conditions: upon saving, the tags listed above will be assigned to all existings assets that fulfill the specified conditions.
Apply this rule to all new assets imported in the future: the tags listed above will automatically be assigned to all assets imported in the future that fulfill the specified conditions.
Remove tags when asset no longer matches conditions: when an asset no longer fulfills the specified conditions, the tags listed above will be removed from the asset.
Click Save.
→ The rule is displayed in the Tagging rules tab.
6.2.4.3.2 Managing Tagging Rules
Select Risk & Exposure > Assets in the menu.
Click Tag management.
→ The Tag management dialog is opened. The Tagging rules tab is shown.
 Display details of the tagging rule.
 Executed the tagging rule immediately.
The tags defined in the tagging rule will be assigned to all existings assets that fulfill the specified conditions.
Executed the tagging rule immediately.
The tags defined in the tagging rule will be assigned to all existings assets that fulfill the specified conditions.- Delete the tagging rule.
A tagging rule can be activated or deactivated by clicking on the toggle switch.
The order of the tagging rules determines their hierarchy.
Assets cannot have multiple tags assigned with the same name. In case of conflicts, rules are overridden by other rules further down on the list.
Example: there are two tagging rules that assign a tag with the name
Departmentand different values. Assets that fulfill the conditions of both tagging rules, will get the tag of the rule that is lower on the list.The order can be changed per dragging and dropping with
 .
.
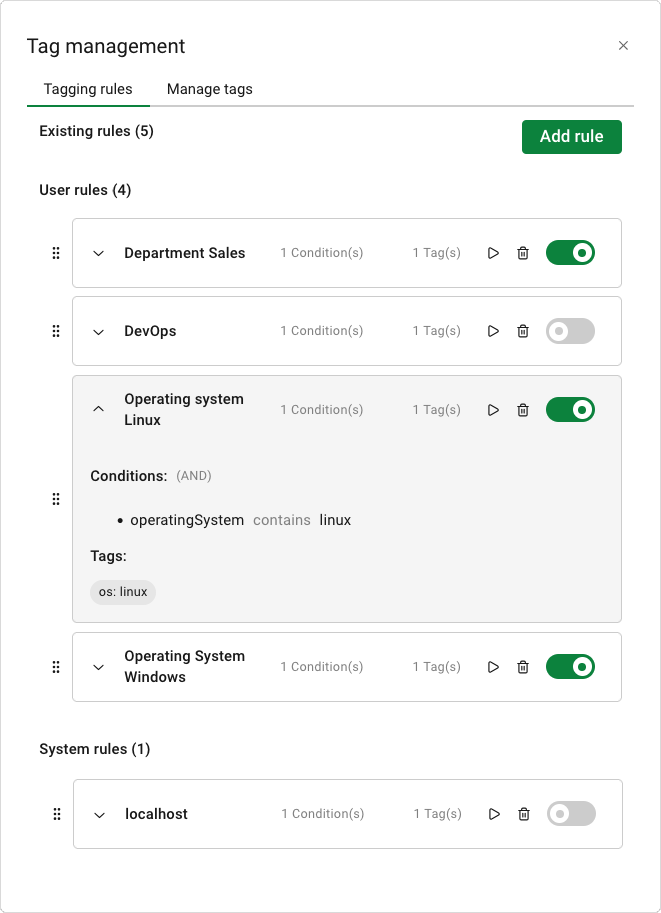
Fig. 6.15 Managing tagging rules
6.2.4.4 Using Tag Permissions
Note
Tag permissions can only be configured by a super admin or an operator.
Tag permissions can be used to to control access to assets and their associated data (vulnerabilities, overrides).
More information about the permission principle can be found in Chapter 6.2.1.
6.2.4.4.1 Creating a Tag Permission
Select Risk & Exposure > Assets in the menu.
Click Tag permissions.
→ The Tag permissions dialog is opened.
Click Add permission rule.
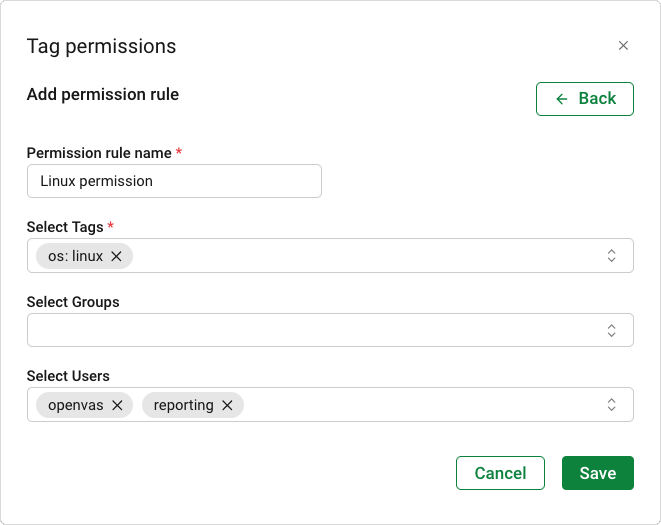
Fig. 6.16 Creating a tag permission
Enter a name for the permission rule in the input box Permission rule name.
Select the system tags for which permissions should be configured from the Select Tags drop-down list.
Note
Only system tags can be selected.
Select the groups and/or users to whom permissions should be granted from the drop-down lists.
Click Save.
6.2.4.4.2 Managing Tag Permissions
Select Risk & Exposure > Assets in the menu.
Click Tag permissions.
→ The Tag permissions dialog is opened.
- Display details of the tag permission.
- Edit the tag permission.
- Delete the tag permission.
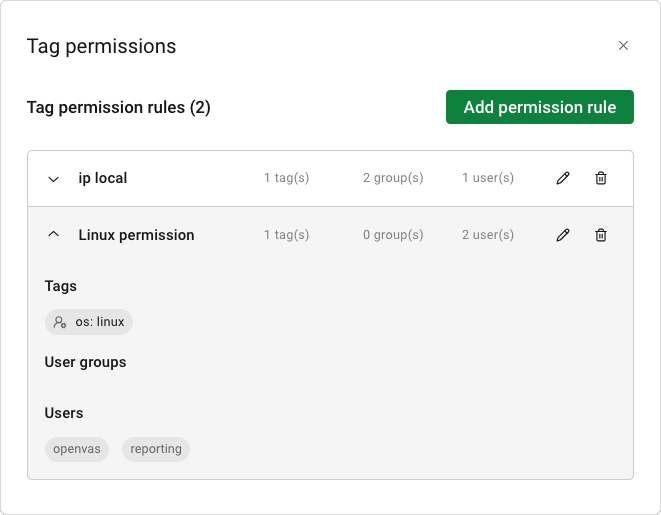
Fig. 6.17 Managing tag permissions
6.2.4.5 Removing Tags from Assets
6.2.4.5.1 Removing a Tag from One Asset
A tag can be removed from an asset as follows:
Select Risk & Exposure > Assets in the menu.
Click
in the Action column.Click
for the tag that should be removed.Click Save tags.
6.2.4.5.2 Removing a Tag from Multiple Assets
Note
If a tag is removed from all assets it is assigned to, it is deleted completely.
A tag can be deleted as follows:
Select Risk & Exposure > Assets in the menu.
Filter the assets to display all those from which the tag should be removed (see Chapter 5.4).
Click Tag management.
→ The Tag management dialog is opened.
Select the tab Manage tags.
→ The Manage tags tab is opened.
Click
for the tag that should be removed.Click Save tags.
Note
Depending on the number of assets the tag is removed from, it may take a while until the tag is not displayed anymore.
6.2.5 Managing Vulnerabilities
Note
Vulnerabilities with the severity classes Log and False Positive on the appliance are not displayed in OPENVAS SECURITY INTELLIGENCE.
6.2.5.1 Viewing Vulnerabilities
6.2.5.1.1 Viewing the Overall List of Vulnerabilities
All existing vulnerabilities can be displayed by selecting Risk & Exposure > Vulnerabilities in the menu (see Fig. 6.18).
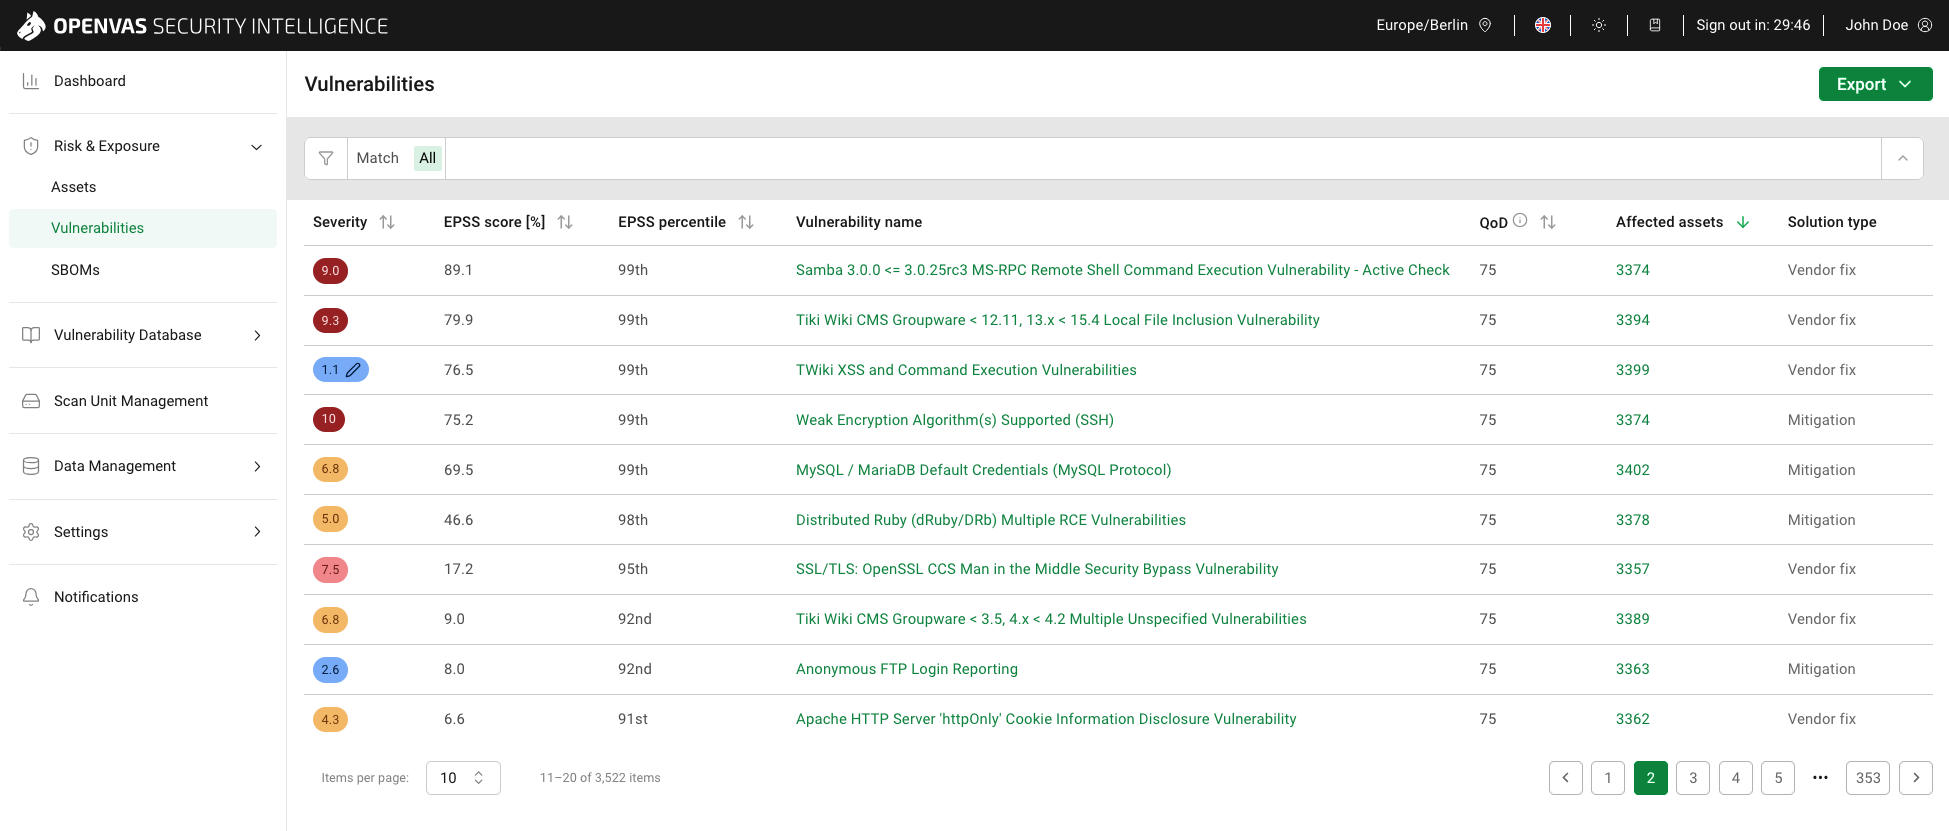
Fig. 6.18 Vulnerabilities page
For all vulnerabilities, the following information is displayed:
- Severity
Qualitative measure of a vulnerability’s severity according to the Common Vulnerability Scoring System (CVSS). CVSS is an industry standard for describing the severity of vulnerabilities.
CVSS v2.0 and CVSS v3.x consist of three metric groups: Base, Temporal, and Environmental.
CVSS v4.0, the current version, consists of four metric groups: Base, Threat, Environmental, and Supplemental.
Note
If a vulnerability contains data of more than one CVSS version, the newest is always used.
The National Vulnerability Database (NVD) provides CVSS assessments of Base metrics since they are the intrinsic characteristics of a vulnerability. Assessments for Temporal, Threat, Environmental, or Supplemental metrics are not provided as they strongly depend on time, on the particular organization in which they occur and on additional context.
Base score metrics rate the exploitability of a vulnerability and its impact on the target system. This includes, among other things, assessing the accessibility of the target system and whether the confidentiality, integrity or availability of the target system is at risk.
The severity includes a severity score, which is a number from 0.0 to 10.0, with 10.0 being the most severe, and a severity class. Regardless of the CVSS version, the severity class is determined using the following grading:
Critical: 9.0–10.0
High: 7.0–8.9
Medium: 4.0–6.9
Low: 0.0–3.9
Existing overrides are imported from the appliance together with the scan results. If an override exists for a vulnerability, this is indicated by
next to the severity.
Moving the cursor over the severity displays the original severity.- EPSS score [%]
Qualitative measure of a vulnerability’s likelihood of exploitation according to the Exploit Prediction Scoring System (EPSS).
The score indicates the probability of attempts to exploit a vulnerability being observed in the next 30 days and is a value between 0 and 100 %. The higher the value, the greater the probability that a vulnerability will actually be exploited.
- EPSS percentile
The EPSS percentile indicates the proportion of vulnerabilities that were rated the same or lower than the vulnerability. This helps putting the score into context.
- Vulnerability name
Descriptive name of the vulnerability.
Clicking on the vulnerability name opens the details page of the vulnerability (see Chapter 6.2.5.1.2).
- QoD
Short for “Quality of Detection”. The QoD describes the reliability of the executed vulnerability detection. It is a value between 0 and 100, with 100 being the most reliable.
For more information see Chapter 6.2.5.4.
- Affected assets
Number of assets for which this vulnerability was detected.
Clicking on the number of affected assets opens the Assets affected by page (see Chapter 6.2.5.1.3).
- Solution type
Type of measure to remedy the vulnerability. The following solution types exist:
Workaround: Information about a configuration or specific deployment scenario that can be used to avoid exposure to the vulnerability is available. This is usually the “first line of defense” against a new vulnerability before a mitigation or vendor fix has been issued or even discovered.
Mitigation: Information about a configuration or deployment scenario that helps to reduce the risk of the vulnerability is available but that does not resolve the vulnerability on the affected product. Mitigations may include using devices or access controls external to the affected product.
Vendor fix: Information is available about an official fix that is issued by the original vendor of the affected product. Unless otherwise noted, it is assumed that this fix fully resolves the vulnerability.
None available: Currently there is no fix available. Information should contain details about why there is no fix.
Vendor will not fix: There is no fix for the vulnerability and there never will be one. This is often the case when a product has been orphaned, is no longer maintained or otherwise deprecated. Information should contain details about why there will be no fix issued.
6.2.5.1.2 Viewing Vulnerability Details
In the overall list of vulnerabilities (see Chapter 6.2.5.1.1), click on the vulnerability name to display the details page of a vulnerability (see Fig. 6.19).
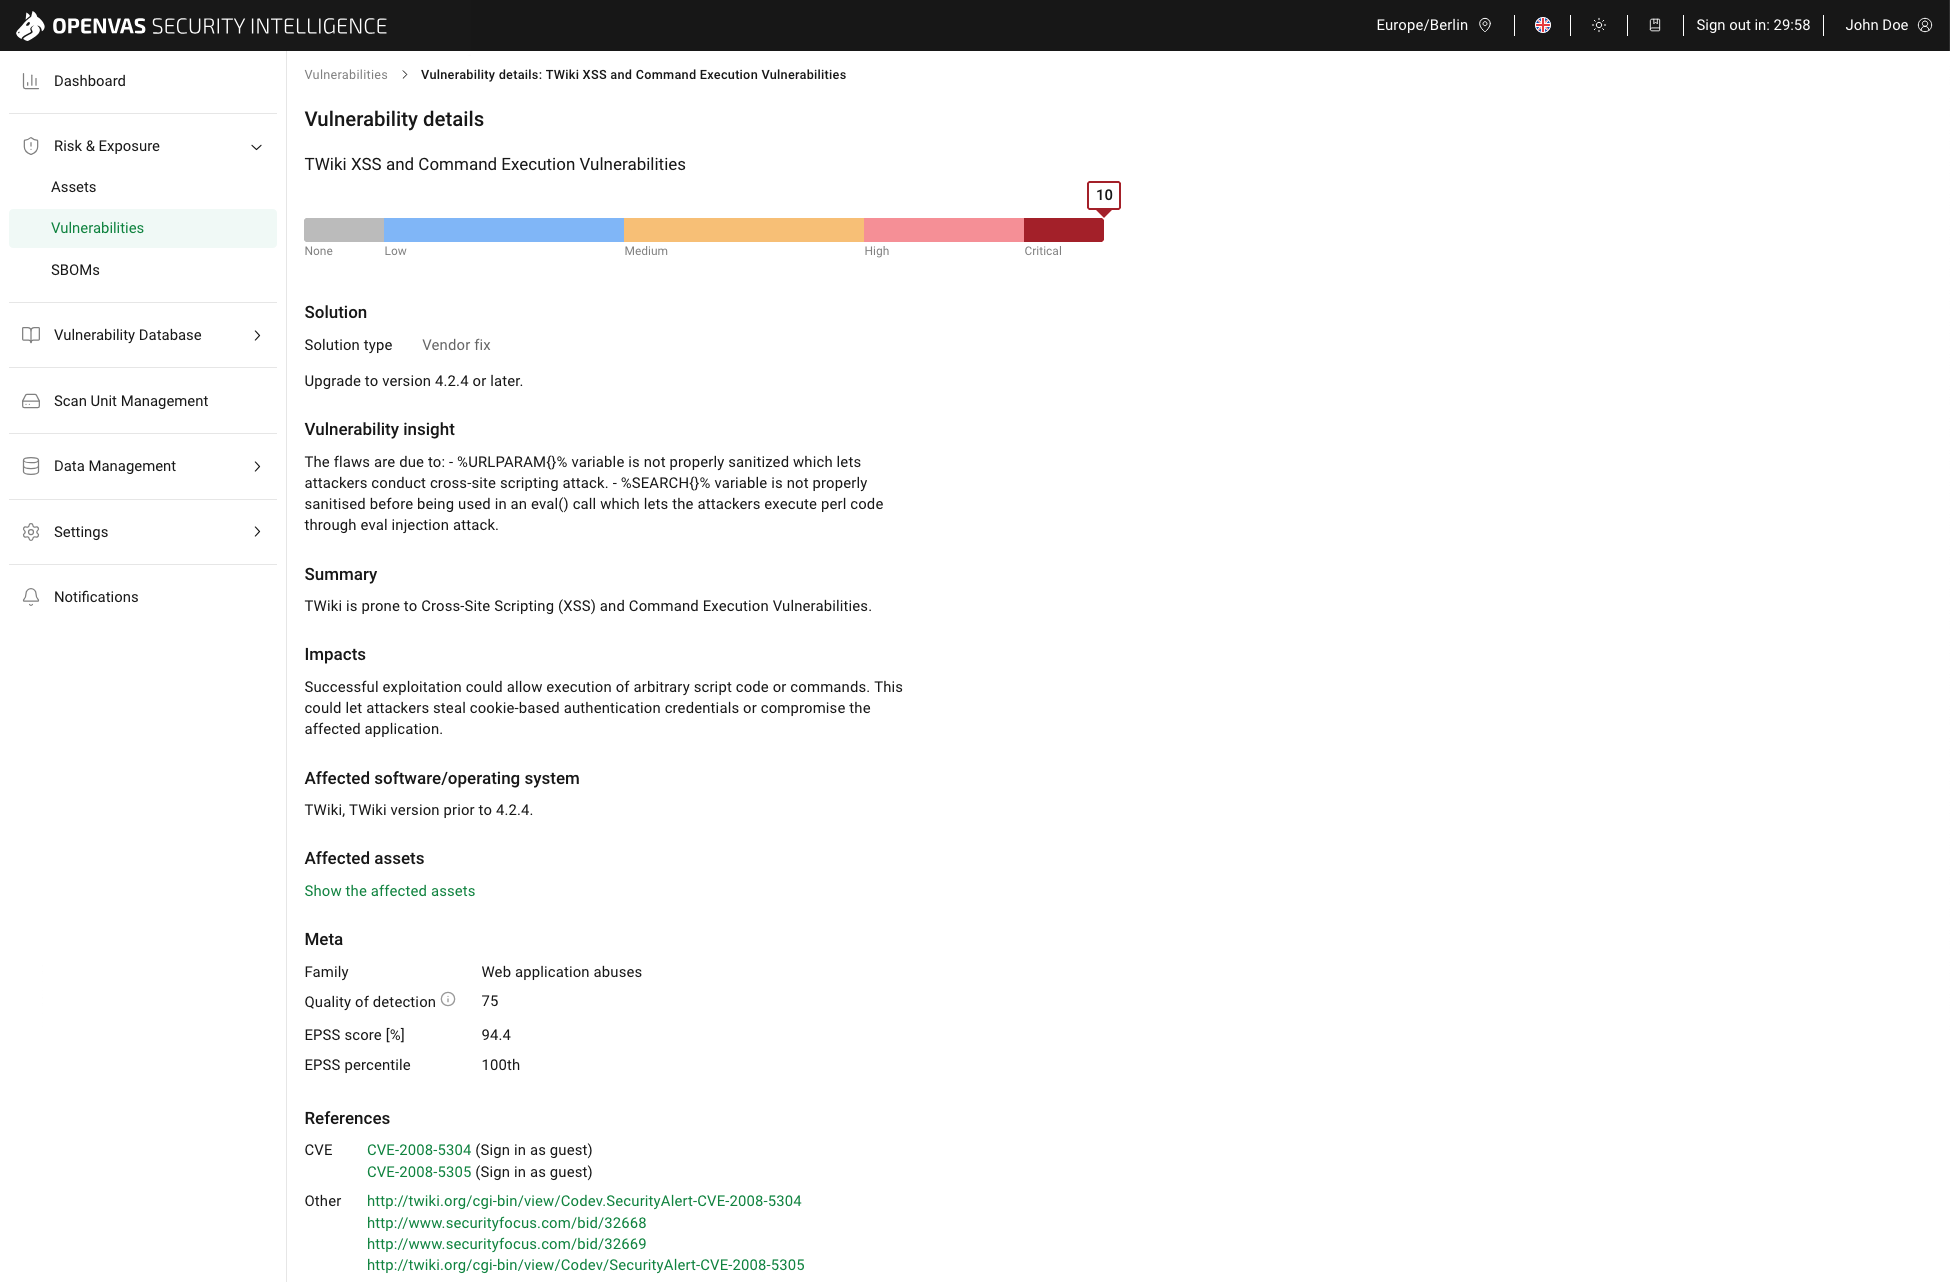
Fig. 6.19 Vulnerability details
The following information is displayed:
- Name (displayed at the top below the headline Vulnerability details)
Descriptive name of the vulnerability.
- Severity (displayed as a graphical element)
Qualitative measure of a vulnerability’s severity according to the Common Vulnerability Scoring System (CVSS). CVSS is an industry standard for describing the severity of vulnerabilities.
CVSS v2.0 and CVSS v3.x consist of three metric groups: Base, Temporal, and Environmental.
CVSS v4.0, the current version, consists of four metric groups: Base, Threat, Environmental, and Supplemental.
Note
If a vulnerability contains data of more than one CVSS version, the newest is always used.
The National Vulnerability Database (NVD) provides CVSS assessments of Base metrics since they are the intrinsic characteristics of a vulnerability. Assessments for Temporal, Threat, Environmental, or Supplemental metrics are not provided as they strongly depend on time, on the particular organization in which they occur and on additional context.
Base score metrics rate the exploitability of a vulnerability and its impact on the target system. This includes, among other things, assessing the accessibility of the target system and whether the confidentiality, integrity or availability of the target system is at risk.
The severity includes a severity score, which is a number from 0.0 to 10.0, with 10.0 being the most severe, and a severity class. Regardless of the CVSS version, the severity class is determined using the following grading:
Critical: 9.0–10.0
High: 7.0–8.9
Medium: 4.0–6.9
Low: 0.0–3.9
Existing overrides are imported from the appliance together with the scan results. If an override exists for a vulnerability, the new severity is displayed in the graphical element. The original severity is indicated by
 .
Moving the cursor over displays the original severity.
.
Moving the cursor over displays the original severity.- Solution type
Type of measure to remedy the vulnerability. The following solution types exist:
Workaround: Information about a configuration or specific deployment scenario that can be used to avoid exposure to the vulnerability is available. This is usually the “first line of defense” against a new vulnerability before a mitigation or vendor fix has been issued or even discovered.
Mitigation: Information about a configuration or deployment scenario that helps to reduce the risk of the vulnerability is available but that does not resolve the vulnerability on the affected product. Mitigations may include using devices or access controls external to the affected product.
Vendor fix: Information is available about an official fix that is issued by the original vendor of the affected product. Unless otherwise noted, it is assumed that this fix fully resolves the vulnerability.
None available: Currently there is no fix available. Information should contain details about why there is no fix.
Vendor will not fix: There is no fix for the vulnerability and there never will be one. This is often the case when a product has been orphaned, is no longer maintained or otherwise deprecated. Information should contain details about why there will be no fix issued.
- Solution
Description of how the vulnerability can be remediated.
- Vulnerability insight
Details about the cause of the vulnerability.
This information is not available for all vulnerabilities.
- Summary
Further details about the vulnerability.
- Impacts
Possible consequences if the vulnerability is exploited, for example, remote-code execution.
This information is not available for all vulnerabilities.
- Affected software/operating system
Products, including version and operating system, that are affected by the vulnerability.
This information is not available for all vulnerabilities.
- Affected assets link
Link to an overview of assets for which this vulnerability was detected (see Chapter 6.2.5.1.3).
- Meta
- Family
Group of vulnerability tests the test that detected the vulnerability belongs to.
- Quality of detection
Abbreviated as “QoD”. The QoD describes the reliability of the executed vulnerability detection. It is a value between 0 and 100, with 100 being the most reliable.
For more information see Chapter 6.2.5.4.
- EPSS score [%]
Qualitative measure of a vulnerability’s likelihood of exploitation according to the Exploit Prediction Scoring System (EPSS).
The score indicates the probability of attempts to exploit a vulnerability being observed in the next 30 days and is a value between 0 and 100 %. The higher the value, the greater the probability that a vulnerability will actually be exploited.
- EPSS percentile
The EPSS percentile indicates the proportion of vulnerabilities that were rated the same or lower than the vulnerability. This helps putting the score into context.
- CVE references
Common Vulnerabilities and Exposure (CVE) references for the vulnerability.
CVE was founded by MITRE in order to avoid multiple naming of the same vulnerability by different organizations and to ensure a uniform naming convention. Every vulnerability is assigned a unique identifier by MITRE or another CVE numbering authority, such as product vendors, third-party coordinators or researchers. This identifier consists of the release year and a simple number, and serves as a central reference.
CVEs are published and made accessible by the National Institute of Standards and Technology (NIST) in the National Vulnerability Database (NVD). The NVD complements the CVEs with information regarding the elimination, severity, potential impact and affected products of the vulnerability.
The vulnerability can have no CVE references, one CVE reference or several CVE references.
Clicking on a reference opens the Greenbone SecInfo Portal in a separate browser tab. Click Sign In as Guest to view the CVE details.
- Other references
Any other available references, for example more details from the software vendor. The vulnerability can have no other references, one other reference or several other references.
Links opens in separate browser tabs.
6.2.5.1.3 Viewing Affected Assets
In the overall list of vulnerabilities (see Chapter 6.2.5.1.1), click on the number of affected assets to display all assets for which this vulnerability was detected (see Fig. 6.20).
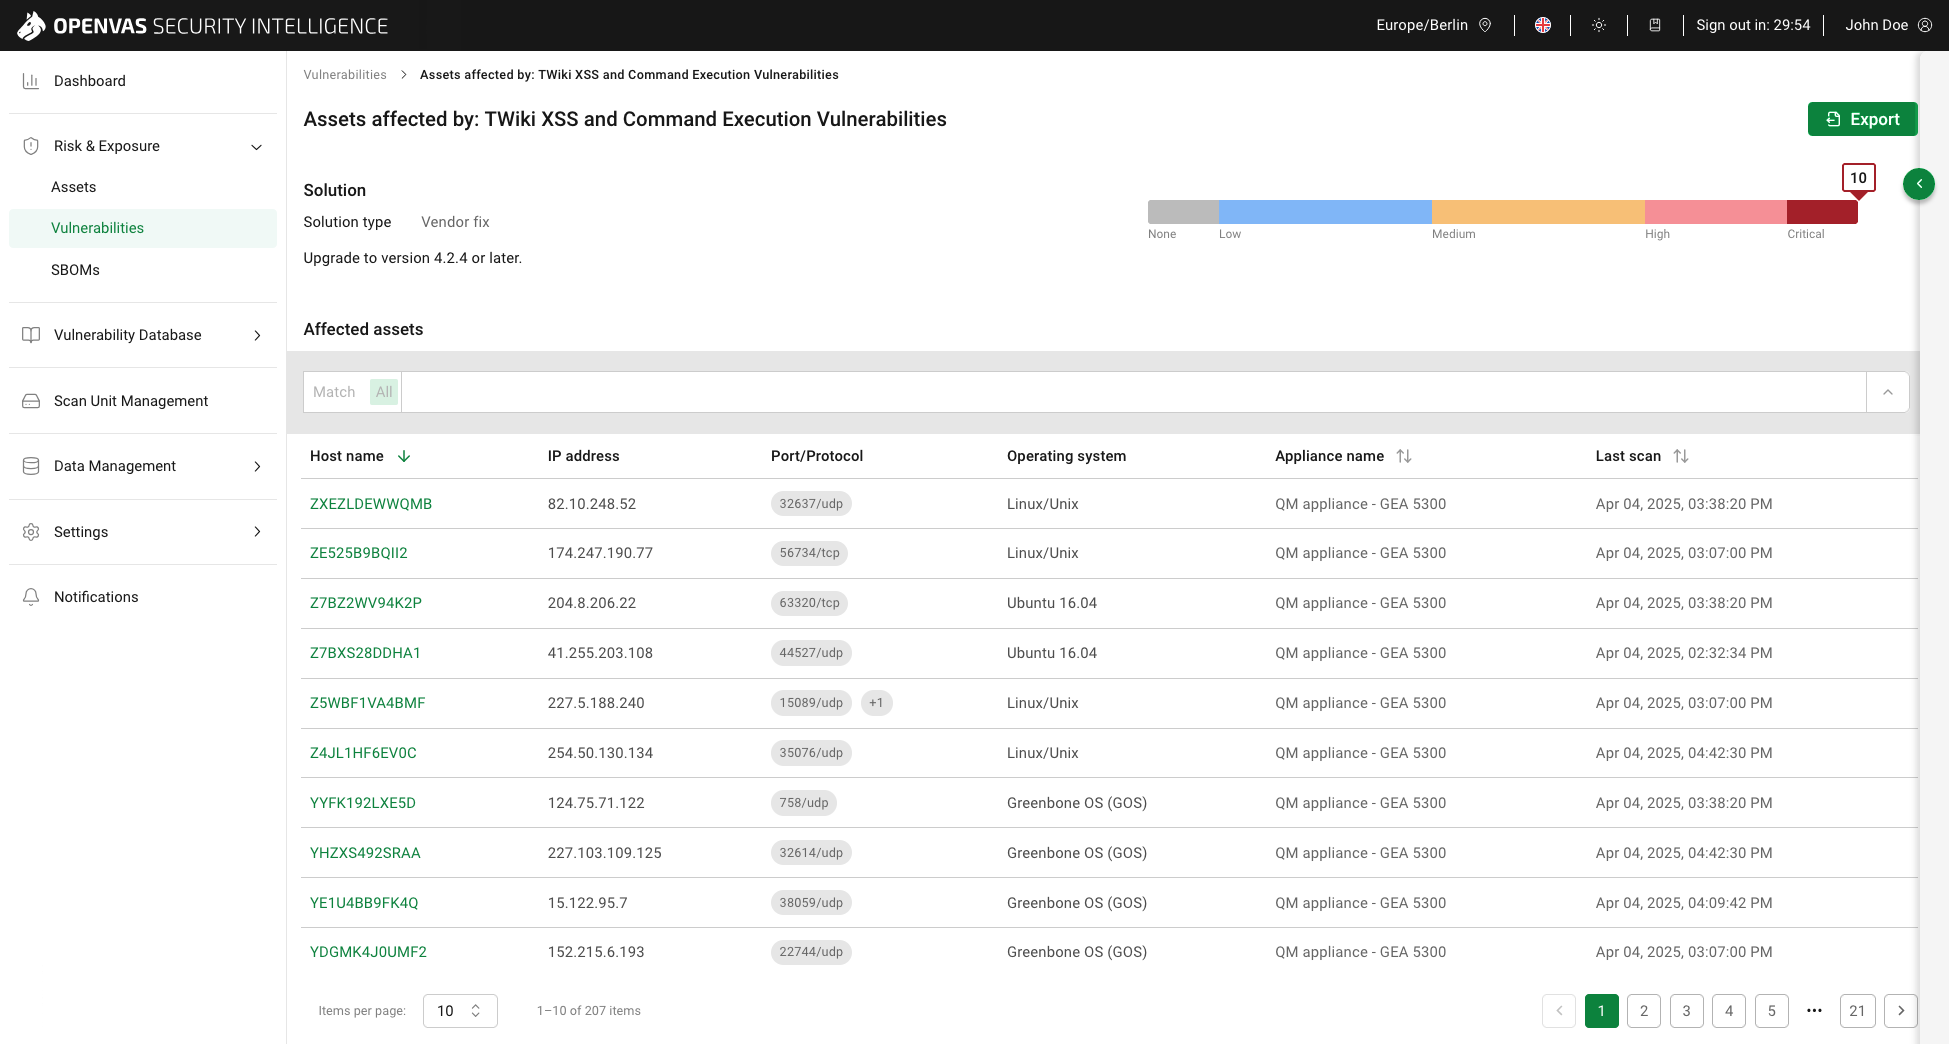
Fig. 6.20 Assets affected by a vulnerability
Note
The filter bar on this page offers a read-only view and shows the filter from the Vulnerabilities page.
The following information about the vulnerability is displayed:
- Vulnerability name (displayed after the static text Assets affected by in the headline of the page)
Descriptive name of the vulnerability.
- Solution type
Type of measure to remedy the vulnerability. The following solution types exist:
Workaround: Information about a configuration or specific deployment scenario that can be used to avoid exposure to the vulnerability is available. This is usually the “first line of defense” against a new vulnerability before a mitigation or vendor fix has been issued or even discovered.
Mitigation: Information about a configuration or deployment scenario that helps to reduce the risk of the vulnerability is available but that does not resolve the vulnerability on the affected product. Mitigations may include using devices or access controls external to the affected product.
Vendor fix: Information is available about an official fix that is issued by the original vendor of the affected product. Unless otherwise noted, it is assumed that this fix fully resolves the vulnerability.
None available: Currently there is no fix available. Information should contain details about why there is no fix.
Vendor will not fix: There is no fix for the vulnerability and there never will be one. This is often the case when a product has been orphaned, is no longer maintained or otherwise deprecated. Information should contain details about why there will be no fix issued.
- Solution
Description of how the vulnerability can be remediated.
- Severity (displayed as a graphical element on the right)
Qualitative measure of a vulnerability’s severity according to the Common Vulnerability Scoring System (CVSS). CVSS is an industry standard for describing the severity of vulnerabilities.
CVSS v2.0 and CVSS v3.x consist of three metric groups: Base, Temporal, and Environmental.
CVSS v4.0, the current version, consists of four metric groups: Base, Threat, Environmental, and Supplemental.
Note
If a vulnerability contains data of more than one CVSS version, the newest is always used.
The National Vulnerability Database (NVD) provides CVSS assessments of Base metrics since they are the intrinsic characteristics of a vulnerability. Assessments for Temporal, Threat, Environmental, or Supplemental metrics are not provided as they strongly depend on time, on the particular organization in which they occur and on additional context.
Base score metrics rate the exploitability of a vulnerability and its impact on the target system. This includes, among other things, assessing the accessibility of the target system and whether the confidentiality, integrity or availability of the target system is at risk.
The severity includes a severity score, which is a number from 0.0 to 10.0, with 10.0 being the most severe, and a severity class. Regardless of the CVSS version, the severity class is determined using the following grading:
Critical: 9.0–10.0
High: 7.0–8.9
Medium: 4.0–6.9
Low: 0.0–3.9
Existing overrides are imported from the appliance together with the scan results. If an override exists for a vulnerability, the new severity is displayed in the graphical element. The original severity is indicated by
.
Moving the cursor over displays the original severity.
Clicking  on the right side displays the following additional information:
- Vulnerability insight
Details about the cause of the vulnerability.
This information is not available for all vulnerabilities.
- Summary
Further details about the vulnerability.
- Impacts
Possible consequences if the vulnerability is exploited, for example, remote-code execution.
This information is not available for all vulnerabilities.
- Affected software/operating system
Products, including version and operating system, that are affected by the vulnerability.
This information is not available for all vulnerabilities.
- Meta
- Family
Group of vulnerability tests the test that detected the vulnerability belongs to.
- Quality of detection
Abbreviated as “QoD”. The QoD describes the reliability of the executed vulnerability detection. It is a value between 0 and 100, with 100 being the most reliable.
For more information see Chapter 6.2.5.4.
- EPSS score [%]
Qualitative measure of a vulnerability’s likelihood of exploitation according to the Exploit Prediction Scoring System (EPSS).
The score indicates the probability of attempts to exploit a vulnerability being observed in the next 30 days and is a value between 0 and 100 %. The higher the value, the greater the probability that a vulnerability will actually be exploited.
- EPSS percentile
The EPSS percentile indicates the proportion of vulnerabilities that were rated the same or lower than the vulnerability. This helps putting the score into context.
For all assets affected by the vulnerability, the following information is displayed:
- Asset name
Host name or container image name of the asset. The name is empty if the asset does not have a host name or container image name.
Clicking on the asset name opens the details page of the asset (see Chapter 6.2.3.2.2).
Note
Filters for vulnerability attributes are taken over.
- IP address
IP address of the asset.
- Port/Protocol
Port number and protocol type that was used to find the vulnerability on the host.
Clicking on the number of additional ports, for example
, displays all ports.- Operating system
Detected operating system of the asset, for example Windows 10 Enterprise 21H2 or FreeBSD 12.2.
- Appliance name
- Last scan
Date and time the asset was last scanned.
6.2.5.2 Filtering Vulnerabilities
The overall list of vulnerabilities can be filtered as described in Chapter 5.4.
Note
If a filter delivers no results, the table with the list of vulnerabilities shows No data available. Please check your filter.
6.2.5.3 Exporting Vulnerabilities
6.2.5.3.1 Exporting a List of Vulnerabilities
The list of vulnerabilities (see Chapter 6.2.5.1.1) can be exported as a CSV file. If the vulnerability list is filtered, only the filtered vulnerabilities are exported.
Note
If no data is imported or the filter delivers no results, the export functionality is disabled. Data has to be imported from appliances (see Chapter 6.1) or the filter has to be adjusted (see Chapter 5.4).
A list of vulnerabilities can be exported as follows:
Select Risk & Exposure > Vulnerabilities in the menu.
Filter the vulnerabilities to all those that should be exported (see Chapter 6.2.5.2).
Click Export and select Export from the drop-down list.
→ The list of vulnerabilities is exported.
The CSV file contains the following information for each vulnerability:
Severity (if overrides exist, the CSV file will only show the new severity without indicating the overridden severity)
EPSS score
EPSS percentile
Vulnerability name
QoD
Summary
Total assets
Solution type
6.2.5.3.2 Exporting a List of Vulnerabilities with All Their Affected Assets
The list of vulnerabilities (see Chapter 6.2.5.1.1) with details about all their affected assets can be exported as a CSV file. If the vulnerability list is filtered, only the filtered vulnerabilities are exported.
Note
If no data is imported or the filter delivers no results, the export functionality is disabled. Data has to be imported from appliances (see Chapter 6.1) or the filter has to be adjusted (see Chapter 5.4).
A list of vulnerabilities with all their affected assets can be exported as follows:
Select Risk & Exposure > Vulnerabilities in the menu.
Filter the vulnerabilities to all those that should be exported (see Chapter 6.2.5.2).
Click Export and select Export data with details from the drop-down list.
→ The list of vulnerabilities is exported.
The CSV file contains the following information for each vulnerability:
Severity (if overrides exist, the CSV file will only show the new severity without indicating the overridden severity)
EPSS score
EPSS percentile
Vulnerability name
Solution type
Solution
QoD
Summary
Impact
Affected software/operating system
Specific result
CVE references
CERT references
Port/Protocol
Asset name
Asset type
IP address
Operating system
Appliance name
Last scan
6.2.5.3.3 Exporting a List of Affected Assets
The list of assets affected by a specific vulnerability (see Chapter 6.2.5.1.3) can be exported as a CSV file. If the list of affected assets is filtered by an asset attribute (see Chapter 5.4.3, tab Assets (overall list)), only the affected assets that match the filter are exported.
The list of affected assets can be exported as follows:
Select Risk & Exposure > Vulnerabilities in the menu.
Click on the number of assets in the Affected assets column.
Click Export.
→ The list of affected assets is exported.
The CSV file contains the following information:
Severity (if overrides exist, the CSV file will only show the new severity without indicating the overridden severity)
Vulnerability name
Solution type
Solution
QoD
Summary
Impact
Affected software/operating system
CVE references
CERT references
Port/Protocol
Asset name
IP address
Operating system
Appliance name
Last scan
Note
Severity, vulnerability name, solution type, solution, QoD, summary, impact, affected software/operating system, CVE references and CERT references are the same for all assets because they are all affected by the same vulnerability. This allows to make the reference by which vulnerability the assets are affected.
6.2.5.4 Quality of Detection (QoD) Concept
The quality of detection (QoD) is a value between 0 and 100 describing the reliability of the executed vulnerability detection or product detection.
While the QoD range allows to express the quality quite fine-grained, most tests use a standard methodology. Therefore, QoD types are associate with a QoD value. The current list of types may be extended over time.
Note
The QoD of a “discovery” result is higher than that of an actual “vulnerability” result as it reflects the quality of the product detection itself – which is reliable – and not the quality of the associated vulnerability tests, which may be unreliable for various reasons (see table).
The lowest QoD that could apply is always used, for example in case of multiple detection methods (remote or local/authenticated).
QoD |
QoD Type |
Description |
|---|---|---|
100 |
exploit |
The detection happened via an exploit and is therefore fully verified. |
99 |
remote_vul |
Remote active checks (code execution, traversal attack, SQL injection etc.) in which the response clearly shows the presence of the vulnerability. |
98 |
remote_app |
Remote active checks (code execution, traversal attack, SQL injection etc.) in which the response clearly shows the presence of the vulnerable application. |
97 |
package |
Authenticated package-based checks for Linux(oid) systems. |
97 |
registry |
Authenticated registry based checks for Microsoft Windows systems. |
95 |
remote_active |
Remote active checks (code execution, traversal attack, SQL injection etc.) in which the response shows the likely presence of the vulnerable application or of the vulnerability. “Likely” means that only rare circumstances are possible in which the detection would be wrong. |
80 |
remote_banner |
Remote banner checks of applications that offer patch level in version. Many proprietary products do so. |
80 |
executable_version |
Authenticated executable version checks for Linux(oid) or Microsoft Windows systems where applications offer patch level in version. |
75 |
If results without any QoD information are processed, they are assigned this value. |
|
70 |
remote_analysis |
Remote checks that do some analysis but which are not always fully reliable. |
50 |
remote_probe |
Remote checks in which intermediate systems such as firewalls might pretend correct detection so that it is actually not clear whether the application itself answered. For example, this can happen for non-TLS connections. |
30 |
remote_banner_unreliable |
Remote banner checks of applications that do not offer patch level in version identification. For example, this is the case for many open source products due to backport patches. |
30 |
executable_version_unreliable |
Authenticated executable version checks for Linux(oid) systems where applications do not offer patch level in version identification. |
30 |
package_unreliable |
Authenticated package-based checks which are not always fully reliable for, for example, Linux(oid) systems. |
1 |
general_note |
General note on potential vulnerability without finding any present application. |