5 Using OPENVAS SECURITY INTELLIGENCE
Note
To ensure consistent and correct handling of login sessions, the internal clocks of the OPENVAS SECURITY INTELLIGENCE instance and the system used to access it must be synchronized or at least nearly identical. For achieving this, it is recommended to activate the time synchronization on both systems.
For OPENVAS SECURITY INTELLIGENCE, the time synchronization can be activated via the respective host system or by executing os-cli service update systemd-timesyncd enabled:true in the OPENVAS OS CLI.
5.1 Supported Web Browsers
OPENVAS SECURITY INTELLIGENCE can be used with the desktop versions of the following web browsers:
Google Chrome
Mozilla Firefox
Microsoft Edge
The latest version and one major previous version of the browsers are supported.
5.2 Signing in to OPENVAS SECURITY INTELLIGENCE
OPENVAS SECURITY INTELLIGENCE can be accessed as follows:
Open the web browser.
Enter the IP address of OPENVAS SECURITY INTELLIGENCE.
Sign in using the user name and password of the OPENVAS SECURITY INTELLIGENCE account (see Fig. 5.1).
Note
When signing in for the first time, a new password must be set.
The password requirements are specified in the password policy by a super admin.
Click Sign In.
→ The page that was last opened is displayed.
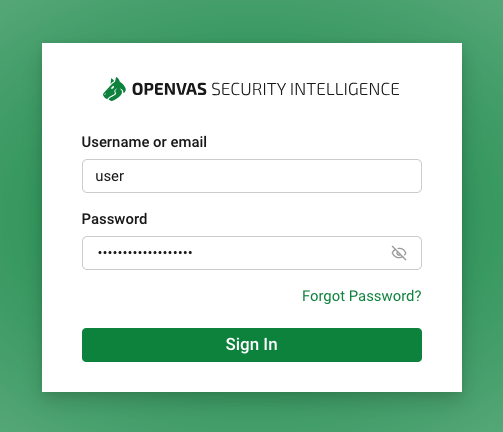
Fig. 5.1 Signing in to OPENVAS SECURITY INTELLIGENCE
5.3 Signing Out of OPENVAS SECURITY INTELLIGENCE
Signing out of the platform can be done by moving the cursor over the user name in the upper right corner and select Sign out from the drop-down list (see Fig. 5.2).
If no action is performed on the platform for a certain amount of time, the user is signed out automatically.
Note
The logout timer can be configured by a super admin (see Chapter 5.6).
The default is five minutes.
The remaining time until the user is automatically signed out is displayed next to the user name in the upper right corner. By clicking anywhere on the platform, the timeout can be reset.
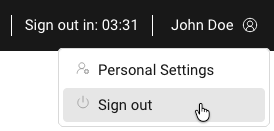
Fig. 5.2 Signing out of OPENVAS SECURITY INTELLIGENCE
5.4 Filtering the Page Content
Many pages offer the possibility to filter the displayed content.
5.4.1 Applying a Filter
A filter can be selected and applied as follows:
Click inside the filter bar at the top of the page.
Select a filter attribute from the drop-down list.
→ The applicable filter operators are automatically displayed in a second drop-down list (see Fig. 5.3).

Fig. 5.3 Available filter operators
Select a filter operator from the drop-down list.
→ Depending on the filter attribute selected in step 2, different options for specifying the filter value are displayed.
Specify the filter value (see Fig. 5.4).
In case of a free text, enter the text in the input box and select the text in the drop-down list that is opened.
In case of predefined options, select the desired option from the drop-down list that is opened.
In case of a date, select the date in the displayed calendar.

Fig. 5.4 Specifying the filter value
Click outside the filter bar to apply the filter (see Fig. 5.5).

Fig. 5.5 Applied filter
Click All/Any at the left side of the filter bar to select the desired filter conjunction.
Note
If All is selected, only results that match all selected filter parameters are displayed.
If Any is selected, all results that match at least one of the selected filter parameters are displayed.
5.4.2 Saving Filters
On the pages Dashboard, Assets and Vulnerabilities, filters can be saved as follows:
Enter the desired filter parameters in the filter bar as described in Chapter 5.4.1.
Move the cursor over
 at the right side of the filter bar and click Save filter.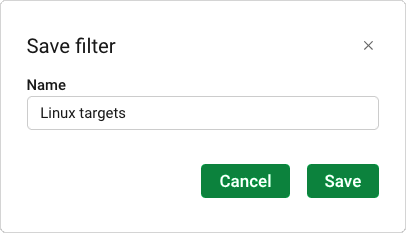
Fig. 5.6 Saving a filter
Enter a name for the filter in the input box.
Note
The filter name can contain any type of character and can be at most 255 characters long.
Click Save.
→ Saved filters can be used by clicking
 at the left side of the filter bar and selecting the desired filter from the drop-down list.
5.4.2.1 Updating Saved Filters
Filters can be updated as follows:
Click
at the left side of the filter bar and select the desired filter from the drop-down list.→ The filter is applied.
Add more filter criteria, or remove existing ones.
To overwrite the saved filter, move the cursor over
at the right side of the filter bar and click Save filter.or
To save the changed filter under a new name, move the cursor over
at the right side of the filter bar and click Save filter as.
Enter a name for the filter in the input box and click Save.Note
The filter name can contain any type of character and can be at most 255 characters long.
5.4.2.2 Deleting Saved Filters
A saved filter can be deleted by clicking at the left side of the filter bar and then clicking  for the filter in the drop-down list.
5.4.3 Overview of all Filter Options
The following table shows all filter options for each page of OPENVAS SECURITY INTELLIGENCE:
Filter Criteria |
Filter Operators |
|---|---|
Asset ID |
|
Asset name |
|
IP address |
|
Last scan |
|
Operating system |
|
Appliance name |
|
Tag > Tag name |
|
Vulnerability name |
|
Severity |
|
QoD |
|
Solution type |
|
CVE |
|
CERT advisories |
|
Family |
|
Severity class |
|
EPSS score [%] |
|
EPSS percentile |
|
Filter Criteria |
Filter Operators |
|---|---|
Asset ID |
|
Asset type |
|
Asset name |
|
IP address |
|
Last scan |
|
Operating system |
|
Appliance name |
|
Tag > Tag name |
|
Filter Criteria |
Filter Operators |
|---|---|
Vulnerability name |
|
Severity |
|
QoD |
|
Solution type |
|
CVE |
|
CERT advisories |
|
Family |
|
Severity class |
|
EPSS score [%] |
|
EPSS percentile |
|
Port/protocol |
|
Filter Criteria |
Filter Operators |
|---|---|
Asset ID |
|
Vulnerability name |
|
Operating system |
|
Asset name |
|
IP address |
|
Severity |
|
QoD |
|
Solution type |
|
CVE |
|
CERT advisories |
|
Family |
|
Last scan |
|
Appliance name |
|
Tag > Tag name |
|
Severity class |
|
EPSS score [%] |
|
EPSS percentile |
|
Port/protocol |
|
Filter Criteria |
Filter Operators |
|---|---|
Created |
|
Daily Scan |
|
Last scan |
|
Modified |
|
Name |
|
Status |
|
Version |
|
Vulnerable |
|
Filter Attribute |
Filter Operators |
|---|---|
CPE |
|
Description |
|
EPSS percentile |
|
EPSS score [%] |
|
Is exploited |
|
Modified |
|
Name |
|
Published |
|
Severity |
|
Status |
|
Filter Criteria |
Filter Operators |
|---|---|
Aliases |
|
Assigned by |
|
Description |
|
EPSS score [%] |
|
Modified |
|
Name |
|
Product |
|
Published |
|
References |
|
Severity |
|
Vendor |
|
Filter Criteria |
Filter Operators |
|---|---|
EPSS percentile |
|
EPSS score [%] |
|
Is exploited |
|
Modified |
|
Name |
|
Publisher name |
|
Severity |
|
Summary |
|
Title |
|
TLP |
|
Filter Criteria |
Filter Operators |
|---|---|
Created |
|
Modified |
|
Name |
|
Severity |
|
Title |
|
Filter Criteria |
Filter Operators |
|---|---|
Created |
|
CSAF |
|
CVE |
|
Detection type |
|
Modified |
|
Name |
|
QoD |
|
Severity |
|
Solution type |
|
Summary |
|
Filter Criteria |
Filter Operators |
|---|---|
Name |
|
Filter Criteria |
Filter Operators |
|---|---|
Created |
|
Last scan |
|
Name |
|
Status |
|
Task ID |
|
Task Name |
|
Filter Criteria |
Filter Operators |
|---|---|
Import Interval |
|
Last Import |
|
Name |
|
Status |
|
URL |
|
Filter Criteria |
Filter Operators |
|---|---|
Created |
|
Daily Scan |
|
Last Scan |
|
Modified |
|
Name |
|
Status |
|
Version |
|
Vulnerable |
|
Filter Criteria |
Filter Operators |
|---|---|
Description |
|
Level |
|
Name |
|
Occurrence |
|
Origin |
|
5.5 Using Alerts
Note
Communication channels and alerts can only be configured by a super admin or an operator.
With alerts, notifications can be sent via various communication channels. This can be used to receive information about completed or failed processes on the system.
5.5.1 Setting up a Communication Channel
Alerts can be sent via email, Mattermost, or Microsoft Teams. Before an alert can be created and used, the corresponding communication channel must be configured.
5.5.1.1 Configuring a Mail Server
Note
Only one mail server can be configured.
A mail server can be configured as follows:
Select Settings > Communications in the menu.
Click Add in the section SMTP host.
→ The Set up an SMTP host dialog is opened.
Enter the host name or IP address of the mail server in the input box Mailhub.
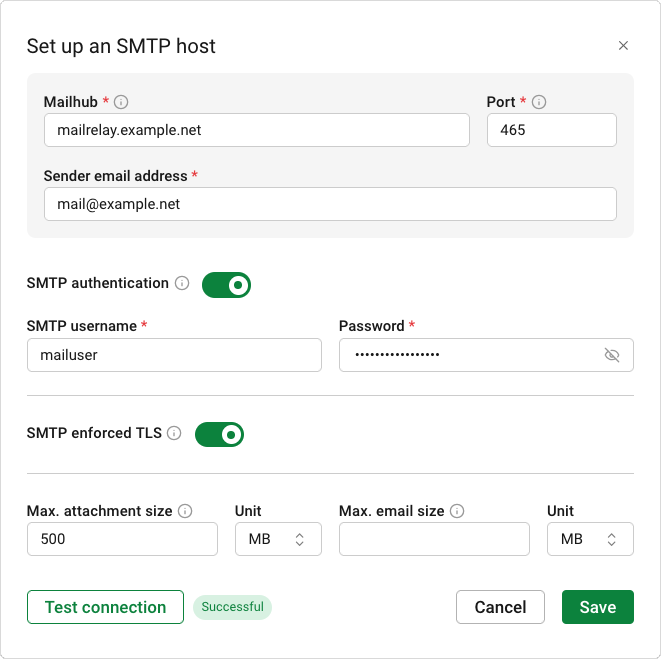
Fig. 5.7 Configuring a mail server
Enter the port the e-mails are delivered through in the input box Port.
Enter the e-mail address that should be displayed as the sender in the input box Sender email address.
If the mail server requires authentication, click on the toggle switch SMTP authentication.
Enter the user name and the password for the SMTP authentication.
If the mail server uses TLS for encryption, click on the toggle switch SMTP enforced TLS.
Define the maximum size of attachments per e-mail in the input box Max. attachment size.
Define the maximum size of an e-mail including attachments in the input box Max. email size.
Click Test connection.
→ The result of the test is displayed next to the button.
If the connection is not successful, error messages are shown below the input boxes that require changes.
Click Save.
5.5.1.2 Configuring a Microsoft Teams Webbhook
Note
Up to 20 webhooks can be configured.
A Microsoft Teams webhook can be configured as follows:
Select Settings > Communications in the menu.
Click Add in the section MS Teams webhook.
→ The Set up an MS Teams webhook dialog is opened.
Enter a name for the webhook.
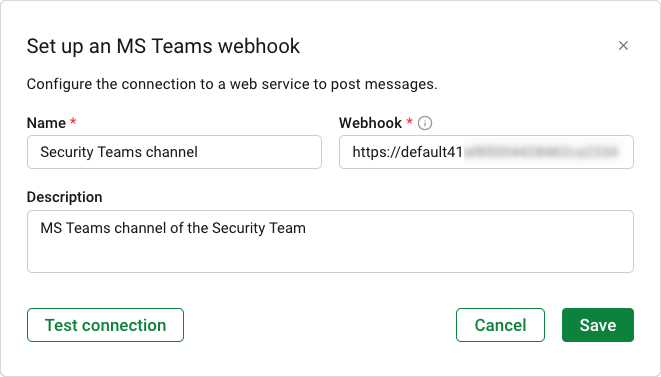
Fig. 5.8 Configuring a Microsoft Teams webhook
Enter the URL of the webhook in the input box Webhook.
Note
Instructions for how to create a Microsoft Teams webhook can be found in the Microsoft Teams documentation.
If required, add a description for the webhook.
Click Test connection.
→ The result of the test is displayed next to the button.
If the connection is not successful, error messages are shown below the input boxes that require changes.
Click Save.
5.5.1.3 Configuring a Mattermost Webhook
Note
Up to 20 webhooks can be configured.
A Mattermost webhook can be configured as follows:
Select Settings > Communications in the menu.
Click Add in the section Mattermost webhook.
→ The Set up a Mattermost webhook dialog is opened.
Enter a name for the webhook.
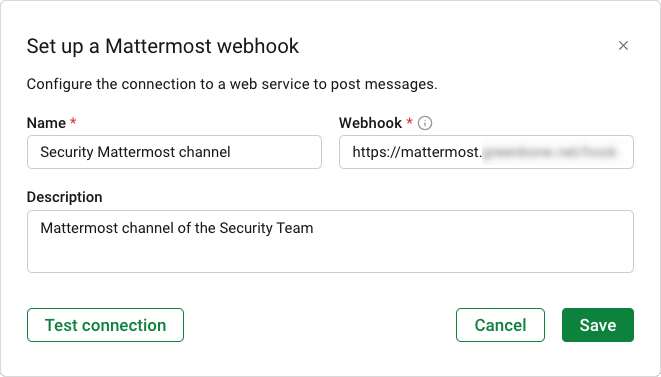
Fig. 5.9 Configuring a Mattermost webhook
Enter the URL of the webhook in the input box Webhook.
Note
Instructions for how to create a Mattermost webhook can be found in the Mattermost documentation.
If required, add a description for the webhook.
Click Test connection.
→ The result of the test is displayed next to the button.
If the connection is not successful, error messages are shown below the input boxes that require changes.
Click Save.
5.5.2 Creating an Alert
A new alert can be created as follows:
Select Settings > Alert Settings in the menu.
Click Add alert.
Enter a name for the alert.
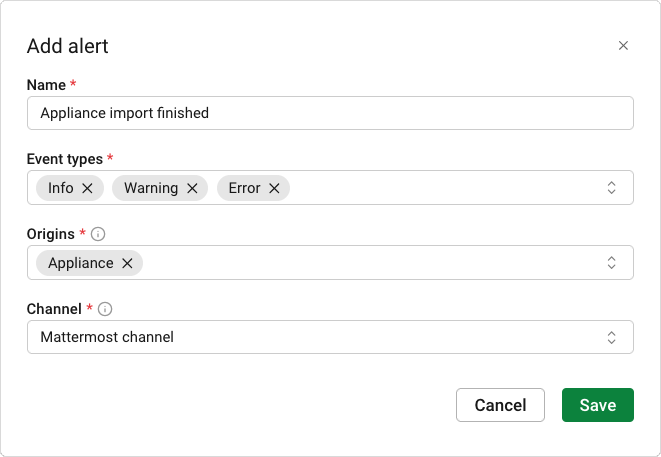
Fig. 5.10 Creating an alert
Select the event types the alert should be sent for in the drop-down list Event types.
Info: An action finished successfully, or a user interaction was carried out successfully. Examples:
An SBOM scan finished successfully.
The download of new CSAF files finished successfully.
An SBOM scan was canceled successfully.
The download of new CSAF files was canceled successfully.
An import from an appliance was started.
An import from an appliance was finished successfully.
Warning: An action failed due to a faulty user interference. Example:
An SBOM scan was interrupted by a server shutdown.
Error: An action failed due to an incorrect configuration. Examples:
The download of new CSAF files failed due to an error on the CSAF provider side.
An SBOM main CPE generation failed because the necessary fields are invalid.
An import from an appliance failed.
Urgent: An event requires immediate attention.
Select the components of OPENVAS SECURITY INTELLIGENCE the alert should be sent for in the drop-down list Origin.
Select a previously created communication channel in the drop-down list Channel (see Chapter 5.5).
Click Save.
5.5.3 Managing Alerts
All alerts are displayed when selecting Settings > Alert Settings in the menu.
 Display details of the alert.
 Edit the alert.
 Delete the alert.
An alert can be activated or deactivated by clicking on the toggle switch.
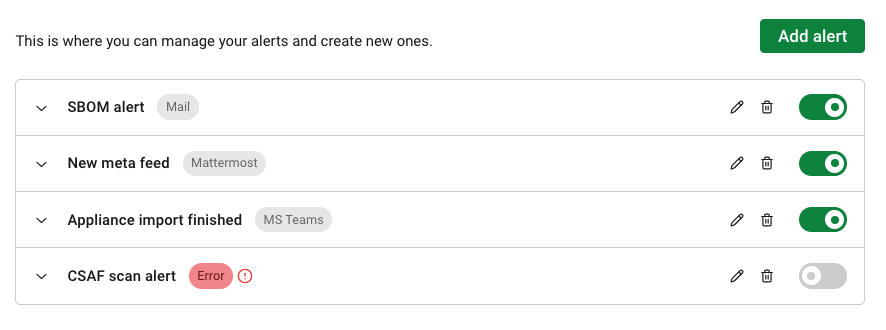
Fig. 5.11 Managing alerts
5.6 Configuring the Logout Timer
Note
The logout timer can only be configured by a super admin.
The time after which a user is automatically logged out if no action is taken can be changed as follows:
Select Settings > User Management in the menu.
→ The user management is opened in a new browser tab.
Select Realm settings in the menu.
Select the Sessions tab.
Enter the desired time in the input box SSO Session Idle and select the desired unit in the drop-down list.
Click Save.
5.7 Updating the Meta Feed
Note
The meta feed can only be updated by a super admin or an operator.
The meta feed that delivers CVEs, CSAF advisories, EUVD records, CPEs, and vulnerability tests is updated daily at 7:00 a.m. CET/CEST.
It can also be updated manually as follows:
Select Data Management > Feed in the menu.
Click Update Feed.
→ The feed update is running.
Note
The date and time displayed for Last feed update are only updated if the feed update actually included new content.
5.8 Enabling the Automatic Removal of Assets
Note
The automatic removal of assets can only be configured by a super admin or an operator.
Inactive assets are assets for which the last scan was performed some time ago and which may no longer exist. These assets can be automatically removed from OPENVAS SECURITY INTELLIGENCE. The removal happens automatically once per day.
Note
The time of the last scan can be found, for example, on the Assets page in the Last scan column (see Chapter 6.2.3.2.1).
The automatic removal of assets can be configured as follows:
Select Settings > Asset Configuration in the menu.
Click on the toggle switch to enable the automatic asset removal.
Enter the minimum number of days since the last scan of an asset for it to be automatically deleted.
Note
Values from 1 to 365 can be entered.
Assets for which the last scan was performed earlier than the specified number of days are removed.
Example: if the value
30is entered, assets that were last scanned 31 days ago or earlier will be removed.Click Save.
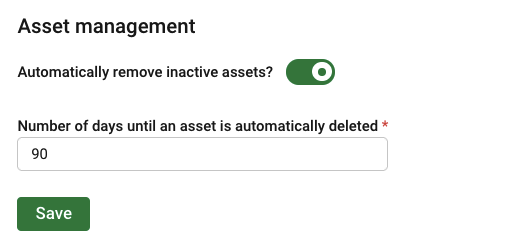
Fig. 5.12 Enabling the automatic removal of assets
5.9 Managing the User Settings
5.9.1 Changing the Language
OPENVAS SECURITY INTELLIGENCE is available in English and in German. The flag of the selected language is displayed in the upper right corner:
 If English is selected, the flag for the United Kingdom (UK) is displayed.
 If German is selected, the flag for Germany is displayed.
Click on the icon to change the language.
Note
OPENVAS SECURITY INTELLIGENCE saves the language setting for the next login.
5.9.2 Changing the Theme
OPENVAS SECURITY INTELLIGENCE supports a light and a dark color theme. The icon for the currently applied theme in displayed in the upper right corner:
 If the light theme is selected, the sun icon is displayed.
 If the dark theme is selected, the moon icon is displayed.
Click on the icon to change the theme.
Note
OPENVAS SECURITY INTELLIGENCE saves the theme setting for the next login.
5.9.3 Changing the Password
Every user can change their own password as follows:
Move the cursor over the user name in the upper right corner and select Personal Settings in the drop-down list.
→ The user management is opened in a new browser tab.
Select Account security > Signing in in the menu.
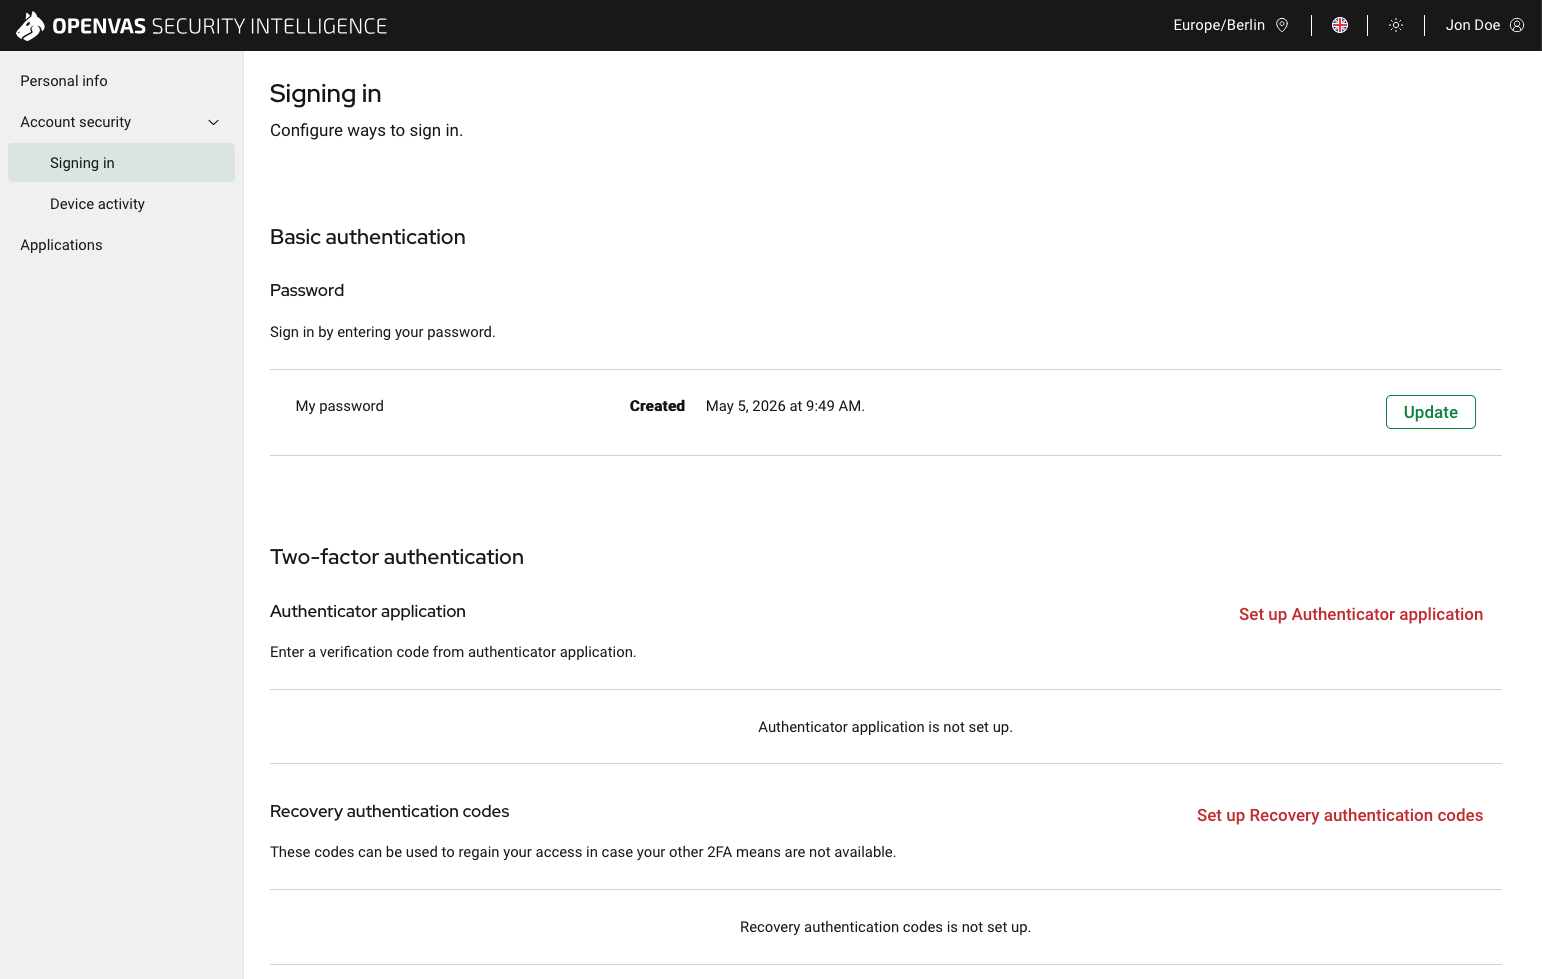
Fig. 5.13 Changing the password
Click Update.
Enter the current password and click Sign In.
Enter the new password in the New Password input box and confirm it.
Note
The password requirements are specified in the password policy by a super admin.
Click Submit.
Note
The password can be reset by a super admin (see Chapter 4.2.5).
5.9.4 Setting up Two-Factor Authentication
Note
A smartphone with a authenticator app (for example, FreeOTP, Microsoft Authenticator, Google Authenticator) is required.
Every user can set up two-factor authentication as follows:
Move the cursor over the user name in the upper right corner and select Personal Settings in the drop-down list.
→ The user management is opened in a new browser tab.
Select Account security > Signing in in the menu.
In the section Two-factor authentication, click Set up Authenticator application.
Enter the current password to authenticate.
Click Sign In.
Open the authenticator app on the smartphone and use it to scan the QR code.
→ A one-time code is displayed in the authenticator app.
Enter the one-time code from the authenticator app.
Click Submit.
→ The two-factor authentication is enabled. When logging in, the user must now enter a one-time code from the authenticator app in addition to the password.
5.9.5 Deleting Two-Factor Authentication
The two-factor authentication can be deleted as follows:
Move the cursor over the user name in the upper right corner and select Personal Settings in the drop-down list.
→ The user management is opened in a new browser tab.
Select Account security > Signing in in the menu.
In the section Two-factor authentication, click Delete.
Enter the current password to authenticate.
Click Sign In.
Enter the one-time code from the authenticator app.
Click Sign In.
Click Confirm deletion.
→ The two-factor authentication is disabled. When logging in, the user must now only enter the password.
5.10 Opening the User Manual
The user manual can be opened by clicking  in the upper right corner.
5.11 Viewing Information about OPENVAS SECURITY INTELLIGENCE
Select About in the menu to display information about OPENVAS SECURITY INTELLIGENCE.
The page provides a brief description of the purpose and functionality of OPENVAS SECURITY INTELLIGENCE.
The Contact information section provides contact details for the Greenbone Support Team and the security response team, including relevant e-mail addresses, certificates, and cryptographic keys. It also contains the postal address of the Greenbone AG.
The Version & Copyright section displays the currently installed software version of OPENVAS SECURITY INTELLIGENCE and the corresponding copyright information.
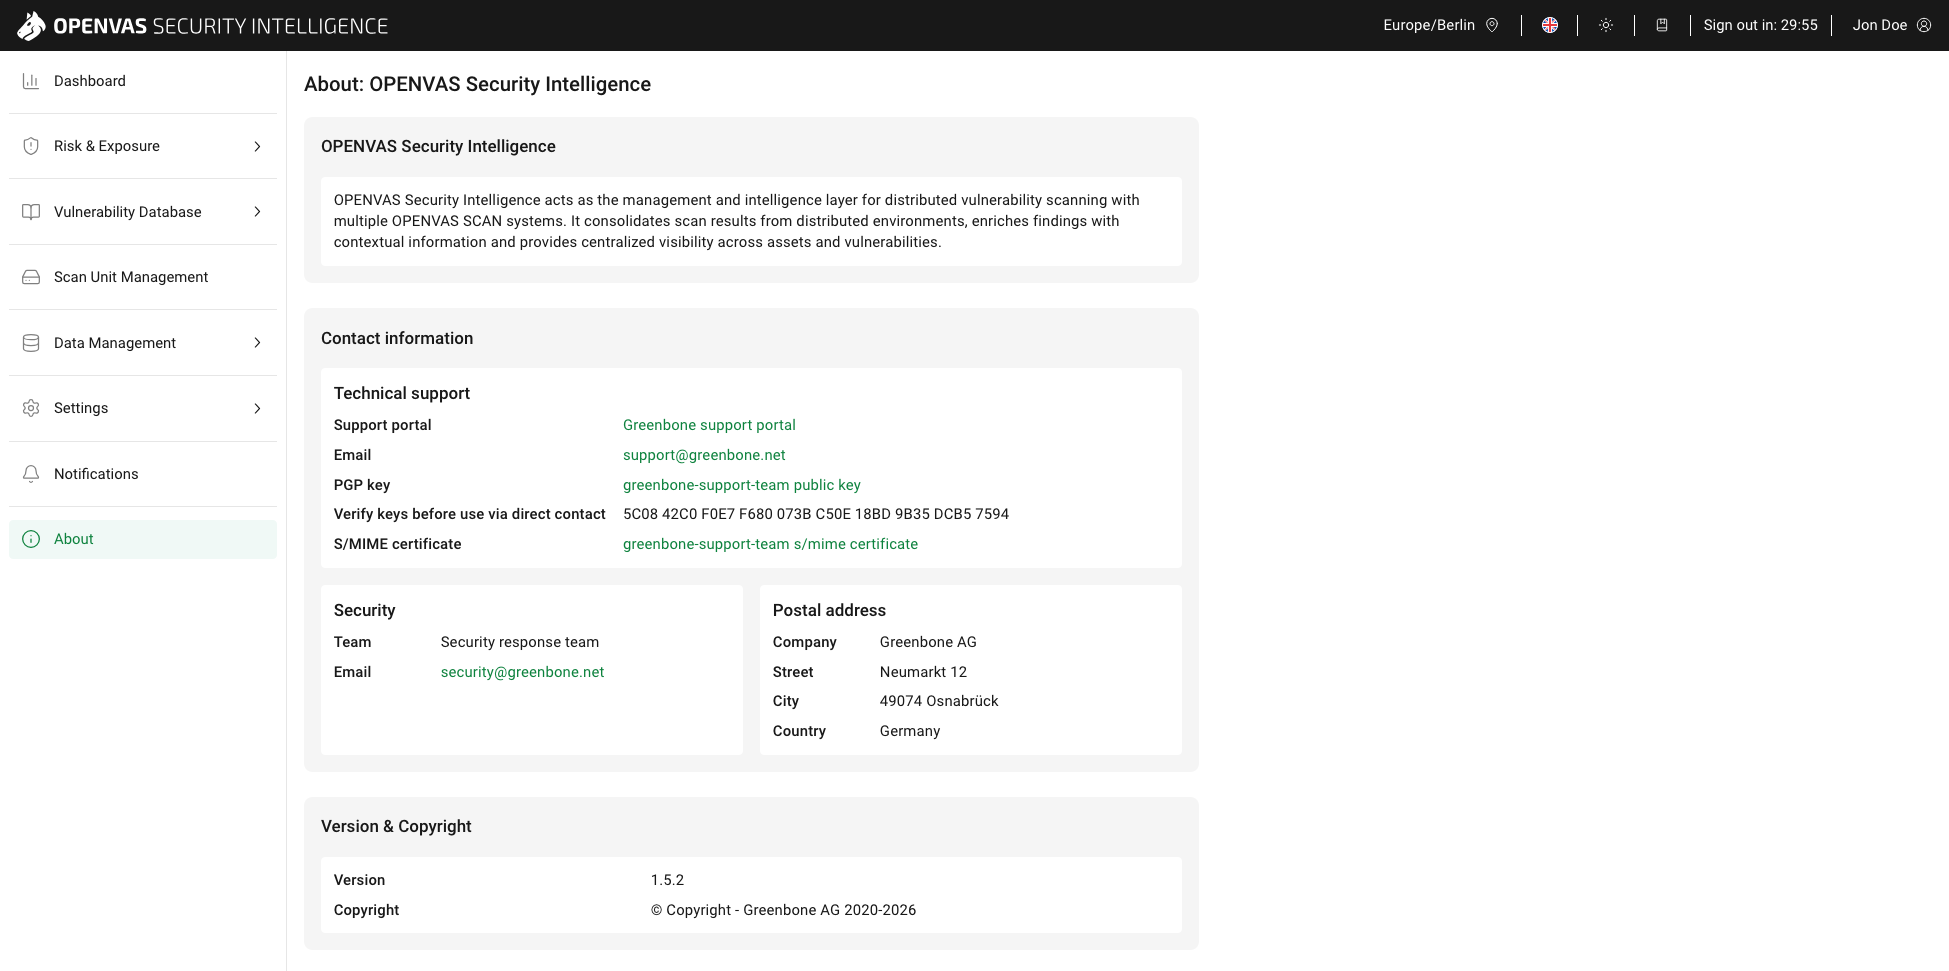
Fig. 5.14 About page