3 Setting up OPENVAS SECURITY INTELLIGENCE
3.1 Deploying OPENVAS SECURITY INTELLIGENCE
OPENVAS SECURITY INTELLIGENCE is delivered by Greenbone as a virtual machine containing the OPENVAS Operating System (OPENVAS OS) and a certificate which authorizes the users to deploy OPENVAS SECURITY INTELLIGENCE.
To use OPENVAS SECURITY INTELLIGENCE, users must first set up OPENVAS OS.
OPENVAS SECURITY INTELLIGENCE is then installed as follows:
Access the shell of OPENVAS OS as the admin user.
Install OPENVAS SECURITY INTELLIGENCE by running the following command:
os-cli container-management install-product security-intelligence
Note
The address of the web interface must be specified explicitly.
Example: If the web interface should be reachable at
https://osi.example.net, the address must be set toosi.example.net.This setting must match the virtual machine’s network configuration. The command does not change the network configuration.
Set the address for the web interface by running the following command:
os-cli container-management configure-product security-intelligence --product-base-webaddress <WEB_INTERFACE_ADDRESS>
Note
If OPENVAS SECURITY INTELLIGENCE is installed on another operating system, it should be ensured that at least 15 million inodes are available on the partition used by the container orchestrator. This keeps the system running reliably over the long term.
For non-inode-based file systems, metadata storage must be available for approximately 4 million files.
If an appliance connected via outbound mode should be able to push scan data to OPENVAS SECURITY INTELLIGENCE (see Chapter 6), the TLS certificate used by OPENVAS SECURITY INTELLIGENCE must include the web interface address as a Subject Alternative Name (SAN).
If a domain name is specified as the web interface address, the certificate must contain the corresponding DNS name, for example:
X509v3 Subject Alternative Name:
    DNS:example.local
If an IP address is specified, the certificate must contain the corresponding IP address, for example:
X509v3 Subject Alternative Name:
    IP Address:192.168.1.50
If the certificate does not contain the configured web interface address, it must be replaced with a suitable certificate before scan data can be sent.
Information about replacing the TLS certificate in OPENVAS OS can be found here in the OPENVAS OS user manual.
To ensure consistent and correct handling of login sessions, the internal clocks of the OPENVAS SECURITY INTELLIGENCE instance and the system used to access it must be synchronized or at least nearly identical. To achieve this, it is recommended to activate the time synchronization on both systems.
For OPENVAS SECURITY INTELLIGENCE, the time synchronization can be activated via the respective host system or by executing
os-cli service update systemd-timesyncd enabled:truein the OPENVAS OS CLI.
3.2 Initially Signing in as a Super Admin
OPENVAS SECURITY INTELLIGENCE can initially be accessed as a super admin as follows:
Open the web browser.
Enter the configured web interface address of OPENVAS SECURITY INTELLIGENCE (see Chapter 3.1).
Sign in using the user name
openvasand the initial passwordopenvas#user.When signing in for the first time, a new password must be set.
Note
The password must fulfill the following criteria:
At least 10 characters long
Different from the user name
Different from the e-mail address
Different from the last three passwords
Not a common word that could be found in an English or German dictionary
The user name cannot be changed.
Enter and repeat a new password.
Click Submit.
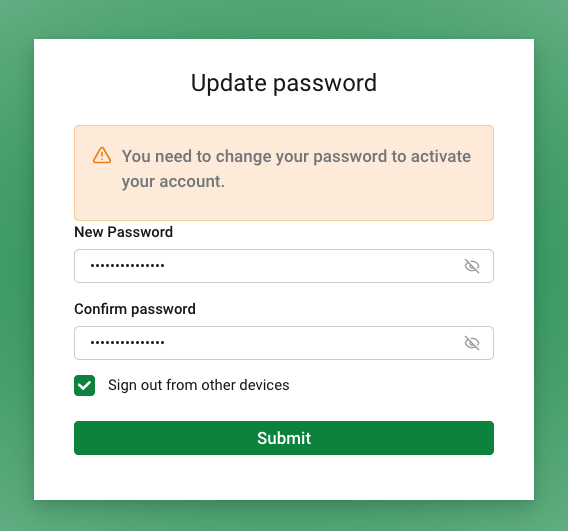
Fig. 3.1 Signing in to OPENVAS SECURITY INTELLIGENCE as a super admin for the first time
→ The super admin can now create additional users for OPENVAS SECURITY INTELLIGENCE.
Note
After signing in initially, the meta feed must be updated manually once, so that the relevant data is loaded into OPENVAS SECURITY INTELLIGENCE.
Select Data Management > Feed in the menu.
Click Update Feed.
→ The feed update is running. It may take up to three to four hours to complete.
Note
To verify users’ e-mail addresses, reset passwords, or send notifications about server events to administrators, the system must be able to send e-mails. To do this, a mail server must be connected. The mail server must support the Simple Mail Transfer Protocol (SMTP).
Select Settings > User Management in the menu.
→ The user management is opened in a new browser tab.
Select Realm settings in the menu.
Select the Email tab.
Fill in the input boxes.
The following settings are required:
- From
E-mail address that is used as the sender for e-mails.
- Host
Mail server host name used for sending e-mails.
Note
More information can be found in the Keycloak documentation.
Click Test connection.
→ The result of the test is displayed in the upper right corner.
Click Save.