8 Viewing and Analyzing Security Information
8.1 Managing CVEs
In order to avoid multiple naming of the same vulnerability by different organizations and to ensure a uniform naming convention, MITRE founded the Common Vulnerabilities and Exposure (CVE) program. Every vulnerability is assigned a unique identifier by MITRE or another CVE numbering authority, such as product vendors, third-party coordinators or researchers. This identifier consists of the release year and a simple number, and serves as a central reference.
CVEs are published and made accessible by the National Institute of Standards and Technology (NIST) in the National Vulnerability Database (NVD). The NVD complements the CVEs with information regarding the elimination, severity, potential impact and affected products of the vulnerability.
8.1.1 Viewing CVEs
Note
The availability of a CVE in OPENVAS SECURITY INTELLIGENCE depends on its availability in the NVD. As soon as it has been published there, it takes 1–2 working days for it to appear in OPENVAS SECURITY INTELLIGENCE.
8.1.1.1 Viewing the Overall List of CVEs
All existing CVEs can be displayed by selecting Vulnerability Database > CVE Database in the menu.
Note
For performance reasons, only the first 10,000 items are displayed. Filters can be used to narrow down the displayed items (see Chapter 5.4).
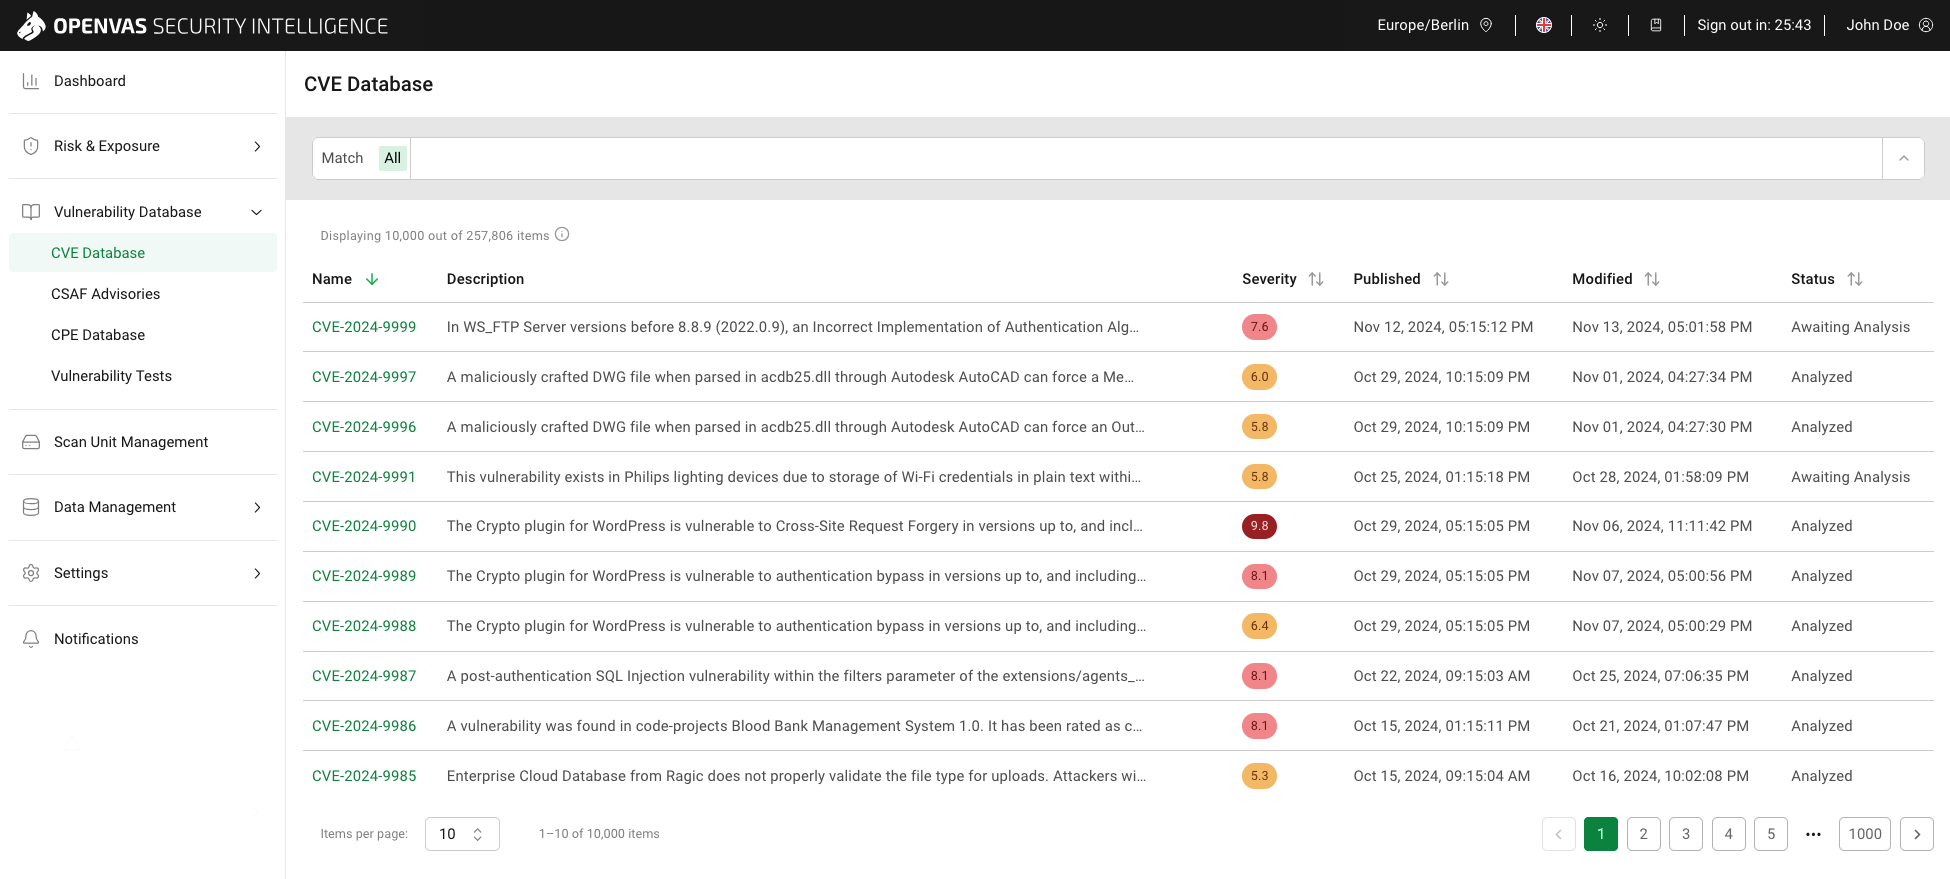
Fig. 8.1 CVE Database page
Tip
In the Column options drop-down menu, the columns to be displayed in the table can be selected.
The columns can be rearranged using drag and drop.
For all CVEs, the following information is displayed:
- Name
Unique identifier of the CVE consisting of the release year and a simple number.
Clicking on the name opens the details page of the CVE (see Chapter 8.1.1.2).
- Description
Extended information about the CVE. This can include in which versions the vulnerability occurs, how it is caused and how it can be exploited by attackers.
- Severity
Qualitative measure of a vulnerability’s severity according to the Common Vulnerability Scoring System (CVSS). This includes a severity score, which is a number from 0.0 to 10.0, with 10.0 being the most severe, and a severity class based on the score:
Critical: 9.0–10.0
High: 7.0–8.9
Medium: 4.0–6.9
Low: 0.0–3.9
The label
 may be displayed for one of the following reasons:
The CVE was published but no vulnerability analysis/severity assessment has been carried out by the NVD yet. This can take anywhere from a few days up to a few weeks. The column Status shows the current status of the CVE in the NVD.
There is always a delay of 1–2 working days between the vulnerability analysis/severity assessment and the time the updated information is displayed in OPENVAS SECURITY INTELLIGENCE.
- Published
Date and time the CVE was published in the NVD.
- Modified
Date and time the CVE was last modified in the NVD.
- Status
Vulnerability status according to https://nvd.nist.gov/vuln/vulnerability-status.
Received: the CVE has been recently published and has been received by the NVD.
Awaiting Analysis: the CVE has been marked for analysis and will likely be analyzed within 24 hours.
Undergoing Analysis: the CVE is currently being analyzed which will result in association of reference link tags, CVSS metrics, CWE association, and CPE applicability statements.
Analyzed: the CVE has been analyzed.
Modified: the CVE has been amended by a source (CVE Primary CNA or another CNA). The initial analysis may be no longer be accurate.
Deferred: the CVE is not planned to be analyzed or re-analyzed by the NVD due to resource or other concerns.
Note
CVEs that are marked as
Rejectedin the NVD are not available in OPENVAS SECURITY INTELLIGENCE.
8.1.1.2 Viewing CVE Details
In the overall list of CVEs (see Chapter 8.1.1.1), click on the name of a CVE to display the CVE details.
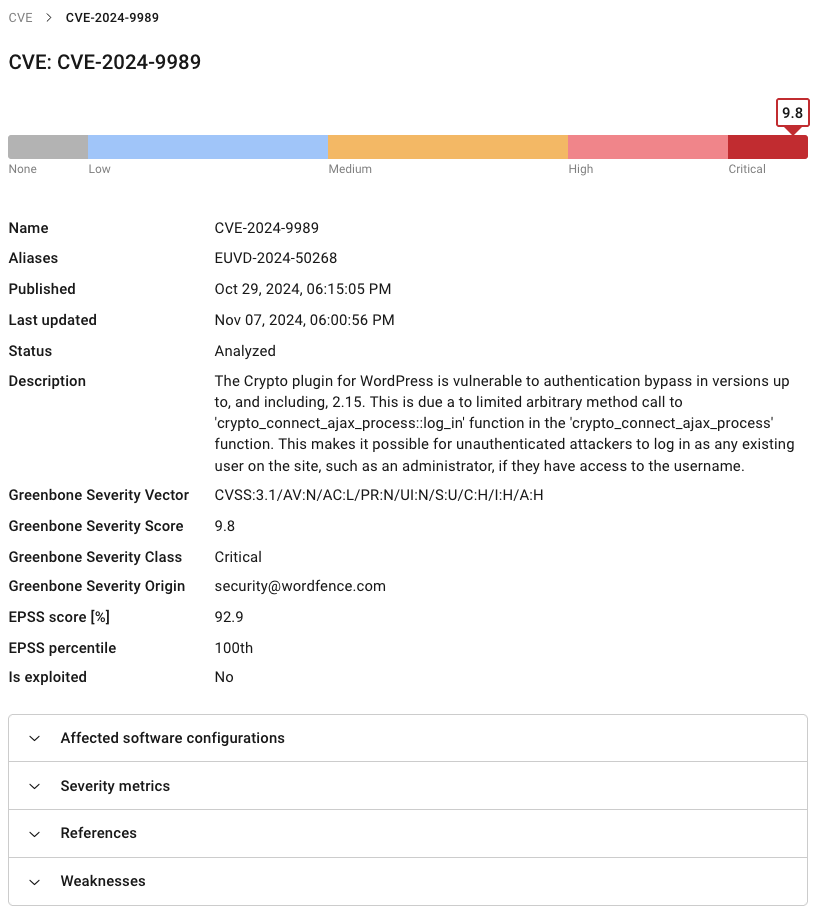
Fig. 8.2 Details of a CVE
The following information is displayed:
- Severity (displayed as a graphical element)
Qualitative measure of a vulnerability’s severity according to the Common Vulnerability Scoring System (CVSS). This includes a severity score, which is a number from 0.0 to 10.0, with 10.0 being the most severe, and a severity class based on the score:
Critical: 9.0–10.0
High: 7.0–8.9
Medium: 4.0–6.9
Low: 0.0–3.9
The graphical element may not be displayed for one of the following reasons:
The CVE was published but no vulnerability analysis/severity assessment has been carried out by the NVD yet. This can take anywhere from a few days up to a few weeks. The column Status shows the current status of the CVE in the NVD.
There is always a delay of 1–2 working days between the vulnerability analysis/severity assessment and the time the updated information is displayed in OPENVAS SECURITY INTELLIGENCE.
- Name
Unique identifier of the CVE consisting of the release year and a simple number.
- Aliases
Unique identifier of the vulnerability in the European Union Vulnerability Database (EUVD) consisting of the release year and a simple number.
- Published
Date and time the CVE was published in the NVD.
- Last updated
Date and time the CVE was last modified in the NVD.
- Status
Vulnerability status according to https://nvd.nist.gov/vuln/vulnerability-status.
Received: the CVE has been recently published and has been received by the NVD.
Awaiting Analysis: the CVE has been marked for analysis and will likely be analyzed within 24 hours.
Undergoing Analysis: the CVE is currently being analyzed which will result in association of reference link tags, CVSS metrics, CWE association, and CPE applicability statements.
Analyzed: the CVE has been analyzed.
Modified: the CVE has been amended by a source (CVE Primary CNA or another CNA). The initial analysis may be no longer be accurate.
Deferred: the CVE is not planned to be analyzed or re-analyzed by the NVD due to resource or other concerns.
Note
CVEs that are marked as
Rejectedin the NVD are not available in OPENVAS SECURITY INTELLIGENCE.- Description
Extended information about the CVE. This can include in which versions the vulnerability occurs, how it is caused and how it can be exploited by attackers.
- Greenbone Severity Vector, Greenbone Severity Score, Greenbone Severity Class, Greenbone Severity Origin
The Common Vulnerability Scoring System (CVSS) is an industry standard for describing the severity of vulnerabilities.
CVSS v2.0 and CVSS v3.x consist of three metric groups: Base, Temporal, and Environmental.
CVSS v4.0, the current version, consists of four metric groups: Base, Threat, Environmental, and Supplemental.
Note
If a vulnerability contains data of more than one CVSS version, the newest version is always used.
The NVD provides CVSS assessments of Base metrics since they are the intrinsic characteristics of a vulnerability. Assessments for Temporal, Threat, Environmental, or Supplemental metrics are not provided as they strongly depend on time, on the particular organization in which they occur and on additional context.
Base score metrics rate the exploitability of a vulnerability and its impact on the target system. This includes, among other things, assessing the accessibility of the target system and whether the confidentiality, integrity or availability of the target system is at risk.
The Greenbone Severity Score is a numerical score from 0.0 to 10.0 describing a vulnerability’s severity according to CVSS, with 10.0 being the most severe.
The Greenbone Severity Vector is the severity score in CVSS vector form, a condensed text representation of the values used to calculate the score.
The Greenbone Severity Class is the severity classification based on the severity score:
Critical: 9.0–10.0
High: 7.0–8.9
Medium: 4.0–6.9
Low: 0.0–3.9
The Greenbone Severity Origin is the origin of the severity metrics of the newest available CVSS version.
- EPSS score [%]
Qualitative measure of a vulnerability’s likelihood of exploitation according to the Exploit Prediction Scoring System (EPSS).
The score indicates the probability of attempts to exploit a vulnerability being observed in the next 30 days and is a value between 0 and 100 %. The higher the value, the greater the probability that a vulnerability will actually be exploited.
- EPSS percentile
The EPSS percentile indicates the proportion of vulnerabilities that were rated the same or lower than the vulnerability. This helps putting the score into context.
- Is exploited
Information on whether the vulnerability is exploited.
CVEs are marked as exploited if they appear in the Known Exploited Vulnerabilities (KEV) Catalog maintained by CISA.
- Affected software configurations
Information about CPEs of products that are affected by the vulnerability, if available, including the vulnerable versions.
For each affected product, there is an own Nodes object.
- Severity metrics
Information about the metrics used to calculate the severity score, vector and class according to the Common Vulnerability Scoring System (CVSS).
Note
If a vulnerability contains data of more than one CVSS version, the newest version is always used.
- References
References for the CVE, such as security advisories containing the vulnerability, or vendor information.
- Weaknesses
Category the CVE belongs to in the Common Weakness Enumeration (CWE).
CWE defines and categorizes types of software and hardware weaknesses that can result in vulnerabilities. Each weakness is specified by a unique identifier.
8.1.2 Filtering CVEs
The list of CVEs can be filtered as described in Chapter 5.4.
Note
If a filter delivers no results, the table shows No data available.
8.2 Managing EUVD Records
EUVD records provide information about publicly known vulnerabilities tracked in the European Vulnerability Database (EUVD). The EUVD links its entries directly to standard international CVEs. The EUVD is maintained by the European Union Agency for Cybersecurity (ENISA) to support vulnerability awareness and risk management across the EU.
EUVD records include key details such as vulnerability identifiers and aliases, affected products, severity and exploitation scores, descriptions, and references.
8.2.1 Viewing EUVD Records
8.2.1.1 Viewing the Overall List of EUVD Records
All existing EUVD records can be displayed by selecting Vulnerability Database > EUVD Database in the menu.
Note
For performance reasons, only the first 10,000 items are displayed. Filters can be used to narrow down the displayed items (see Chapter 5.4).
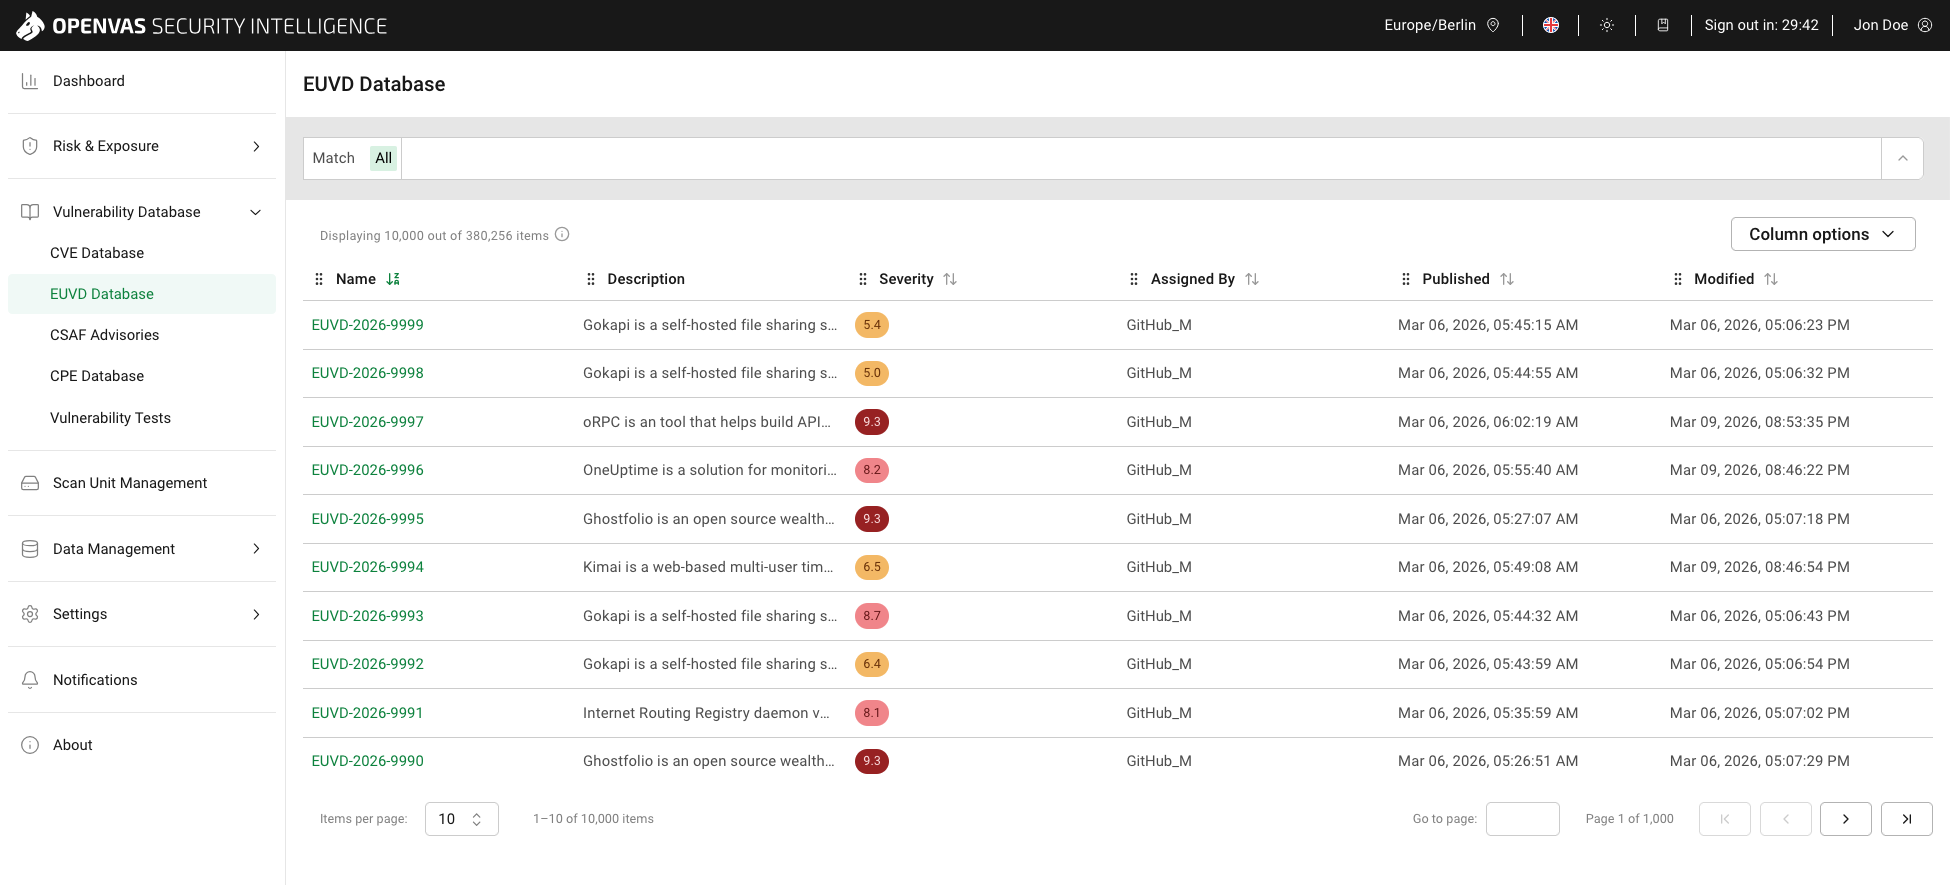
Fig. 8.3 EUVD Database page
Tip
In the Column options drop-down menu, the columns to be displayed in the table can be selected.
The columns can be rearranged using drag and drop.
For all EUVD records, the following information is displayed:
- Name
ID of the EUVD record.
Clicking on the name opens the details page of the EUVD record (see Chapter 8.2.1.2).
- Description
Extended information about the EUVD record. This can include in which versions the vulnerability occurs, how it is caused and how it can be exploited by attackers.
- Severity
Qualitative measure of a vulnerability’s severity according to the Common Vulnerability Scoring System (CVSS). This includes a severity score, which is a number from 0.0 to 10.0, with 10.0 being the most severe, and a severity class based on the score:
Critical: 9.0–10.0
High: 7.0–8.9
Medium: 4.0–6.9
Low: 0.0–3.9
The label
may be displayed for one of the following reasons:The EUVD record was published but no vulnerability analysis/severity assessment has been carried out yet. This can take anywhere from a few days up to a few weeks.
There is always a delay of 1–2 working days between the vulnerability analysis/severity assessment and the time the updated information is displayed in OPENVAS SECURITY INTELLIGENCE.
- Assigned by
Organization or authority that assigned/published the underlying vulnerability identifier or record.
- Published
Date and time the EUVD record was published.
- Modified
Date and time the EUVD record was last modified.
8.2.1.2 Viewing EUVD Record Details
In the overall list of EUVD records (see Chapter 8.2.1.1), click on the name of an EUVD record to display the EUVD record details.
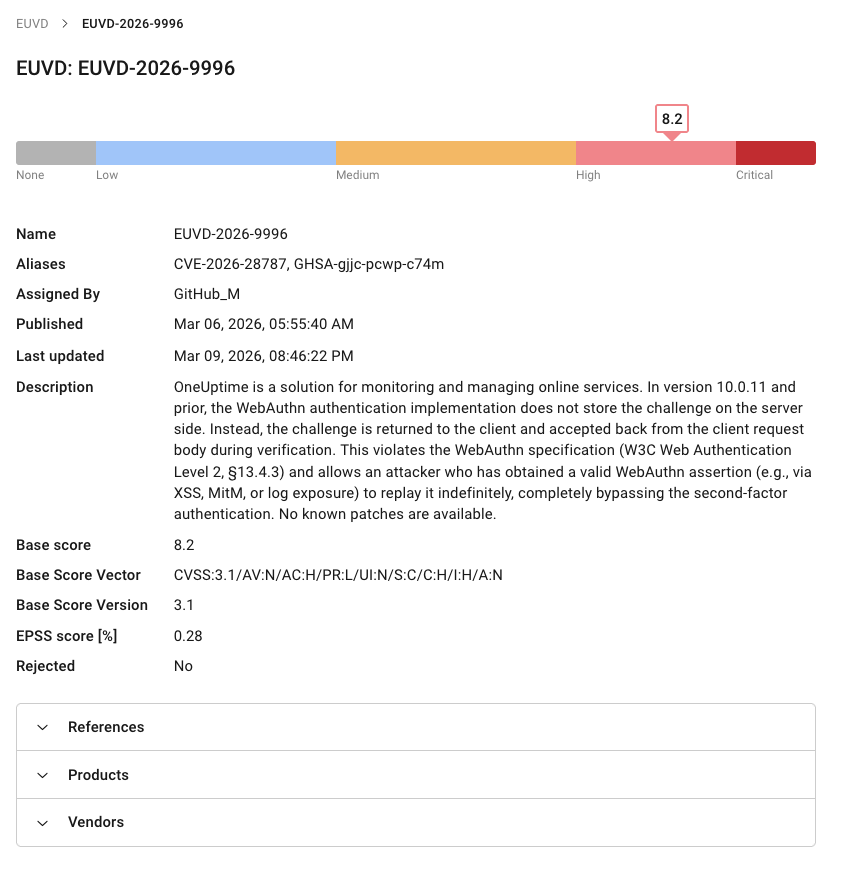
Fig. 8.4 Details of an EUVD record
The following information is displayed:
- Severity (displayed as a graphical element)
Qualitative measure of a vulnerability’s severity according to the Common Vulnerability Scoring System (CVSS). This includes a severity score, which is a number from 0.0 to 10.0, with 10.0 being the most severe, and a severity class based on the score:
Critical: 9.0–10.0
High: 7.0–8.9
Medium: 4.0–6.9
Low: 0.0–3.9
The graphical element may not be displayed for one of the following reasons:
The EUVD record was published but no vulnerability analysis/severity assessment has been carried out yet. This can take anywhere from a few days up to a few weeks.
There is always a delay of 1–2 working days between the vulnerability analysis/severity assessment and the time the updated information is displayed in OPENVAS SECURITY INTELLIGENCE.
- Name
ID of the EUVD record.
- Aliases
Unique identifier of the vulnerability in other vulnerability databases or systems.
- Assigned by
Organization or authority that assigned/published the underlying vulnerability identifier or record.
- Published
Date and time the EUVD record was published.
- Last updated
Date and time the EUVD record was last modified.
- Description
Extended information about the EUVD record. This can include in which versions the vulnerability occurs, how it is caused and how it can be exploited by attackers.
- Base Score, Base Score Vector, Base Score Version
The Common Vulnerability Scoring System (CVSS) is an industry standard for describing the severity of vulnerabilities.
CVSS v2.0 and CVSS v3.x consist of three metric groups: Base, Temporal, and Environmental.
CVSS v4.0, the current version, consists of four metric groups: Base, Threat, Environmental, and Supplemental.
Only the CVSS assessments of Base metrics are provided since they are the intrinsic characteristics of a vulnerability. Assessments for Temporal, Threat, Environmental, or Supplemental metrics are not provided as they strongly depend on time, on the particular organization in which they occur and on additional context.
Base score metrics rate the exploitability of a vulnerability and its impact on the target system. This includes, among other things, assessing the accessibility of the target system and whether the confidentiality, integrity or availability of the target system is at risk.
The Base Score is a numerical score from 0.0 to 10.0 describing a vulnerability’s severity according to CVSS, with 10.0 being the most severe.
The Base Score Vector is the severity score in CVSS vector form, a condensed text representation of the values used to calculate the score.
The Base Score Version is the CVSS version used to calculate the score.
- EPSS score [%]
Qualitative measure of a vulnerability’s likelihood of exploitation according to the Exploit Prediction Scoring System (EPSS).
The score indicates the probability of attempts to exploit a vulnerability being observed in the next 30 days and is a value between 0 and 100 %. The higher the value, the greater the probability that a vulnerability will actually be exploited.
- Rejected
Information on whether the vulnerability has been rejected/invalidated.
- References
References for the EUVD record, such as security advisories containing the vulnerability, or vendor information.
- Products
Products that are affected by the vulnerability.
- Vendors
Vendor, project, or organization associated with the affected product(s).
8.2.2 Filtering EUVD Records
The list of EUVD records can be filtered as described in Chapter 5.4.
Note
If a filter delivers no results, the table shows No data available.
8.3 Managing CSAF Advisories
The Common Security Advisory Framework (CSAF) is a standardized, machine-readable framework for distributing security advisories.
CSAF advisories are provided by, for example, software and hardware vendors, governments and independent researchers and contain vulnerability information. Users of CSAF advisories can thus collect security information from a decentralized group of vendors and automate risk assessment with more reliable information and fewer resources.
Restricted CSAF sources from which CSAF advisories can be retrieved can be added to OPENVAS SECURITY INTELLIGENCE (see Chapter 8.8).
8.3.1 Viewing CSAF Advisories
8.3.1.1 Viewing the Overall List of CSAF Advisories
All existing CSAF advisories can be displayed by selecting Vulnerability Database > CSAF Advisories in the menu.
Note
For performance reasons, only the first 10,000 items are displayed. Filters can be used to narrow down the displayed items (see Chapter 5.4).
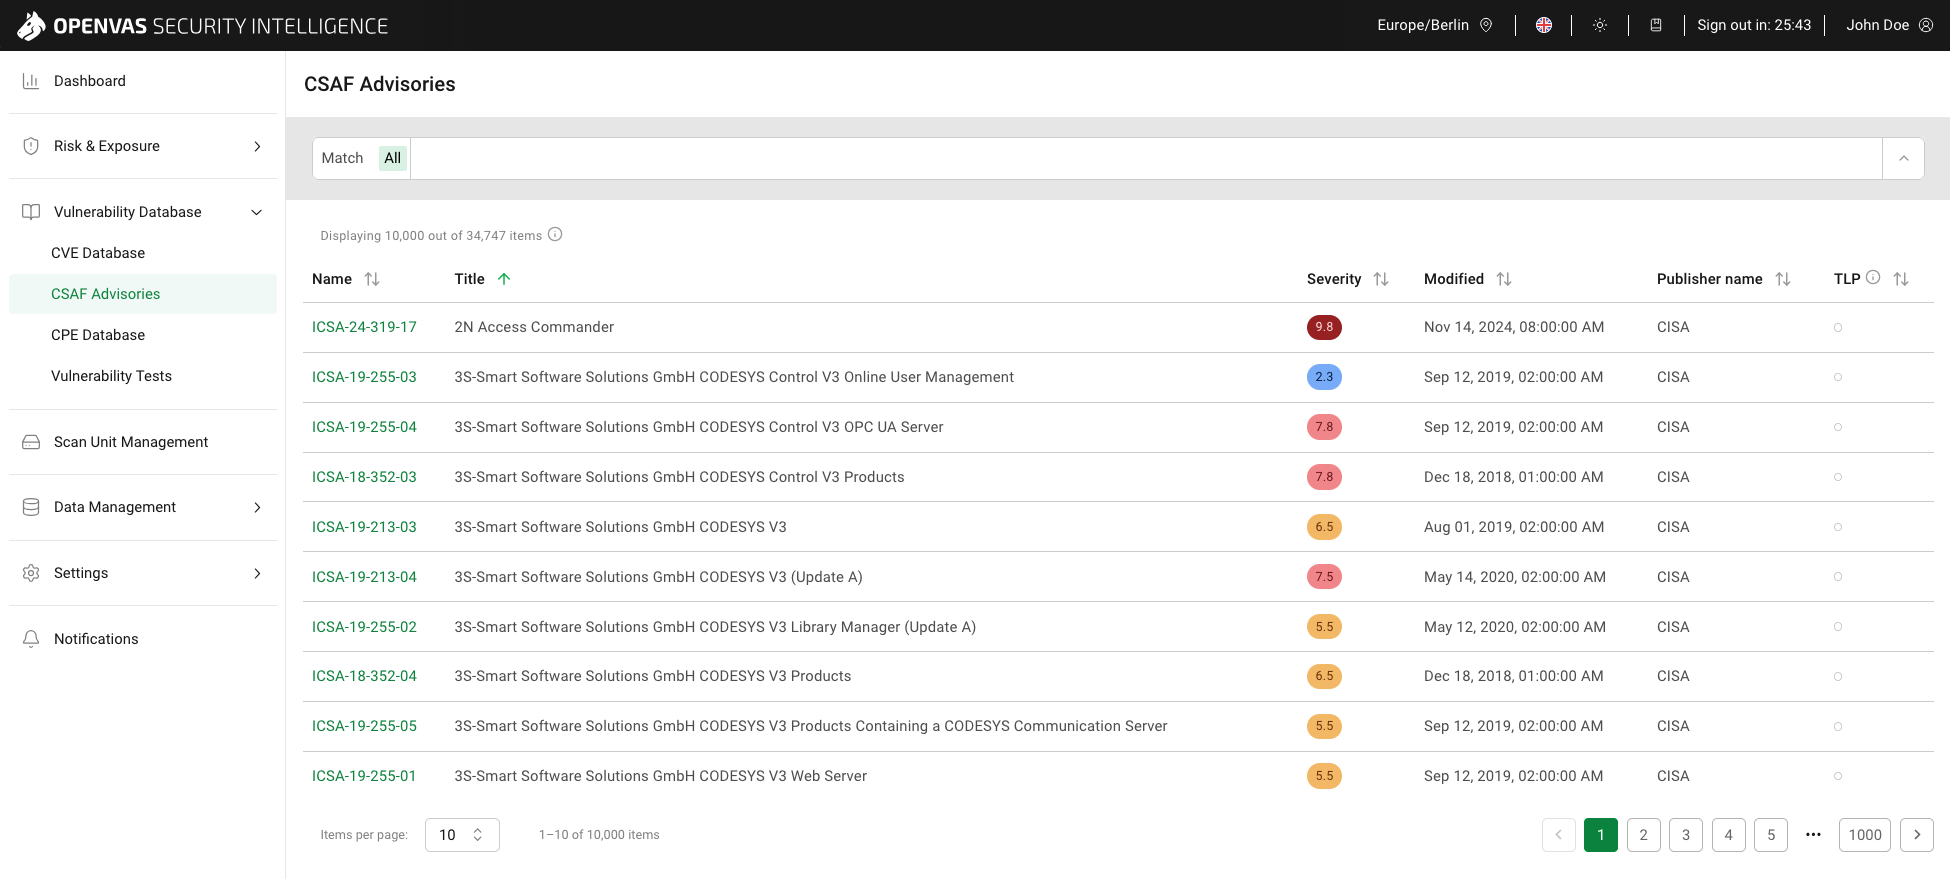
Fig. 8.5 CSAF Advisories page
Tip
In the Column options drop-down menu, the columns to be displayed in the table can be selected.
The columns can be rearranged using drag and drop.
For all CSAF advisories, the following information is displayed:
- Name
ID of the CSAF advisory.
Clicking on the name opens the details page of the CSAF advisory (see Chapter 8.3.1.2).
- Title
Descriptive name of the CSAF advisory.
- Severity
Note
Only the CSAF advisories provided via the Greenbone meta feed show a severity. It is the highest severity among the vulnerabilities described in the CSAF advisory.
For CSAF advisories that were downloaded from added restricted CSAF sources (see Chapter 8.8), the severity is displayed as
.Qualitative measure of a vulnerability’s severity according to the Common Vulnerability Scoring System (CVSS). This includes a severity score, which is a number from 0.0 to 10.0, with 10.0 being the most severe, and a severity class based on the score:
Critical: 9.0–10.0
High: 7.0–8.9
Medium: 4.0–6.9
Low: 0.0–3.9
- Modified
Date and time the CSAF advisory was last modified by the organization that published the CSAF advisory.
- Publisher name
Name of the organization that published the CSAF advisory.
- TLP
TLP is a standard for exchanging sensitive information that categorizes advisories into classes that regulate the conditions for their transfer. The TLP label is obtained from the CSAF advisory.
The current CSAF specification refers to TLP version 2. If a CSAF advisory referring to TLP version 2.1 is available in a CSAF source (see Chapter 8.8), this advisory will not be imported into OPENVAS SECURITY INTELLIGENCE.
The following labels are possible:
TLP:RED: not for disclosure, restricted to individual, direct recipients or participants only
TLP:AMBER: limited disclosure, restricted to the recipient’s organization and to clients on a need-to-know basis to protect themselves or prevent further harm
TLP:GREEN: limited disclosure, restricted to the recipient’s community
TLP:WHITE: no limit on disclosure
Note
If no TLP label is displayed, this is because the corresponding value is not contained in the CSAF advisory.
8.3.1.2 Viewing CSAF Advisory Details
In the overall list of CSAF advisories (see Chapter 8.3.1.1), click on the name of a CSAF advisory to display the CSAF advisory details.
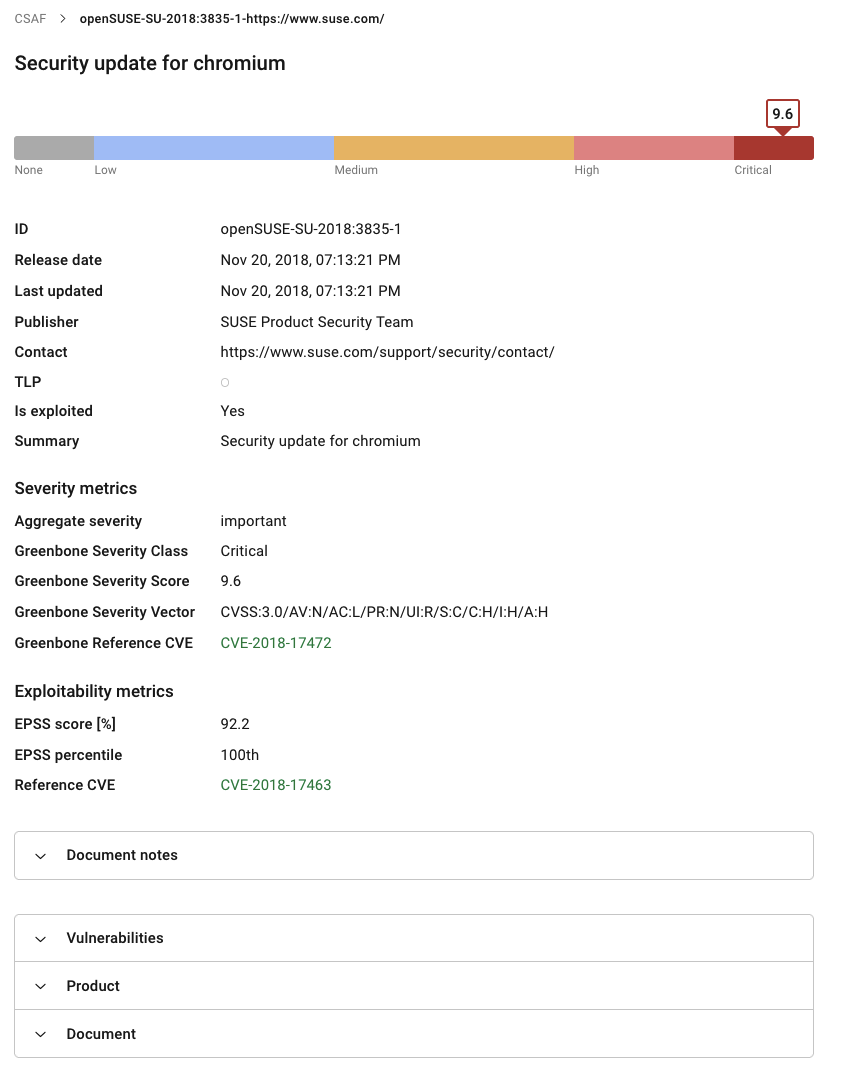
Fig. 8.6 Details of a CSAF advisory
The following information is displayed:
- Severity (displayed as a graphical element)
Note
Only the CSAF advisories provided via the Greenbone meta feed show a severity. It is the highest severity among the vulnerabilities described in the CSAF advisory.
Qualitative measure of a vulnerability’s severity according to the Common Vulnerability Scoring System (CVSS). This includes a severity score, which is a number from 0.0 to 10.0, with 10.0 being the most severe, and a severity class based on the score:
Critical: 9.0–10.0
High: 7.0–8.9
Medium: 4.0–6.9
Low: 0.0–3.9
- ID
ID of the CSAF advisory.
- Release date
Date and time the CSAF advisory was published.
- Last updated
Date and time the CSAF advisory was last modified by the organization that published the CSAF advisory.
- Publisher
Name of the organization that published the CSAF advisory.
- Contact
Contact information of the publisher.
- TLP
TLP is a standard for exchanging sensitive information that categorizes advisories into classes that regulate the conditions for their transfer. The TLP label is obtained from the CSAF advisory.
The current CSAF specification refers to TLP version 2. If a CSAF advisory referring to TLP version 2.1 is available in a CSAF source (see Chapter 8.8), this advisory will not be imported into OPENVAS SECURITY INTELLIGENCE.
The following labels are possible:
TLP:RED: not for disclosure, restricted to individual, direct recipients or participants only
TLP:AMBER: limited disclosure, restricted to the recipient’s organization and to clients on a need-to-know basis to protect themselves or prevent further harm
TLP:GREEN: limited disclosure, restricted to the recipient’s community
TLP:WHITE: no limit on disclosure
Note
If no TLP label is displayed, this is because the corresponding value is not contained in the CSAF advisory.
- Is exploited
Information on whether at least one of the CVEs in the CSAF advisory is exploited.
CVEs are marked as exploited if they appear in the Known Exploited Vulnerabilities (KEV) Catalog maintained by CISA.
- Summary
Brief description of the CSAF advisory and the vulnerabilities it addresses.
- Severity metrics
- Aggregate severity
Metric provided by the publisher to communicate the urgency and criticality with which the reported vulnerabilities should be addressed. It applies to the advisory as a whole and not to specific vulnerabilities.
Note
The aggregate severity is not related to the severity of vulnerabilities according to the Common Vulnerability Scoring System (CVSS) (see Chapter 8.3.1.1).
- Greenbone Severity Class, Greenbone Severity Score, Greenbone Severity Vector
Note
Only the CSAF advisories provided via the Greenbone meta feed show this information. The information is displayed for the vulnerability with the highest severity among the vulnerabilities described in the CSAF advisory.
The Common Vulnerability Scoring System (CVSS) is an industry standard for describing the severity of vulnerabilities.
CVSS v2.0 and CVSS v3.x consist of three metric groups: Base, Temporal, and Environmental.
CVSS v4.0, the current version, consists of four metric groups: Base, Threat, Environmental, and Supplemental.
Note
If a vulnerability contains data of more than one CVSS version, the newest version is always used.
The NVD provides CVSS assessments of Base metrics since they are the intrinsic characteristics of a vulnerability. Assessments for Temporal, Threat, Environmental, or Supplemental metrics are not provided as they strongly depend on time, on the particular organization in which they occur and on additional context.
Base score metrics rate the exploitability of a vulnerability and its impact on the target system. This includes, among other things, assessing the accessibility of the target system and whether the confidentiality, integrity or availability of the target system is at risk.
The Greenbone Severity Score is a numerical score from 0.0 to 10.0 describing a vulnerability’s severity according to CVSS, with 10.0 being the most severe.
The Greenbone Severity Vector is the severity score in CVSS vector form, a condensed text representation of the values used to calculate the score.
The Greenbone Severity Class is the severity classification based on the severity score:
Critical: 9.0–10.0
High: 7.0–8.9
Medium: 4.0–6.9
Low: 0.0–3.9
- Greenbone Reference CVE
CVE ID of the vulnerability for which the metrics above are displayed. It is the vulnerability with the highest severity among the vulnerabilities described in the CSAF advisory.
- Exploitability metrics
Note
Only the CSAF advisories provided via the Greenbone meta feed show this information. The information is displayed for the vulnerability with the highest EPSS score among the vulnerabilities described in the CSAF advisory.
- EPSS score [%]
Qualitative measure of a vulnerability’s likelihood of exploitation according to the Exploit Prediction Scoring System (EPSS).
The score indicates the probability of attempts to exploit a vulnerability being observed in the next 30 days and is a value between 0 and 100 %. The higher the value, the greater the probability that a vulnerability will actually be exploited.
- EPSS percentile
The EPSS percentile indicates the proportion of vulnerabilities that were rated the same or lower than the vulnerability. This helps putting the score into context.
- Reference CVE
CVE ID of the vulnerability for which the metrics above are displayed. It is the vulnerability with the highest EPSS score among the vulnerabilities described in the CSAF advisory.
- Document notes
Notes added to the CSAF advisory by the publisher.
Examples for notes are summaries, technical or non-technial details, FAQ, and terms of use.
- Vulnerabilities
Information about the vulnerabilities described in the CSAF advisory.
For each vulnerability, there is an own accordion.
- Product
Information about products that are affected by the vulnerabilities described in the CSAF advisory.
- Document
Information about the creation of the CSAF advisory, such as details of the revisions, language, category, CSAF version as well as references.
8.3.2 Filtering CSAF Advisories
The list of CSAF advisories can be filtered as described in Chapter 5.4.
Note
If a filter delivers no results, the table shows No data available.
8.4 Managing CPEs
The Common Platform Enumeration (CPE) is a structured naming scheme for information technology systems, platforms and packages. Based on the generic syntax for Uniform Resource Identifiers (URI), CPE includes a formal name format, a language for describing complex platforms, a method for checking names against a system and a description format for binding text and tests to a name.
CPEs are published and made accessible by the National Institute of Standards and Technology (NIST) in the National Vulnerability Database (NVD).
A CPE name starts with “cpe:/”, followed by up to 12 components separated by colons (see Fig. 8.7).
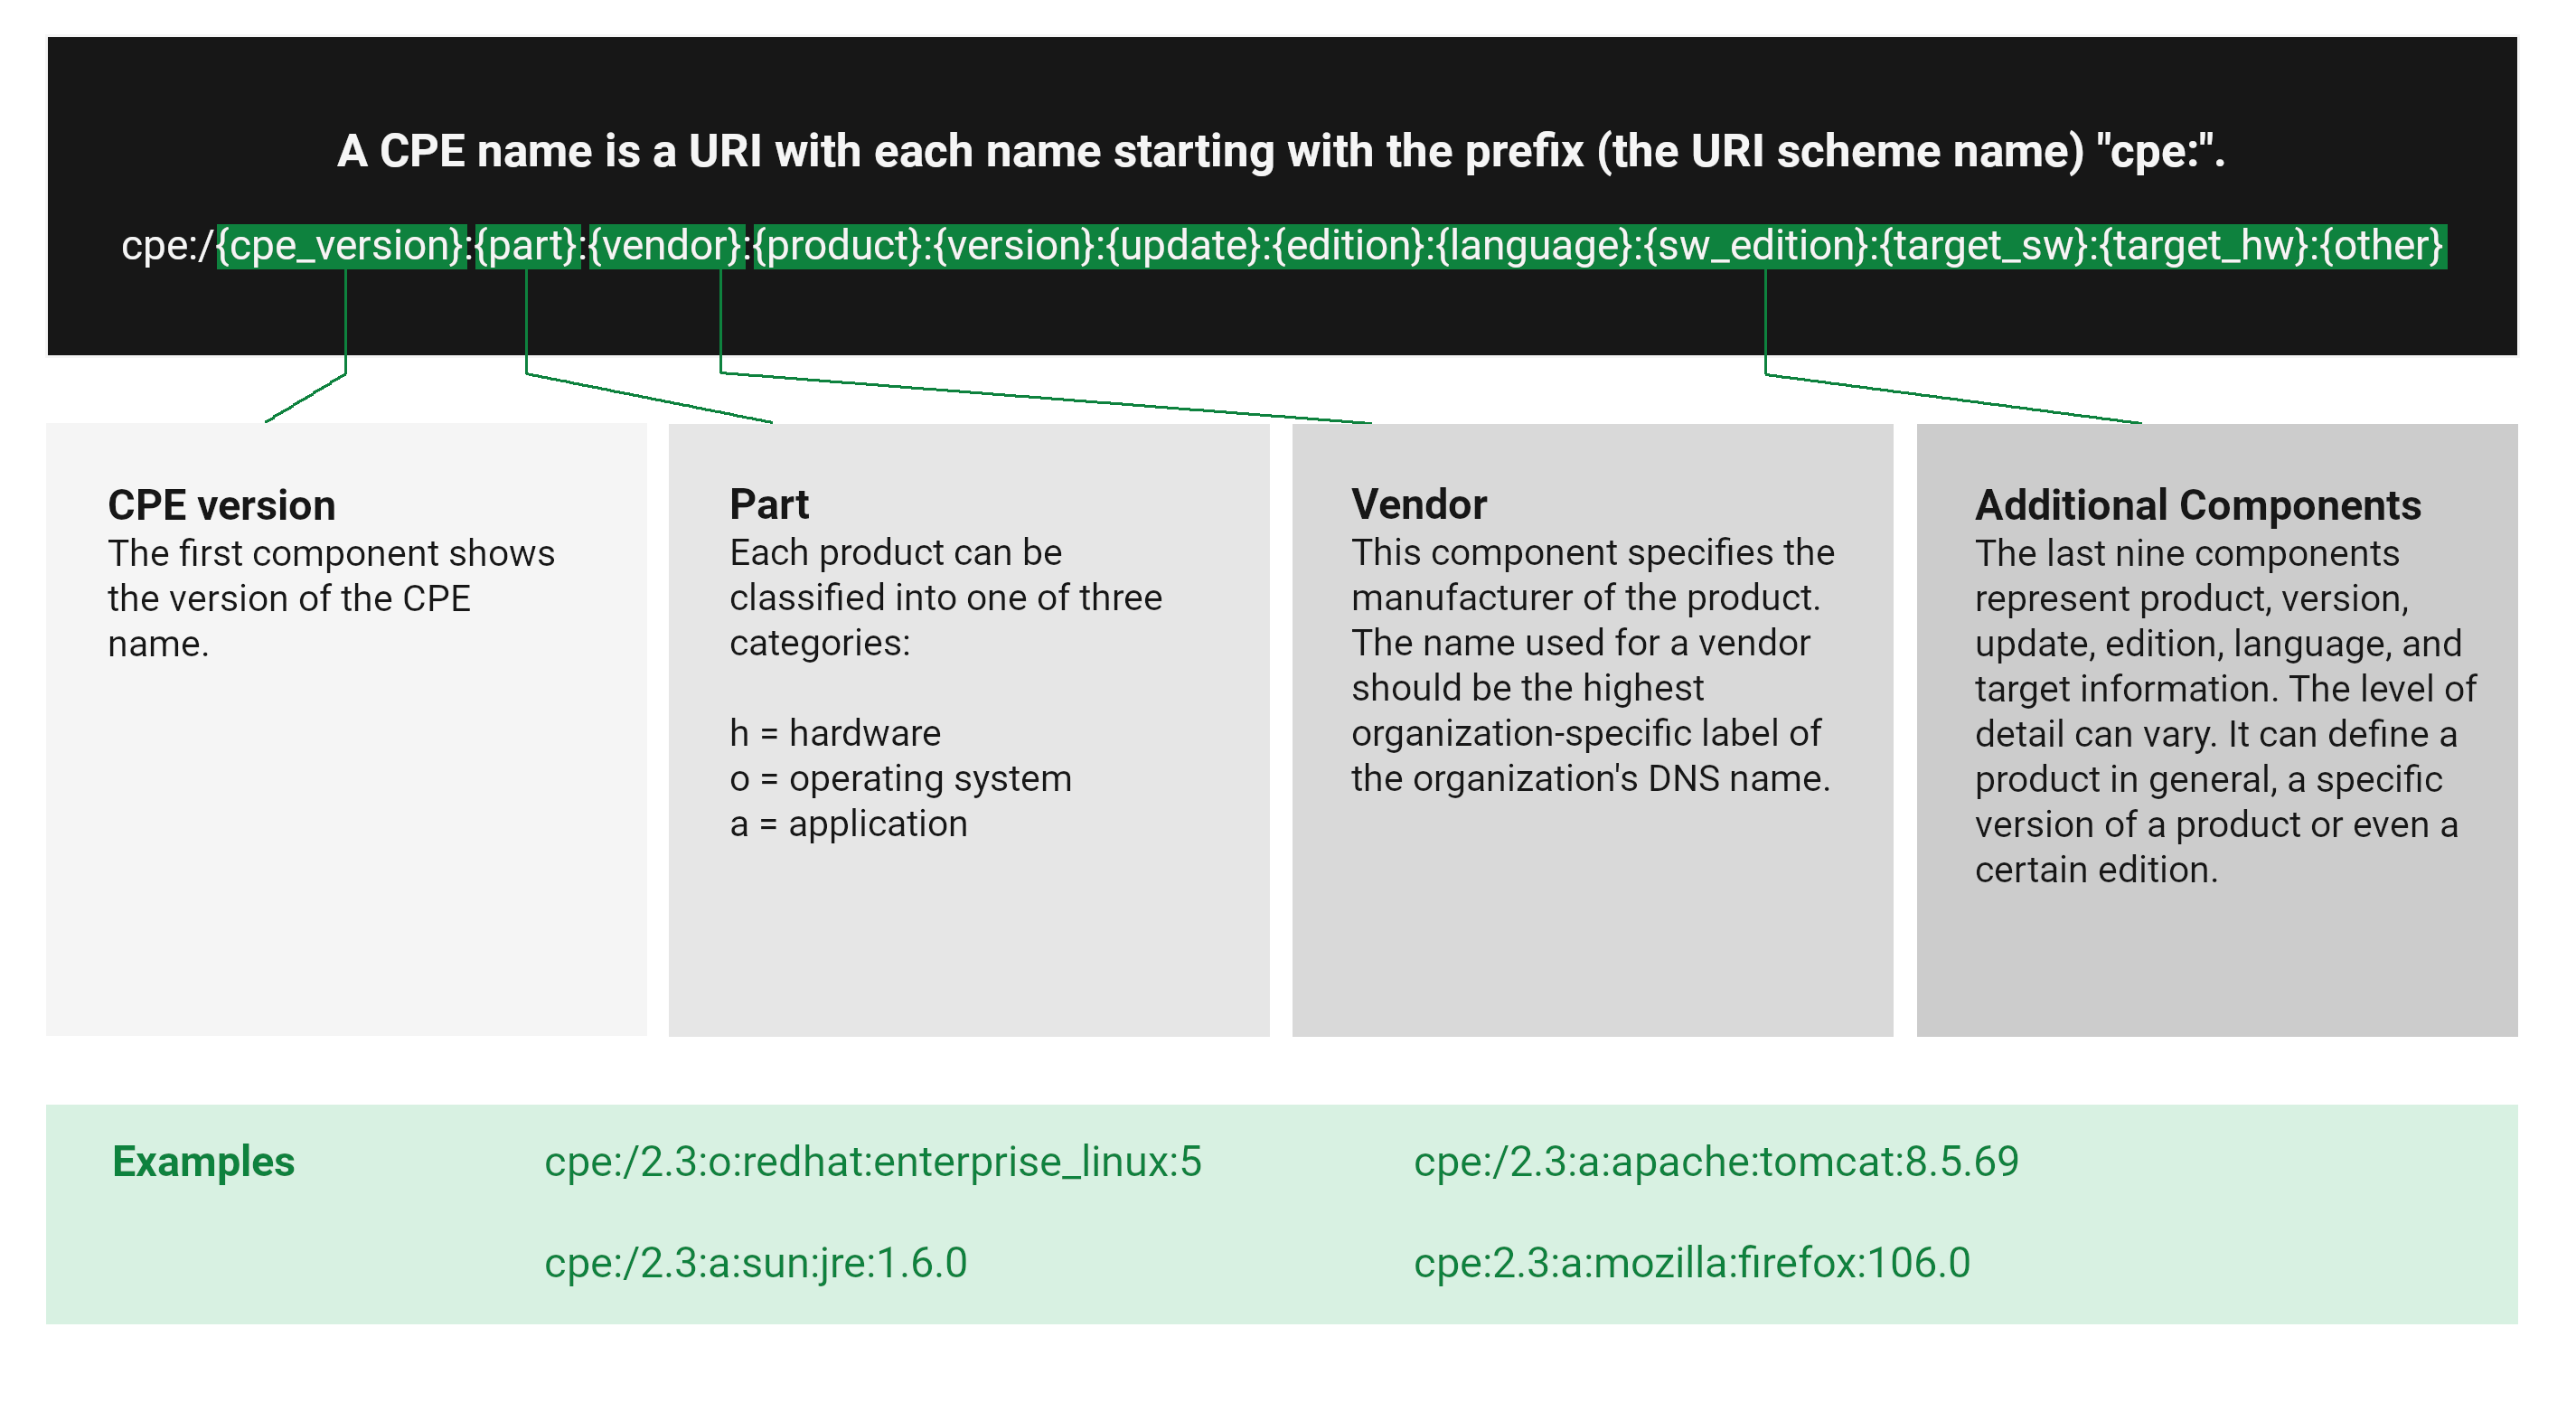
Fig. 8.7 Name structure of a CPE name
8.4.1 Viewing CPEs
Note
The availability of a CPE in OPENVAS SECURITY INTELLIGENCE depends on its availability in the NVD. As soon as it has been published there, it takes 1–2 working days for it to appear in OPENVAS SECURITY INTELLIGENCE.
8.4.1.1 Viewing the Overall List of CPEs
All existing CPEs can be displayed by selecting Vulnerability Database > CPE Database in the menu.
Note
For performance reasons, only the first 10,000 items are displayed. Filters can be used to narrow down the displayed items (see Chapter 5.4).
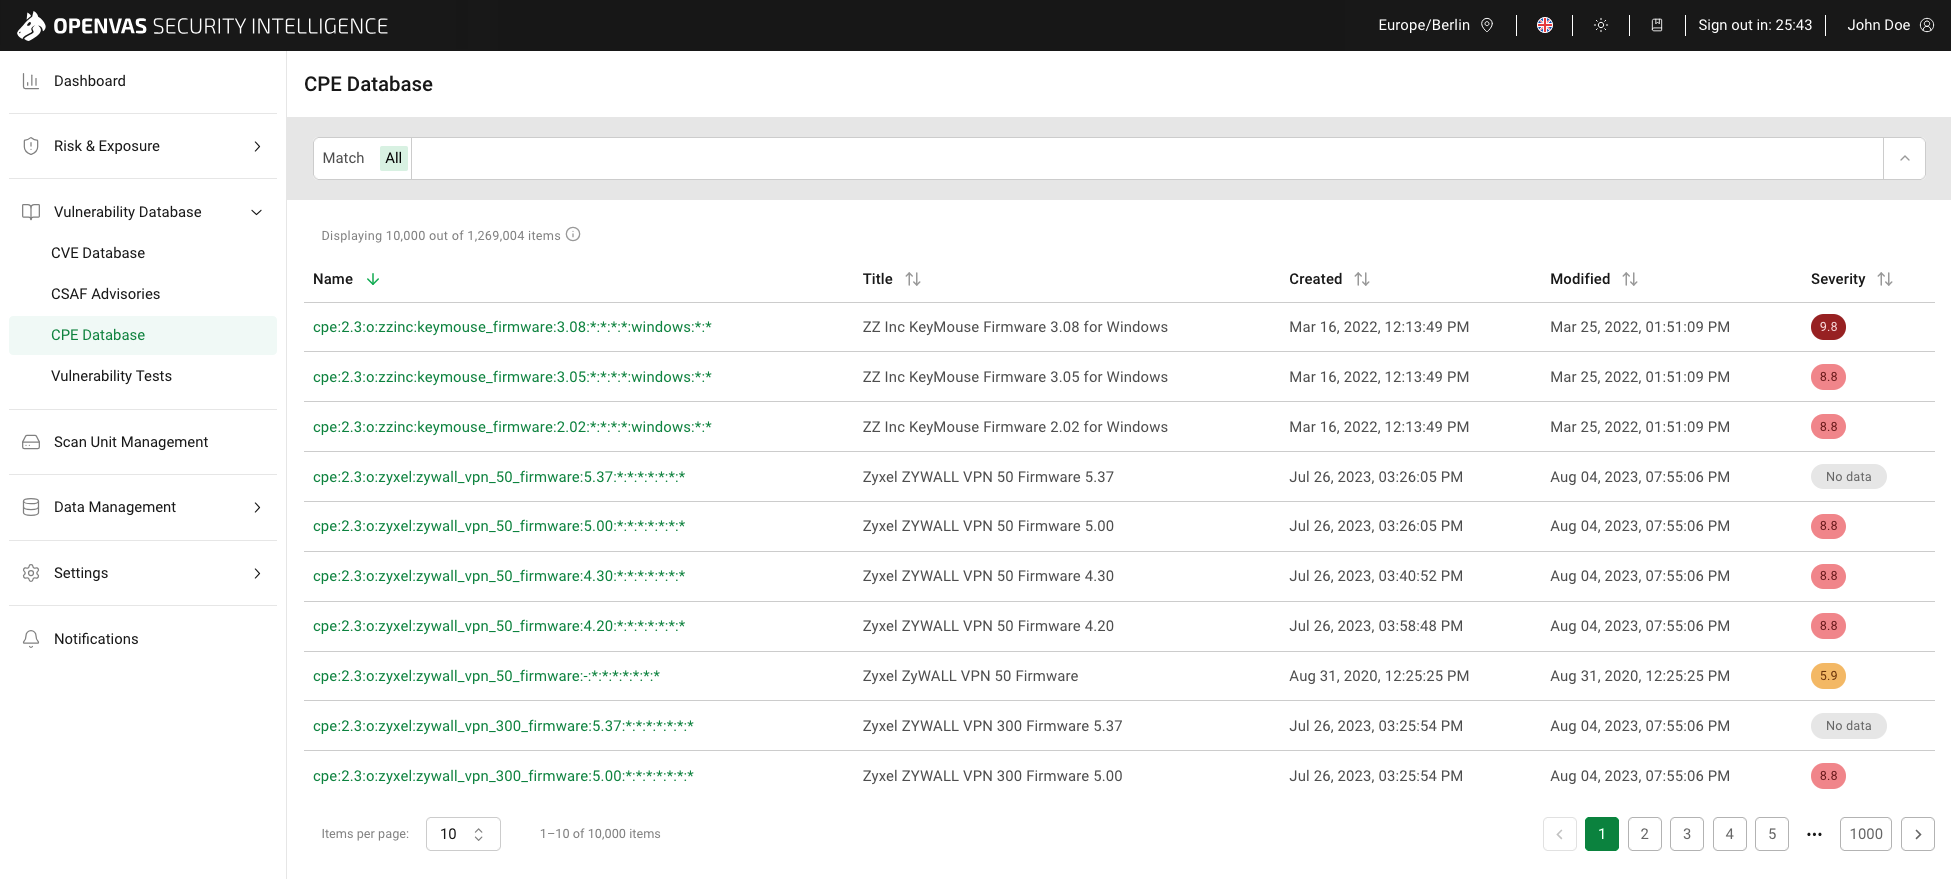
Fig. 8.8 CPE Database page
Tip
In the Column options drop-down menu, the columns to be displayed in the table can be selected.
The columns can be rearranged using drag and drop.
For all CPEs, the following information is displayed:
- Name
CPE name of the system, platform or package.
Clicking on the name opens the details page of the CPE (see Chapter 8.4.1.2).
- Title
Descriptive name of the system, platform or package.
- Created
Date and time the CPE was created in the CPE Dictionary of the NVD.
- Modified
Date and time the CPE was last modified in the CPE Dictionary of the NVD.
- Severity
Qualitative measure of a vulnerability’s severity according to the Common Vulnerability Scoring System (CVSS). This includes a severity score, which is a number from 0.0 to 10.0, with 10.0 being the most severe, and a severity class based on the score:
Critical: 9.0–10.0
High: 7.0–8.9
Medium: 4.0–6.9
Low: 0.0–3.9
Multiple vulnerabilities may exist for a CPE. The severity of the most severe vulnerability for the CPE is displayed.
The label
may be displayed for one of the following reasons:The CVEs for the CPE were published but no vulnerability analysis/severity assessment has been carried out by the NVD yet. This can take anywhere from a few days up to a few weeks.
There is always a delay of 1–2 working days between the vulnerability analysis/severity assessment and the time the updated information is displayed in OPENVAS SECURITY INTELLIGENCE.
8.4.1.2 Viewing CPE Details
In the overall list of CPEs (see Chapter 8.4.1.1), click on the name of a CPE to display the CPE details.
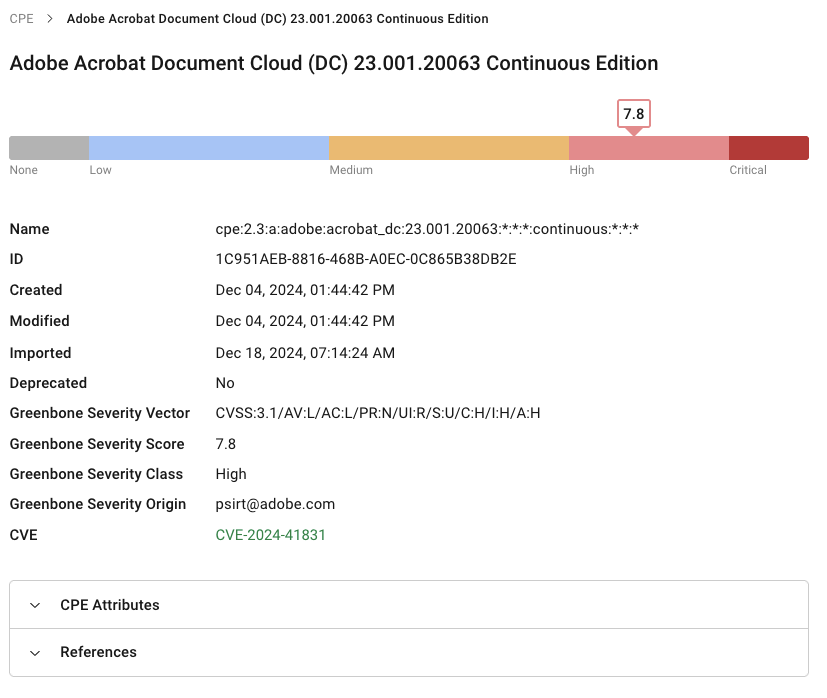
Fig. 8.9 Details of a CPE
The following information is displayed:
- Severity (displayed as a graphical element)
Qualitative measure of a vulnerability’s severity according to the Common Vulnerability Scoring System (CVSS). This includes a severity score, which is a number from 0.0 to 10.0, with 10.0 being the most severe, and a severity class based on the score:
Critical: 9.0–10.0
High: 7.0–8.9
Medium: 4.0–6.9
Low: 0.0–3.9
Multiple vulnerabilities may exist for a CPE. The severity of the most severe vulnerability for the CPE is displayed.
The graphical element may not be displayed for one of the following reasons:
The CVEs for the CPE were published but no vulnerability analysis/severity assessment has been carried out by the NVD yet. This can take anywhere from a few days up to a few weeks.
There is always a delay of 1–2 working days between the vulnerability analysis/severity assessment and the time the updated information is displayed in OPENVAS SECURITY INTELLIGENCE.
- Name
CPE name of the system, platform or package.
- ID
ID of the CPE in the NVD.
- Created
Date and time the CPE was created in the CPE Dictionary of the NVD.
- Modified
Date and time the CPE was last modified in the CPE Dictionary of the NVD.
- Imported
Date and time the CPE was added to OPENVAS SECURITY INTELLIGENCE.
- Deprecated
Indication of whether the CPE name is deprecated in the NVD or not. CPE names can be deprecated for a number of reasons. If a CPE name is deprecated, the unique string is no longer considered correct and a different string should be used instead.
- Greenbone Severity Vector, Greenbone Severity Score, Greenbone Severity Class, Greenbone Severity Origin
The Common Vulnerability Scoring System (CVSS) is an industry standard for describing the severity of vulnerabilities. The displayed values refer to the linked CVE.
CVSS v2.0 and CVSS v3.x consist of three metric groups: Base, Temporal, and Environmental.
CVSS v4.0, the current version, consists of four metric groups: Base, Threat, Environmental, and Supplemental.
Note
If a vulnerability contains data of more than one CVSS version, the newest version is always used.
The NVD provides CVSS assessments of Base metrics since they are the intrinsic characteristics of a vulnerability. Assessments for Temporal, Threat, Environmental, or Supplemental metrics are not provided as they strongly depend on time, on the particular organization in which they occur and on additional context.
Base score metrics rate the exploitability of a vulnerability and its impact on the target system. This includes, among other things, assessing the accessibility of the target system and whether the confidentiality, integrity or availability of the target system is at risk.
The Greenbone Severity Score is a numerical score from 0.0 to 10.0 describing a vulnerability’s severity according to CVSS, with 10.0 being the most severe.
The Greenbone Severity Vector is the severity score in CVSS vector form, a condensed text representation of the values used to calculate the score.
The Greenbone Severity Class is the severity classification based on the severity score:
Critical: 9.0–10.0
High: 7.0–8.9
Medium: 4.0–6.9
Low: 0.0–3.9
The Greenbone Severity Origin is the origin of the severity metrics of the newest available CVSS version.
- CVE
CVE that exists for this CPE (see Chapter 8.1).
If multiple CVEs exist for a CPE, the CVE with the highest severity score is displayed.
- CPE Attributes
Breakdown of the individual parts of the CPE name (see Fig. 8.7).
- References
References for the CPE, such as vendor information.
8.4.2 Filtering CPEs
The list of CPEs can be filtered as described in Chapter 5.4.
Note
If a filter delivers no results, the table shows No data available.
8.5 Managing Vulnerability Tests
A vulnerability test (VT) is a routine that checks a target system for the presence of a specific known or potential security problem. VTs include information about development date, affected systems, impact of vulnerabilities and remediation.
8.5.1 Viewing Vulnerability Tests
8.5.1.1 Viewing the Overall List of Vulnerability Tests
All existing VTs can be displayed by selecting Vulnerability Database > Vulnerability Tests in the menu.
Note
For performance reasons, only the first 10,000 items are displayed. Filters can be used to narrow down the displayed items (see Chapter 5.4).
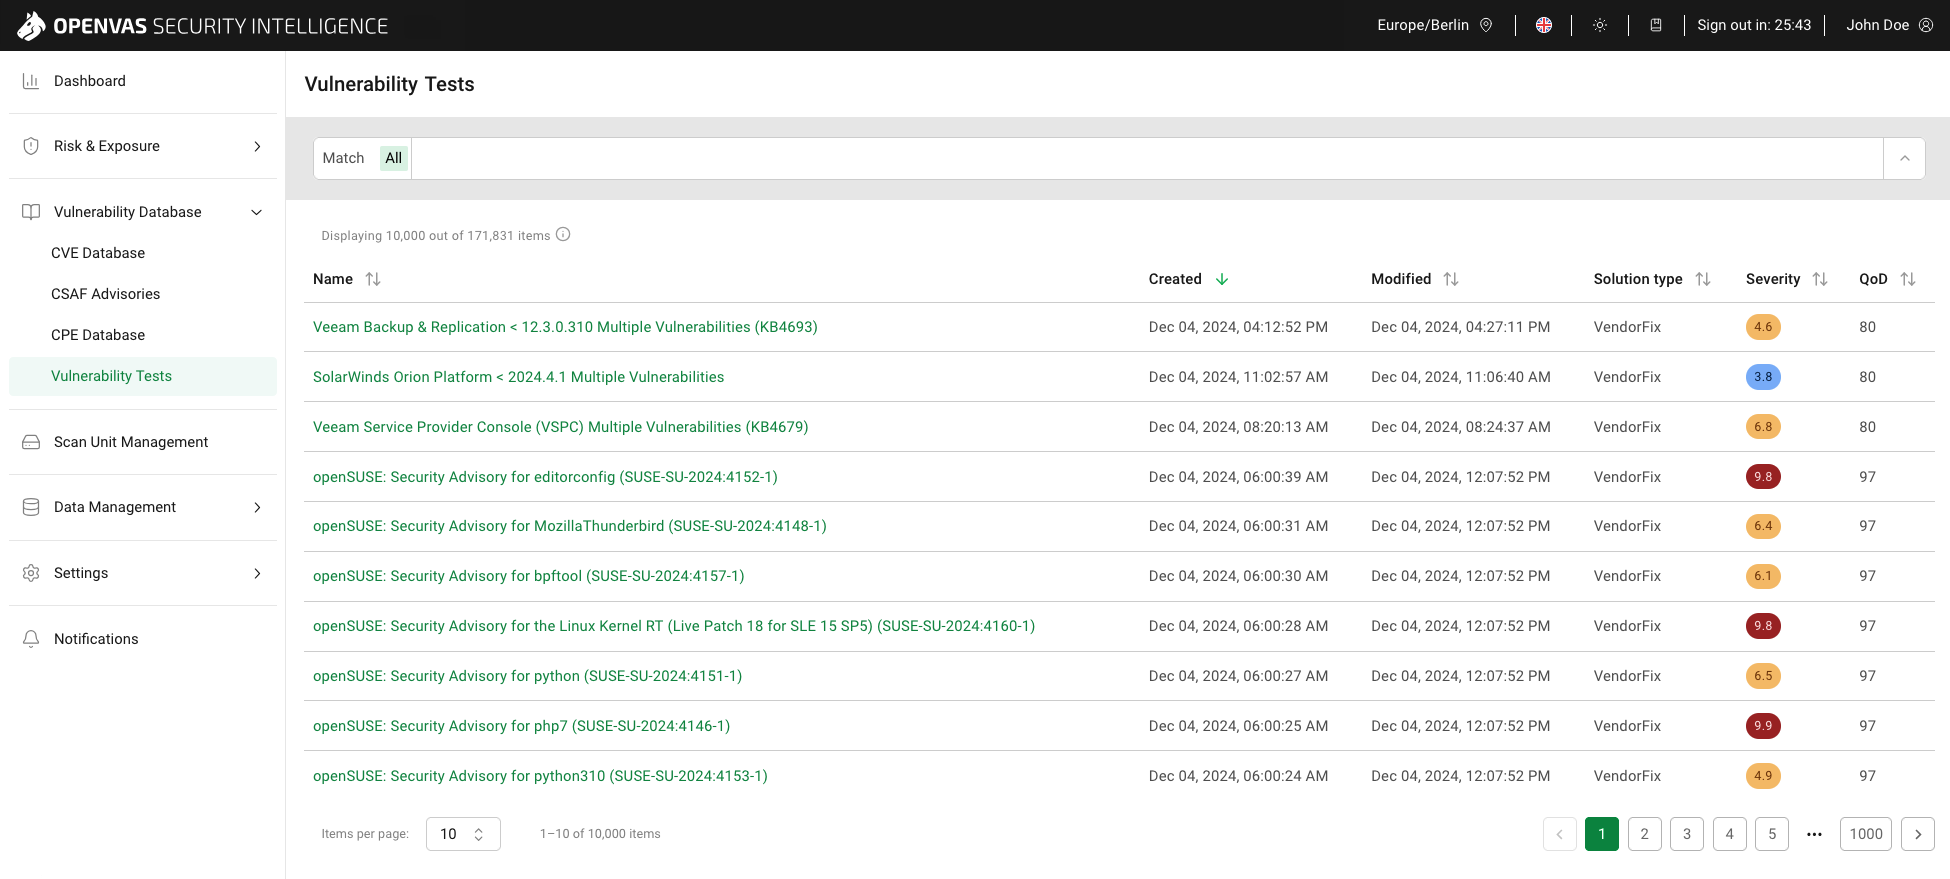
Fig. 8.10 Vulnerability Tests page
Tip
In the Column options drop-down menu, the columns to be displayed in the table can be selected.
The columns can be rearranged using drag and drop.
For all VTs, the following information is displayed:
- Name
Name of the VT.
Clicking on the name opens the details page of the VT (see Chapter 8.5.1.2).
- Created
Date and time the VT was added to the OPENVAS ENTERPRISE FEED.
- Modified
Date and time the VT was last modified in the OPENVAS ENTERPRISE FEED.
- Solution type
Type of measure to remedy the vulnerability. The following solution types exist:
Workaround: Information about a configuration or specific deployment scenario that can be used to avoid exposure to the vulnerability is available. This is usually the “first line of defense” against a new vulnerability before a mitigation or vendor fix has been issued or even discovered.
Mitigation: Information about a configuration or deployment scenario that helps to reduce the risk of the vulnerability is available but that does not resolve the vulnerability on the affected product. Mitigations may include using devices or access controls external to the affected product.
VendorFix: Information is available about an official fix that is issued by the original vendor of the affected product. Unless otherwise noted, it is assumed that this fix fully resolves the vulnerability.
NoneAvailable: Currently there is no fix available. Information should contain details about why there is no fix.
WillNotFix: There is no fix for the vulnerability and there never will be one. This is often the case when a product has been orphaned, is no longer maintained or otherwise deprecated. Information should contain details about why there will be no fix issued.
- Severity
Qualitative measure of a vulnerability’s severity according to the Common Vulnerability Scoring System (CVSS). This includes a severity score, which is a number from 0.0 to 10.0, with 10.0 being the most severe, and a severity class based on the score:
Critical: 9.0–10.0
High: 7.0–8.9
Medium: 4.0–6.9
Low: 0.0–3.9
The severity of the CVE that is detected by the VT is displayed. If multiple CVEs are linked to the VT, the severity of the CVE with the highest severity is displayed.
- QoD
Short for “Quality of Detection”. The QoD describes the reliability of the executed vulnerability detection. It is a value between 0 and 100, with 100 being the most reliable.
QoD
QoD Type
Description
100
exploit
The detection happened via an exploit and is therefore fully verified.
99
remote_vul
Remote active checks (code execution, traversal attack, SQL injection etc.) in which the response clearly shows the presence of the vulnerability.
98
remote_app
Remote active checks (code execution, traversal attack, SQL injection etc.) in which the response clearly shows the presence of the vulnerable application.
97
package
Authenticated package-based checks for Linux(oid) systems.
97
registry
Authenticated registry based checks for Microsoft Windows systems.
95
remote_active
Remote active checks (code execution, traversal attack, SQL injection etc.) in which the response shows the likely presence of the vulnerable application or of the vulnerability. “Likely” means that only rare circumstances are possible in which the detection would be wrong.
80
remote_banner
Remote banner checks of applications that offer patch level in version. Many proprietary products do so.
80
executable_version
Authenticated executable version checks for Linux(oid) or Microsoft Windows systems where applications offer patch level in version.
75
If results without any QoD information are processed, they are assigned this value.
70
remote_analysis
Remote checks that do some analysis but which are not always fully reliable.
50
remote_probe
Remote checks in which intermediate systems such as firewalls might pretend correct detection so that it is actually not clear whether the application itself answered. For example, this can happen for non-TLS connections.
30
remote_banner_unreliable
Remote banner checks of applications that do not offer patch level in version identification. For example, this is the case for many open source products due to backport patches.
30
executable_version_unreliable
Authenticated executable version checks for Linux(oid) systems where applications do not offer patch level in version identification.
30
package_unreliable
Authenticated package-based checks which are not always fully reliable for, for example, Linux(oid) systems.
1
general_note
General note on potential vulnerability without finding any present application.
8.5.1.2 Viewing Vulnerability Test Details
In the overall list of VTs (see Chapter 8.5.1.1), click on the name of a VT to display the VT details.
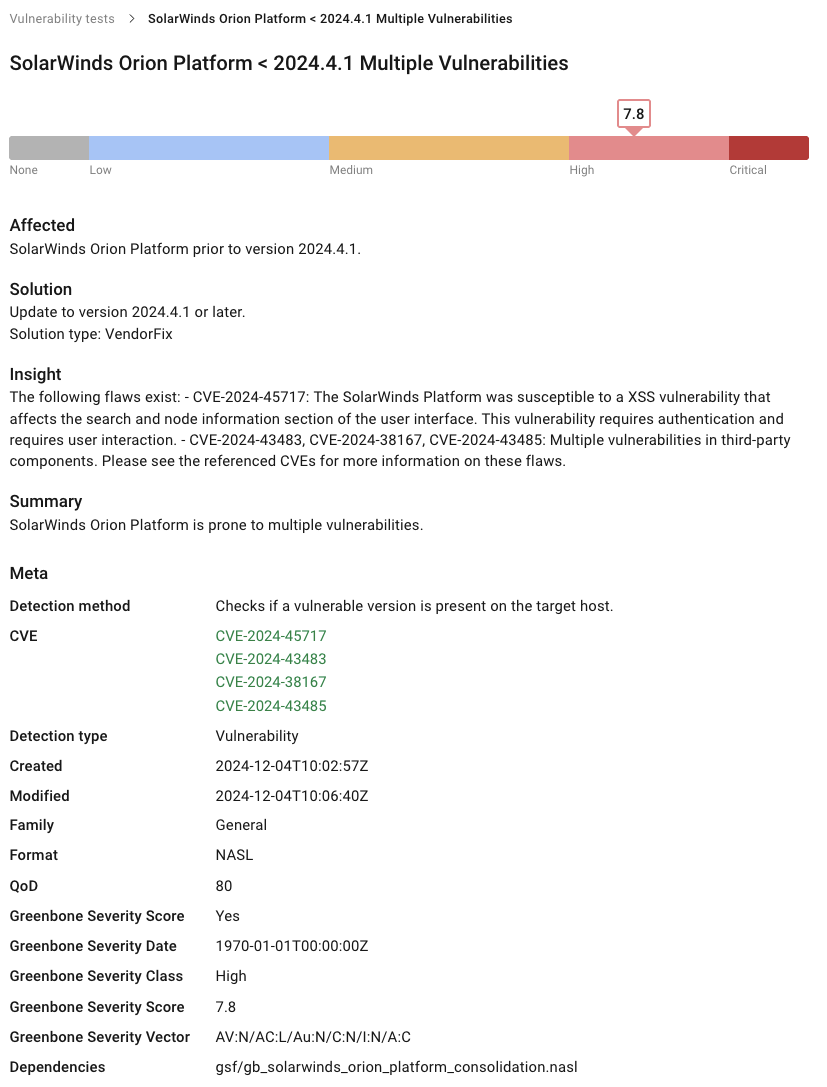
Fig. 8.11 Details of a VT
The following information is displayed:
- Severity (displayed as a graphical element)
Qualitative measure of a vulnerability’s severity according to the Common Vulnerability Scoring System (CVSS). This includes a severity score, which is a number from 0.0 to 10.0, with 10.0 being the most severe, and a severity class based on the score:
Critical: 9.0–10.0
High: 7.0–8.9
Medium: 4.0–6.9
Low: 0.0–3.9
The severity of the CVE that is detected by the VT is displayed. If multiple CVEs are linked to the VT, the severity of the CVE with the highest severity is displayed.
- Affected
Products, including version and operating system, that are affected by the vulnerability that the test detects.
This information is not available for all vulnerability tests.
- Solution
Description of how the vulnerability that the test detects can be remediated.
The following solution types exist:
Workaround: Information about a configuration or specific deployment scenario that can be used to avoid exposure to the vulnerability is available. This is usually the “first line of defense” against a new vulnerability before a mitigation or vendor fix has been issued or even discovered.
Mitigation: Information about a configuration or deployment scenario that helps to reduce the risk of the vulnerability is available but that does not resolve the vulnerability on the affected product. Mitigations may include using devices or access controls external to the affected product.
VendorFix: Information is available about an official fix that is issued by the original vendor of the affected product. Unless otherwise noted, it is assumed that this fix fully resolves the vulnerability.
NoneAvailable: Currently there is no fix available. Information should contain details about why there is no fix.
WillNotFix: There is no fix for the vulnerability and there never will be one. This is often the case when a product has been orphaned, is no longer maintained or otherwise deprecated. Information should contain details about why there will be no fix issued.
This information is not available for all vulnerability tests.
- Insight
Details about the cause of the vulnerability that the test detects.
This information is not available for all vulnerability tests.
- Summary
Short summary of the vulnerability that the test detects.
- Meta
Further information about the VT, such as the detection method, linked CVEs, the test family, the format and severity scoring information.
Clicking on a CVE opens the details page of the CVE (see Chapter 8.1.1.2).
8.5.2 Filtering Vulnerability Tests
The list of vulnerability tests can be filtered as described in Chapter 5.4.
Note
If a filter delivers no results, the table shows No data available.
8.6 Managing SBOMs
Note
SBOM sources can only be managed by a super admin or an operator.
A Software Bill of Materials (SBOM) is a document that lists all components and dependencies that are used in a software product, including source, version and license. The SBOM helps to identify and track the components and dependencies, and to assess their risks and vulnerabilities.
SBOMs can be uploaded on the SBOM Sources page and then checked for vulnerabilities in the products listed in them on the SBOMs page.
8.6.1 Adding SBOMs
An SBOM can be added as follows:
Select Data Management > SBOM Sources in the menu.
Click Add SBOM.
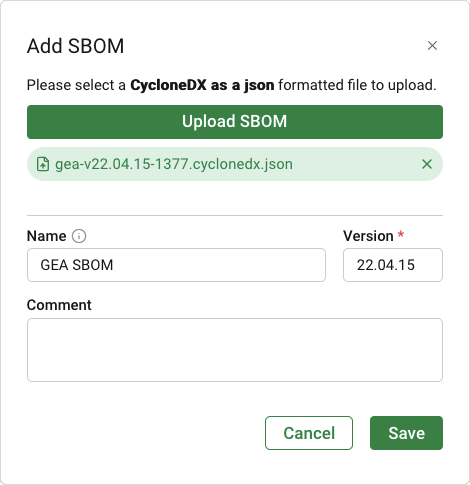
Fig. 8.12 Adding an SBOM
Click Select SBOM.
Select the SBOM file from the file directory.
Note
The SBOM must be a JSON-formatted CycloneDX file.
Fill in the input boxes:
- Name
The name can be chosen freely. A descriptive name should be chosen if possible.
If no name is defined, the file name is displayed instead.
- Version
Version of the SBOM. It is recommended to enter a value that corresponds to the actual version of the product represented by the SBOM, or a value that allows the SBOM to be assigned to a specific product unambiguously.
This input box is mandatory.
- Comment
The optional comment allows specifying further details and background information.
Click Upload.
When the upload is complete, click Close.
8.6.2 Viewing SBOMs
All existing SBOMs can be displayed by selecting Data Management > SBOM Sources in the menu.
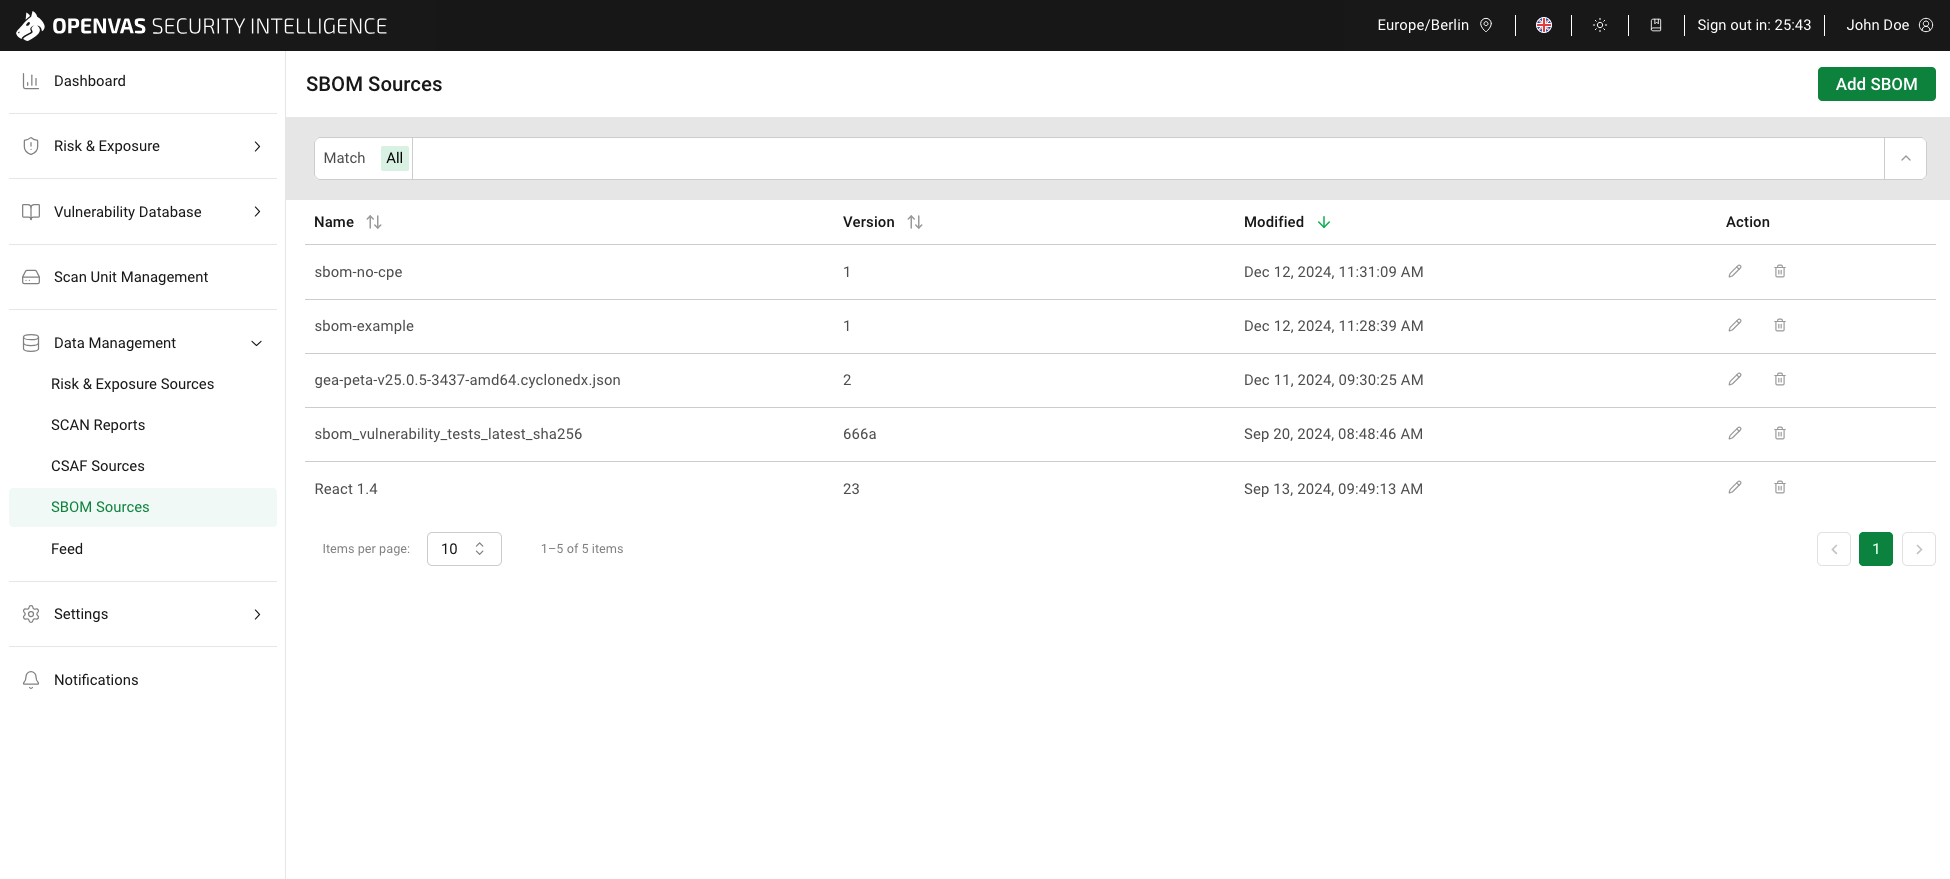
Fig. 8.13 SBOM Sources page
Tip
In the Column options drop-down menu, the columns to be displayed in the table can be selected.
The columns can be rearranged using drag and drop.
For all SBOMs, the following information is displayed:
- Name
Name that was assigned to the SBOM when it was added (see Chapter 8.6.1).
- Version
Version that was assigned to the SBOM when it was added (see Chapter 8.6.1).
- Modified
Date and time the SBOM entry in OPENVAS SECURITY INTELLIGENCE was last modified.
The following actions are available:
8.6.3 Scanning SBOMs
SBOMs that are added on the SBOM Sources page also appear on the SBOMs page and are available for scanning there.
8.6.3.1 Viewing SBOM Scans
All existing SBOMs and their scan status can be displayed by selecting Risk & Exposure > SBOMs in the menu.
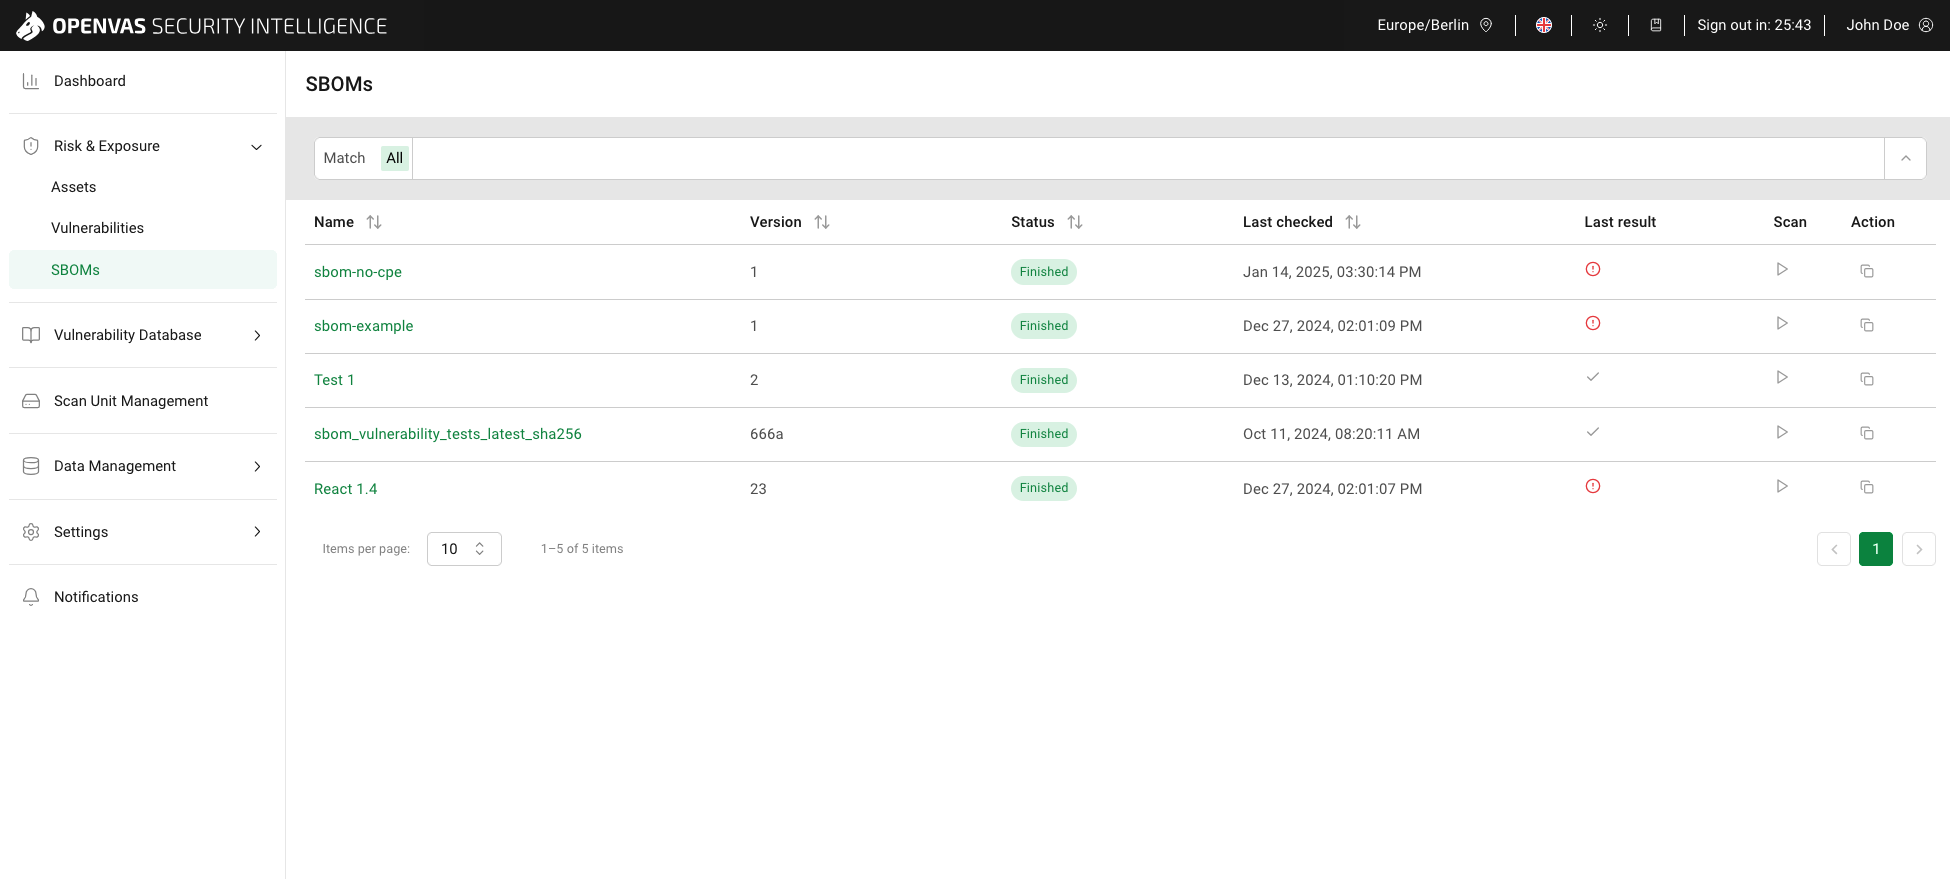
Fig. 8.14 SBOMs page
Tip
In the Column options drop-down menu, the columns to be displayed in the table can be selected.
The columns can be rearranged using drag and drop.
For all SBOMs, the following information is displayed:
- Name
Name that was assigned to the SBOM when it was added (see Chapter 8.6.1).
If the SBOM was scanned for vulnerabilities at least once, clicking on the name opens the results of the latest scan.
- Version
Version that was assigned to the SBOM when it was added (see Chapter 8.6.1).
- Status
Status of the SBOM scan. The following status are possible:
- The SBOM has not yet been scanned.
 The SBOM has been successfully scanned at least once.
Clicking on the SBOM name opens the results of the latest scan.
The SBOM has been successfully scanned at least once.
Clicking on the SBOM name opens the results of the latest scan. The SBOM is currently being scanned.
 The last scan was canceled by the user.
 The last scan was interrupted due to a service shutdown or restart.
More information can be found on the Notifications page (see Chapter 9).
 The last scan failed.
This can have various reasons, for example that the scan report could not be created in the database.
The last scan failed.
This can have various reasons, for example that the scan report could not be created in the database.More information can be found on the Notifications page (see Chapter 9).
- Last checked
Date and time of the last scan.
is displayed if there was no scan yet.- Last result
Result of the latest SBOM scan:
 No vulnerabilities were detected in the SBOM.
 Vulnerable components that require attention were detected in the SBOM.
- The SBOM has not yet been scanned.
- Scan
Scan the SBOM for vulnerabilities.
 Start the SBOM scan.
 Stop the currently running SBOM scan.
The following action is available:
 Copy the CPE name of the main product (see Chapter 8.6.6).
8.6.3.2 Executing an SBOM Scan
An SBOM can be scanned for vulnerabilities as follows:
Select Risk & Exposure > SBOMs in the menu.
Click
in the column Scan.Tip
A running scan can be canceled by clicking
in the column Scan.
No (partial) report is saved.→ A report is created when the SBOM scan is finished.
All CPEs (see Chapter 8.4) are extracted from the SBOM and converted to CPE version 2.3. For all detected CPEs, a list of associated CVEs (see Chapter 8.1) is obtained.
The report can be accessed by clicking on the SBOM name (see Chapter 8.6.3.3).
8.6.3.3 Viewing the Report of an SBOM Scan
The report of the latest SBOM scan can be displayed as follows:
Select Risk & Exposure > SBOMs in the menu.
Click on the SBOM name.
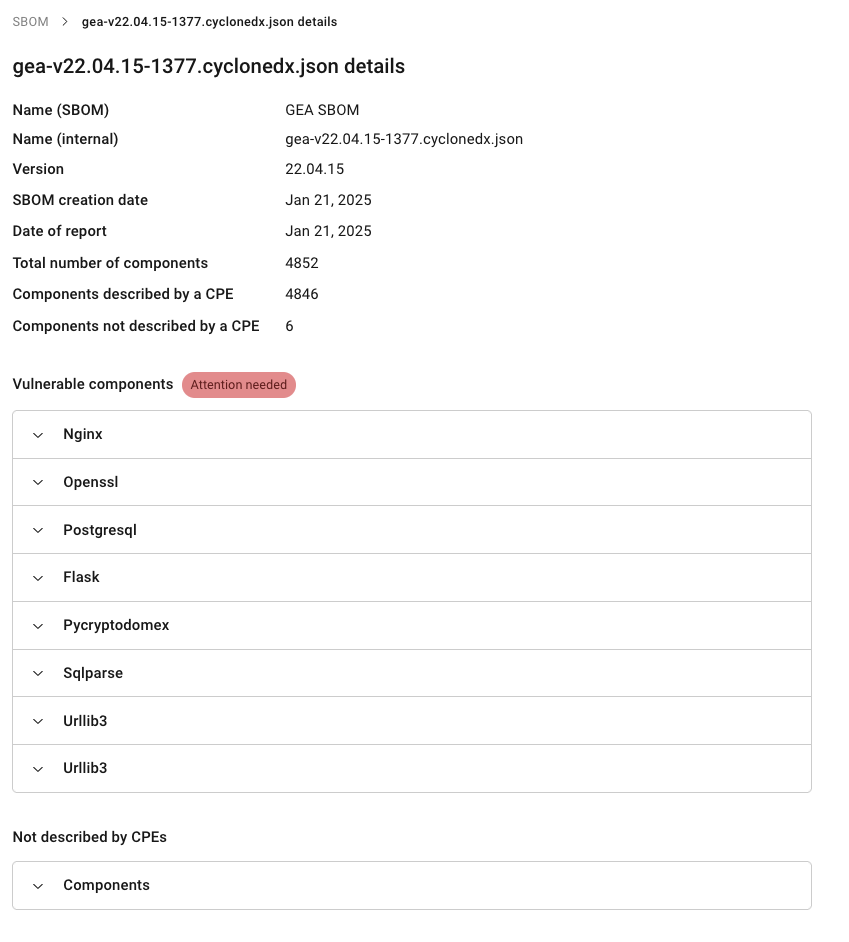
Fig. 8.15 Report of an SBOM scan
→ The following information is displayed:
- Name (SBOM)
Name that was assigned to the SBOM when it was added (see Chapter 8.6.1).
- Name (internal)
File name of the SBOM file (see Chapter 8.6.1).
- Version
Version that was assigned to the SBOM when it was added (see Chapter 8.6.1).
- Comment
Further information about the SBOM that was specified when it was added (see Chapter 8.6.1).
- SBOM creation date
Date the SBOM was added to OPENVAS SECURITY INTELLIGENCE.
- Date of report
Date the scan report was created.
- Total number of components
Total number of components found in the SBOM.
- Components described by a CPE
Total number of components which were described by a CPE and could be used for searching for vulnerabilities.
- Components not described by a CPE
Total number of components which were not described by a CPE and thus, could not be used for searching for vulnerabilities.
- Vulnerable Components
Vulnerable components detected in the SBOM.
For each vulnerable component, there is an own accordion.
For each vulnerable component, the following is displayed: name of the component (from the SBOM), CPE of the component, as well as a list of the CVEs containing a similar CPE with CVE identifier, CVE title, base severity class, impact score and severity vector.
8.6.4 Editing SBOMs
An SBOM can be edited as follows:
Select Data Management > SBOM Sources in the menu.
Click
 in the column Action.
Update the required data (see Chapter 8.6.1).
Click Save.
→ The SBOM’s data in OPENVAS SECURITY INTELLIGENCE is updated.
8.6.5 Deleting SBOMs
An SBOM can be deleted as follows:
Select Data Management > SBOM Sources in the menu.
Click
 in the column Action.
→ A warning dialog is displayed asking to confirm the deletion.
Note
Deleting an SBOM is irreversible. The SBOM and all associated data is removed permanently.
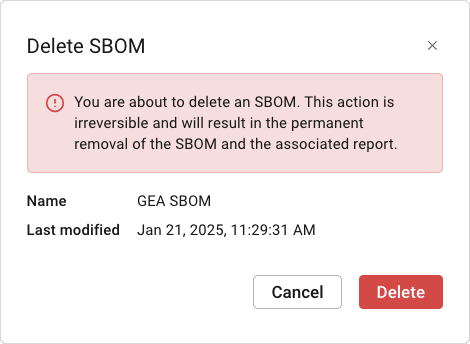
Fig. 8.16 Confirming the deletion
Click Delete.
→ The SBOM is removed from OPENVAS SECURITY INTELLIGENCE.
8.6.6 Copying the CPE Name of the Main Product
The CPE name of the main product, meaning the product represented by the SBOM, can be obtained from the SBOM and copied to the clipboard.
Note
Information about CPE names can be found in Chapter 8.4.
If the CPE name is not directly available within the SBOM, it is generated as follows:
The “product” value is taken from
metadata.component.namein the SBOM.The “vendor” value is taken from
metadata.component.manufacturer.namein the SBOM, with fallback tometadata.component.name.The “version” value is taken from
metadata.component.versionin the SBOM.The “part” value is set as
a.The CPE version is set as
2.3.The remaining fields are filled with the wildcard
*.
The CPE name can be copied as follows:
Select Risk & Exposure > SBOMs in the menu.
Click
in the column Action.→ The CPE name is copied to the clipboard.
8.6.7 Filtering SBOMs
The lists of SBOM sources and SBOMs can be filtered as described in Chapter 5.4.
Note
If a filter delivers no results, the table shows No data available.
8.7 Managing SCAN Reports
Note
SCAN reports can only be managed by a super admin or an operator.
The results of a vulnerability scan performed with an OPENVAS SCAN appliance are summarized in a report. The report contains information about the vulnerabilities detected on a target system, such as the severity and remediations measures. If available, vulnerabilities are associated with CVEs.
A SCAN report exported in the GCS JSON Technical report format can be uploaded to OPENVAS SECURITY INTELLIGENCE and searched for CSAF advisories that exist for the CVEs listed in the report.
8.7.1 Adding SCAN Reports
A SCAN report can be added as follows:
Select Data Management > SCAN Reports in the menu.
Click Add SCAN report.
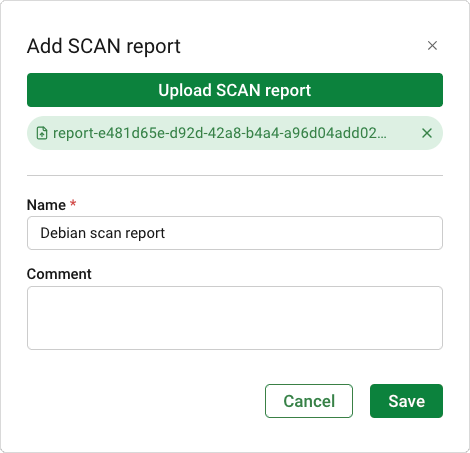
Fig. 8.17 Adding a SCAN report
Click Select SCAN report.
Select the SCAN report file from the file directory.
Note
The SCAN report must be exported in the report format GCS JSON Technical (see OPENVAS SCAN user manual).
Fill in the input boxes:
- Name
The name can be chosen freely. A descriptive name should be chosen if possible.
This input box is mandatory.
- Comment
The optional comment allows specifying further details and background information.
Click Upload.
When the upload is complete, click Close.
8.7.2 Viewing SCAN Reports
All existing SCAN reports can be displayed by selecting Data Management > SCAN Reports in the menu.
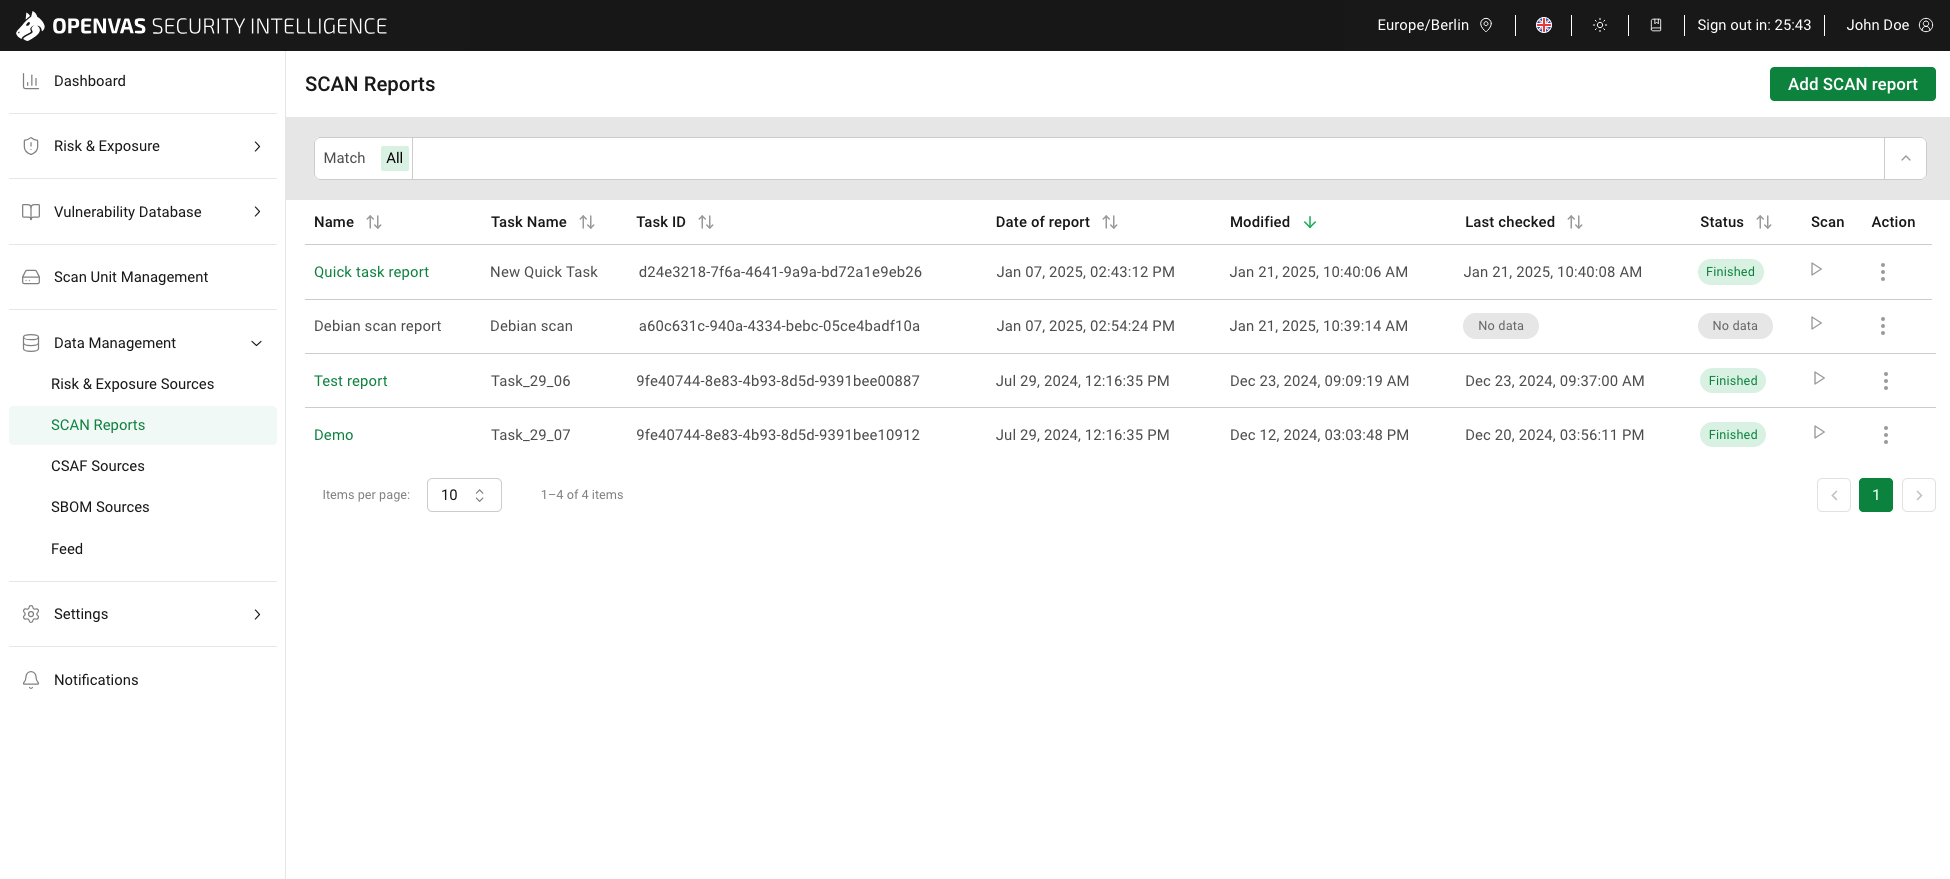
Fig. 8.18 SCAN Reports page
Tip
In the Column options drop-down menu, the columns to be displayed in the table can be selected.
The columns can be rearranged using drag and drop.
For all SCAN reports, the following information is displayed:
- Name
Name that was assigned to the SCAN report when it was added (see Chapter 8.7.1).
If the SCAN report was scanned for related CSAF advisories at least once (see Chapter 8.7.3), clicking on the name opens the results of the latest scan.
- Task Name
Name of the task on the appliance the report belongs to.
For more information see the OPENVAS SCAN user manual.
- Task ID
ID of the task on the appliance the report belongs to.
For more information see the OPENVAS SCAN user manual.
- Date of report
Date and time the SCAN report was generated on the appliance.
For more information see the OPENVAS SCAN user manual.
- Modified
Date and time the SCAN report was last modified in OPENVAS SECURITY INTELLIGENCE.
- Last checked
Date and time of the last scan.
is displayed if there was no scan yet.- Status
Status of the SCAN report scan. The following status are possible:
- The SCAN report has not yet been scanned.
- The SCAN report has been successfully scanned at least once.
Clicking on the SCAN report name opens the results of the latest scan.
- The SCAN report is currently being scanned.
- The scan was canceled by the user.
- The scan was interrupted due to a service shutdown or restart.
- The scan failed.
- Scan
Search the SCAN report for CSAF advisories for the CVEs mentioned in it (see Chapter 8.7.3).
- Start the SCAN report scan.
- Stop the currently running SCAN report scan.
When clicking  the following actions are available:
8.7.3 Scanning SCAN Reports
8.7.3.1 Executing a SCAN Report Scan
A SCAN report can be searched for CSAF advisories for the CVEs mentioned in it as follows:
Select Data Management > SCAN Reports in the menu.
Click
in the column Scan.Tip
A running scan can be canceled by clicking
in the column Scan.
No (partial) report is saved.→ A report is created when the SCAN report scan is finished.
All CVEs (see Chapter 8.1) are extracted from the SCAN report. For all CVEs, a list of associated CSAF advisories (see Chapter 8.3) is obtained.
The report can be accessed by clicking on the SCAN report name (see Chapter 8.7.3.2).
8.7.3.2 Viewing the Report of a SCAN Report Scan
The report of the latest SCAN report scan can be displayed as follows:
Select Data Management > SCAN Reports in the menu.
Click on the SCAN report name.
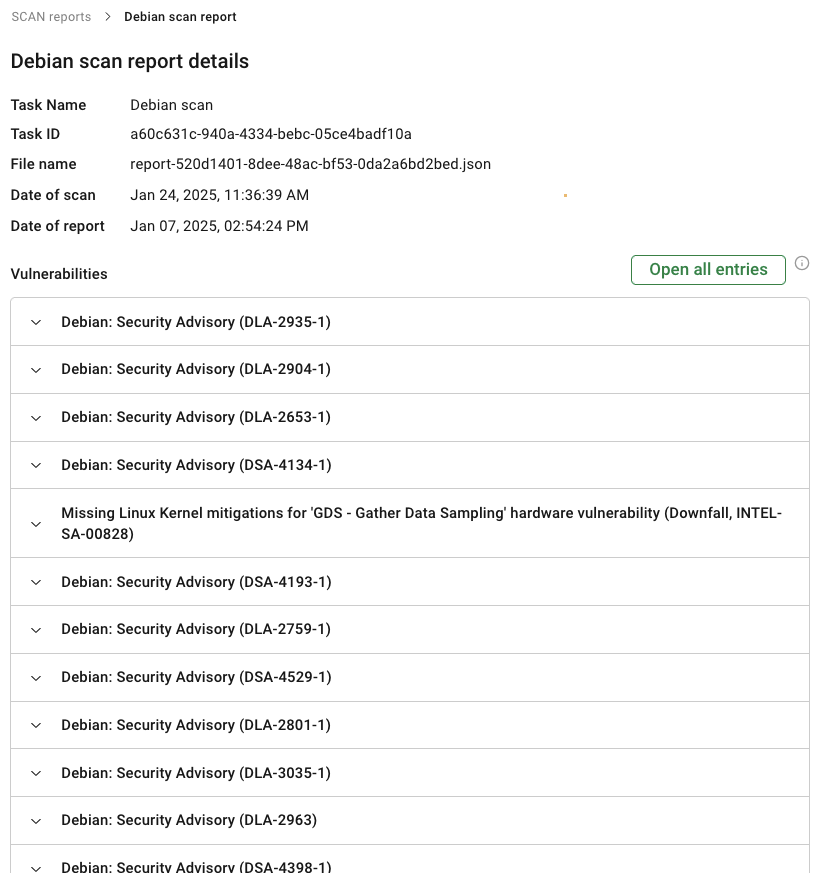
Fig. 8.19 Report of a SCAN report scan
→ The following information is displayed:
- Task Name
Name of the task on the appliance the report belongs to.
For more information see the OPENVAS SCAN user manual.
- Task ID
ID of the task on the appliance the report belongs to.
For more information see the OPENVAS SCAN user manual.
- File name
File name of the SCAN report that was uploaded (see Chapter 8.7.1).
- Date of scan
Date and time the SCAN report was scanned for related CSAF advisories.
- Date of report
Date and time the SCAN report was generated on the appliance.
For more information see the OPENVAS SCAN user manual.
- Vulnerabilities
Information about the vulnerabilities contained in the SCAN report.
For each vulnerability, there is an own accordion. Clicking Open all entries opens all accordions.
For each vulnerability, the following is displayed: CSAF advisories in which the vulnerability is contained, as well as information like the severity score and where and how the vulnerability was detected.
For more information about the displayed details see the OPENVAS SCAN user manual.
8.7.4 Editing SCAN Reports
A SCAN report can be edited as follows:
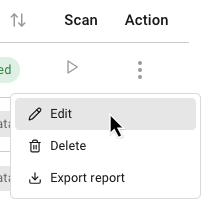
8.7.5 Deleting SCAN Reports
A SCAN report can be deleted as follows:
Select Data Management > SCAN Reports in the menu.
Click
in the column Action and select Delete from the drop-down list.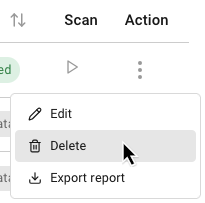
Fig. 8.21 Deleting a SCAN report
→ A warning dialog is displayed asking to confirm the deletion.
Note
Deleting a SCAN report is irreversible. The SCAN report and all associated data is removed permanently.
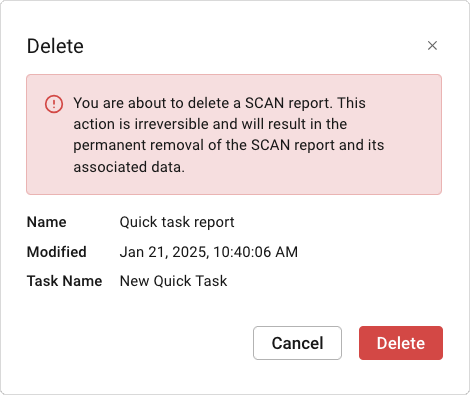
Fig. 8.22 Confirming the deletion
Click Delete.
→ The SCAN report is removed from OPENVAS SECURITY INTELLIGENCE.
8.7.6 Exporting the Report of a SCAN Report Scan
The report of a SCAN report scan can be exported as follows:
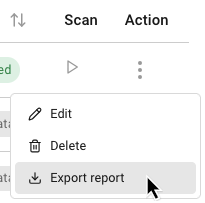
8.7.7 Filtering SCAN Reports
The list of SCAN reports can be filtered as described in Chapter 5.4.
Note
If a filter delivers no results, the table shows No data available.
8.8 Managing CSAF Sources
Note
CSAF sources can only be managed by a super admin or an operator.
The Common Security Advisory Framework (CSAF) is a standardized, machine-readable framework for distributing security advisories.
CSAF advisories are provided by, for example, software and hardware vendors, governments and independent researchers and contain vulnerability information. Users of CSAF advisories can thus collect security information from a decentralized group of vendors and automate risk assessment with more reliable information and fewer resources.
Restricted CSAF sources from which CSAF advisories can be retrieved can be added to OPENVAS SECURITY INTELLIGENCE.
8.8.1 Adding CSAF Sources
A CSAF source can be added as follows:
Select Data Management > CSAF Sources in the menu.
Click Add CSAF source.
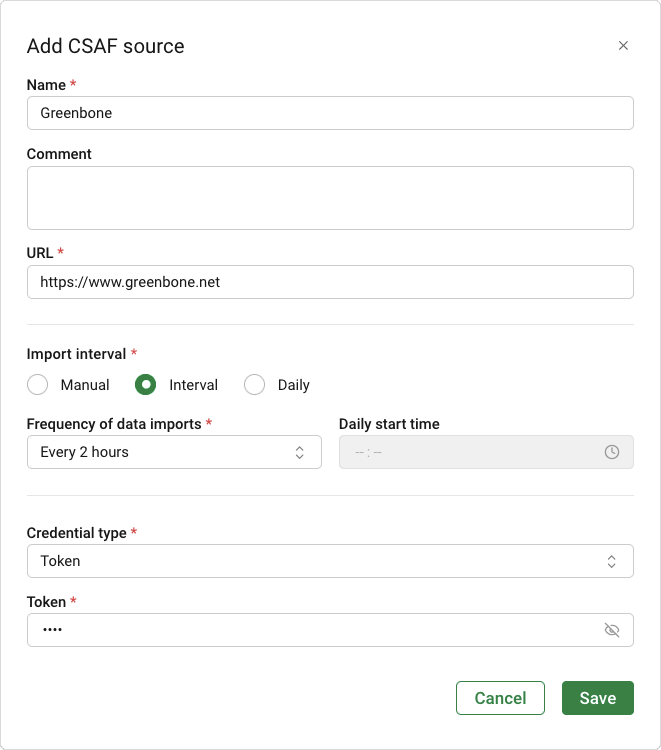
Fig. 8.24 Adding a CSAF-source
Fill in the input boxes:
- Name
The name can be chosen freely. A descriptive name should be chosen if possible.
This input box is mandatory.
- Comment
The optional comment allows specifying further details and background information.
- URL
URL from which the CSAF advisories are retrieved.
This input box is mandatory.
- Import interval
Selection of whether new data should be downloaded only when triggered manually or on a scheduled basis, either at specific intervals or at the same time every day.
- Manual
If this option is selected, the CSAF advisories will only be downloaded from the source if the download is triggered manually (see Chapter 8.8.5). The credentials must be entered for each download process.
This option is used if the credentials for the respective source should not be saved.
- Interval
If this option is selected, the CSAF advisories are downloaded from the source at regular intervals.
The interval can be set to a value between one and 12 hours. The first download takes place after the defined time period has elapsed for the first time after the CSAF source has been added.
- Daily
If this option is selected, the CSAF advisories are downloaded from the source once a day at a specified time.
The first download takes place when the specified time is reached for the first time.
- Frequency of data imports
Frequency of the downloads between every one and every 12 hour(s) in one-hour steps.
This input box is mandatory if Interval is selected for the import interval.
- Daily start time
Time of the daily download in 24-hour time format.
This input box is mandatory if Daily is selected for the import interval.
- Credential type
Type of authentication required to download the CSAF advisories from the respective source.
This selection is mandatory if Interval or Daily is selected for the import interval.
- Token
Token used for authentication to download the CSAF advisories from the respective source.
- Username & Password
User name and password used for authentication to download the CSAF advisories from the respective source.
- TLS client certification
TLS client certificate and key used for authentication to download the CSAF advisories from the respective source.
Click Save.
8.8.2 Viewing CSAF Sources
All existing CSAF sources can be displayed by selecting Data Management > CSAF Sources in the menu.
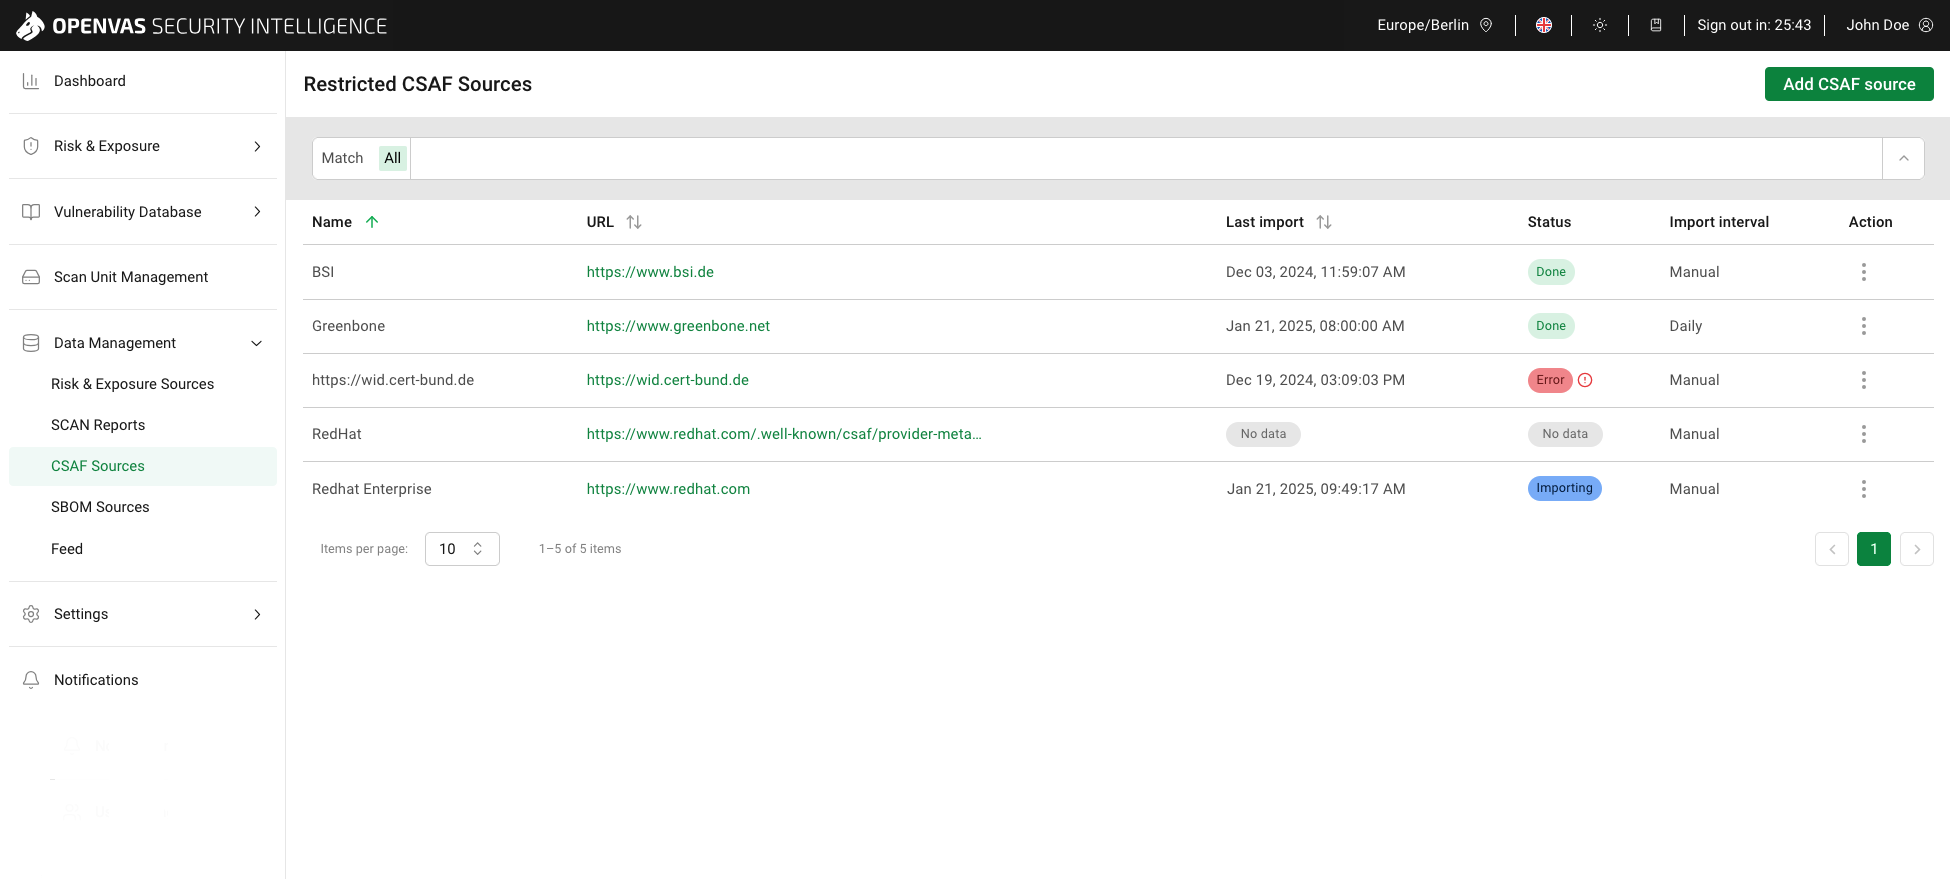
Fig. 8.25 CSAF Sources page
Tip
In the Column options drop-down menu, the columns to be displayed in the table can be selected.
The columns can be rearranged using drag and drop.
For all CSAF sources, the following information is displayed:
- Name
Name that was assigned to the CSAF source when it was added (see Chapter 8.8.1).
- URL
URL from which the CSAF advisories are retrieved.
Clicking on the URL opens it in a separate browser tab.
- Last import
Date and time of the last successful download of CSAF advisories.
is displayed if there was no download yet.- Status
Status of the download of CSAF advisories. The following status are possible:
- No advisories have been downloaded yet.
 The last download was successfully completed.
 Advisories are currently being downloaded.
- The last download was canceled by the user.
More information can be found on the Notifications page (see Chapter 9).
 The last download was completed successfully, but there were problems with some advisories due to one of the following reasons:
Duplicate CSAF advisories were detected.
Invalid CSAF advisories were detected.
More information can be found on the Notifications page (see Chapter 9).
 The last download failed due to one of the following reasons:
The target network is not available.
The provided credentials are not valid.
An internal error occurred.
The download was interrupted.
An download is already running.
There was an error on CSAF source side.
More information can be found on the Notifications page (see Chapter 9).
- Import interval
Setting when and how new data is downloaded.
Manual: the CSAF advisories will only be downloaded from the source if the download is triggered manually (see Chapter 8.8.5).
Interval: the CSAF advisories are downloaded from the source at regular intervals.
Daily: the CSAF advisories are downloaded from the source once a day at a specified time.
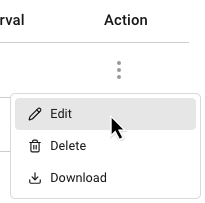
When clicking the following actions are available:
Edit the CSAF source (see Chapter 8.8.3).
Delete the CSAF source (see Chapter 8.8.4).
Download CSAF advisories from the CSAF source (see Chapter 8.8.5). This action is displayed if no download is currently running.
Cancel the currently running download of CSAF advisories (see Chapter 8.8.5). This action is displayed if a download is currently running.
8.8.3 Editing CSAF Sources
A CSAF source can be edited as follows:
8.8.4 Deleting CSAF Sources
A CSAF source can be deleted as follows:
Select Data Management > CSAF Sources in the menu.
Click
in the column Action and select Delete from the drop-down list.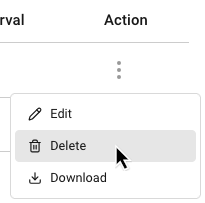
Fig. 8.27 Deleting a CSAF source
→ A warning dialog is displayed asking to confirm the deletion.
Note
Deleting a CSAF source is irreversible. The CSAF source and all associated data, including CSAF advisories downloaded from the source, is removed permanently.
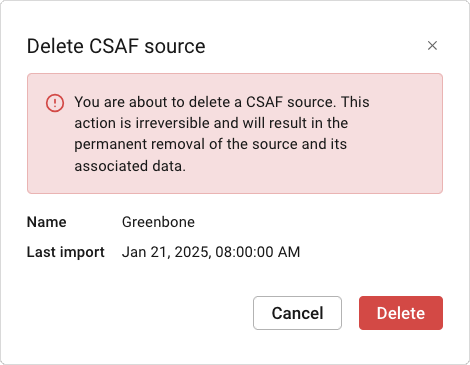
Fig. 8.28 Confirming the deletion
Click Delete.
→ The CSAF source is removed from OPENVAS SECURITY INTELLIGENCE.
8.8.5 Downloading Advisories from a CSAF Source
Advisories can be downloaded from a CSAF source manually as follows:
Select Data Management > CSAF Sources in the menu.
Click
in the column Action and select Download from the drop-down list.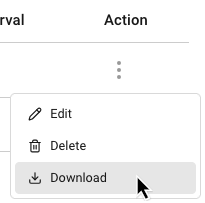
Fig. 8.29 Downloading CSAF advisories
Note
If the import interval is set to Interval or Daily, the credentials specified when the CSAF source was added (see Chapter 8.8.1) are used.
→ The download of CSAF advisories starts directly. See Chapter 8.8.2 for possible status.
Note
If the import interval is set to Manual, it is necessary to specify the credential type and enter the credentials before the download starts. The credentials are only used once and are not saved.
→ Continue with step 3.
Select the credential type from the drop-down list.
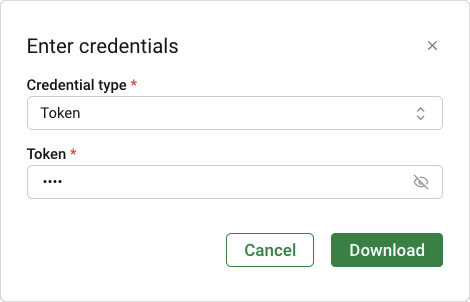
Fig. 8.30 Authenticating the download
Enter the token, the user name and password, or the TLS certificate and key used for authentication.
Click Download.
→ The download of CSAF advisories starts. See Chapter 8.8.2 for possible status.
Tip
A running download can be canceled by clicking
in the column Action and selecting Cancel Download from the drop-down list.
CSAF advisories that have already been downloaded are available in OPENVAS SECURITY INTELLIGENCE.
8.8.6 Filtering CSAF Sources
The list of CSAF sources can be filtered as described in Chapter 5.4.
Note
If a filter delivers no results, the table shows No data available.