16 Managing the Performance
When operating the Greenbone Enterprise Appliance, significant amounts of data can be transferred between the appliance, the scan targets and any sensor appliances. In addition to that, the scan results have to be analyzed, filtered and processed by the appliance. Depending on the appliance model, the number of users and the configuration of the scan tasks, many of these processes will run concurrently.
16.1 Monitoring the Appliance Performance
The overall performance of the Greenbone Enterprise Appliance can be monitored by selecting Administration > Performance in the menu bar (see Fig. 16.1).

Fig. 16.1 Displaying the performance of the appliance
The resource utilization of the appliance for the last hour, day, week, month or year can be displayed.
Note
The performance of a configured sensor can be displayed on the master as well.
The following sections are important:
- Processes
A high amount of processes is not critical. However, primarily only sleeping and running processes should be displayed.
- System Load
An ongoing high utilization is critical. A load of 4 on a system with 4 cores is considered acceptable.
- CPU Usage
Especially a high Wait-IO is critical.
- Memory Usage
The appliance uses aggressive caching. The usage of most of the memory as cache is acceptable.
- Swap Usage
A use of the swap memory points to a potential system overload.
16.2 Optimizing the Scan Performance
The speed of a scan depends on many parameters:
Selected ports
Selected scan configuration
Scanning order of targets
16.2.1 Selecting a Port List for a Task
The port list configured for a target has a large impact on the duration of the alive test and the vulnerability scan of this target.
16.2.1.1 General Information about Ports and Port Lists
Ports are the connection points of network communication. Each port of a system connects with the port on another system.
Transmission Control Protocol (TCP) ports
65535 TCP ports for each system
Data transmission occurs in both directions between two TCP ports.
The scan of TCP ports is usually performed simply and fast.
User Datagram Protocol (UDP) ports
65535 UDP ports for each system
Data transmission occurs only in one directions between two UDP ports.
Data received by UDP are not necessarily confirmed, so the testing of UDP ports usually takes longer.
Ports 0 to 1023 are privileged or system ports and cannot be opened by user applications [1].
The Internet Assigned Numbers Authority (IANA) assigns ports to standard protocols, for example port 80 to “http” or port 443 to “https”. Over 5000 ports are registered.
Scanning all ports takes too long in many cases and many ports are usually not used. To overcome this, port lists can be used.
All ports of all systems of all internet accessible systems were analyzed and lists of the most used ports were created. Those do not necessarily reflect the IANA list because there is no obligation to register a specific service type for a respective port. Nmap, an open-source port scanner, and the OpenVAS scanner use different lists by default and do not check all ports either.
For most scans it is often enough to scan the ports registered with the IANA.
The following port lists are predefined on the appliance:
All IANA assigned TCP: all TCP ports assigned by the Internet Assigned Numbers Authority (IANA), continuously updated
All IANA assigned TCP and UDP: all TCP and UDP ports assigned by the Internet Assigned Numbers Authority (IANA), continuously updated
All privileged TCP
All privileged TCP and UDP
All TCP
All TCP and Nmap top 100 UDP: all TCP ports and the top 100 UDP ports according to the Nmap network scanner, continuously updated
All TCP and Nmap top 1000 UDP: all TCP ports and the top 1000 UDP ports according to the Nmap network scanner, continuously updated
Nmap top 2000 TCP and top 100 UDP: the top 2000 TCP ports and the top 100 UDP ports according to the Nmap network scanner, continuously updated
OpenVAS Default: the TCP ports which are scanned by the OpenVAS scanner when passing the default port range preference
Note
Additional port lists can be created as described in Chapter 9.7.
16.2.1.2 Selecting the Right Port List
When choosing a port list discovery performance and scan duration have to be taken into account.
The duration of a scan is mostly determined by the network configuration and the amount of ports to be tested.
Services not bound to ports on the list are not tested for vulnerabilities. Additionally, malicious applications that are bound to such ports will not be discovered. Malicious applications mostly use open ports that are usually not used and are far from the system ports.
Other criteria are the defense mechanisms that are activated by exhaustive port scans and initiate countermeasures or alerts. Even with normal scans, firewalls can simulate that all 65535 ports are active and as such slow down the actual scan with so called time-outs.
Additionally, for each port that is queried the service behind it reacts at least with one log entry. For organizational reasons some services may only be scanned at a specific time.
16.2.1.2.1 Scan Duration
In some situations with port throttling, scanning all TCP and UDP ports can take up to 24 hours or more for a single system. Since the scans are performed in parallel, two systems will only take marginally more time than a single system. However, the parallelizing has its limits due to system resources and network performance.
All IANA TCP ports usually require only a couple of minutes to be scanned.
Since some countermeasures can increase the duration of a scan, throttling can be prevented by making configuration changes on the defense system.
In suspected cases of a compromise or highest security breaches a fully inclusive scan is unavoidable.
16.2.1.2.2 Total Security
For port scans total security does not exist, which means that even when all TCP and all UDP ports are scanned the preset timeout of the port testing can be too short to force a hidden malicious application to respond.
If an initial suspicion exists, an experienced penetration tester should be consulted.
16.2.2 Selecting a Scan Configuration for a Task
The scan configuration has an impact on the scan duration as well. The appliance offers four different scan configurations for vulnerability scans:
Full and fast
Full and fast ultimate
Full and very deep
Full and very deep ultimate
The scan configurations Full and fast and Full and fast ultimate optimize the scan process by using information found earlier in the scan. Only VTs that are useful are executed, resulting in a reduced scan duration.
Scans using the scan configurations Full and very deep and Full and very deep ultimate ignore already discovered information and execute all available VTs without exception.
16.2.3 Selecting the Scanning Order of Targets
During a scan the correspconding status bar on the page Tasks reflects the progress of the scan in percent (see Chapter 9.8).
In most cases this progress is a rough estimation since it is difficult for the appliance to project how the systems or services that have not been scanned yet behave compared to the already scanned systems and services.
- Example
A target network
192.168.0.0/24that has only 5 alive hosts with the IP addresses192.168.0.250-254should be scanned. When creating a task with default settings for this target, the scanner will try to scan all possible hosts in the target network sequentially.Since no hosts can be scanned for the IP addresses
192.168.0.1-249, the scanner skips these hosts and the scan progress reaches 95 % very quickly, indicating that the scan is almost finished.Then the hosts with the IP addresses
192.168.0.250-254are scanned and for each host, the vulnerability tests take some time. As a consequence, the scan progress is noticeably slower between 95 % and 100 %.
In order to improve the progress estimation, the setting Order for target hosts can be adjusted when creating a new task (see Chapter 9.2.2).
The setting Random is recommended (see Fig. 16.2).
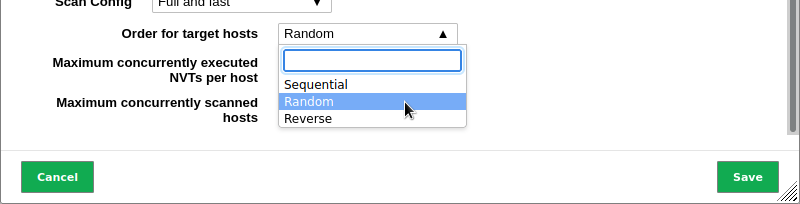
Fig. 16.2 Selecting the order for targets
16.3 Scan Queuing
When  is clicked for a task or an audit, it is added to a waiting queue and gets the status Queued.
The scanner only begins the scan if sufficient system resources are available.
The available resources depend on the appliance model, the GOS version used, and the current workload of the system.
Additionally, the queued scans are started at 1 minute intervals to avoid overloading the system.
is clicked for a task or an audit, it is added to a waiting queue and gets the status Queued.
The scanner only begins the scan if sufficient system resources are available.
The available resources depend on the appliance model, the GOS version used, and the current workload of the system.
Additionally, the queued scans are started at 1 minute intervals to avoid overloading the system.
The most relevant resource for scanning is random-access memory (RAM). Each scan requires a certain minimum of RAM to be executed properly because the same scan process cannot handle multiple scans from different users or even from the same user. RAM has physical limits and cannot be shared in a satisfactory way.
CPU, network connection and disk I/O are relevant system resources as well. However, unlike RAM, they can be shared at the cost of slower scan execution.
Warning
If a high number of tasks is started at the same time, for example by the same schedule, the scan queue will not take effect before the RAM is exceeded. This can have a negative impact on system performance, and can cause system crashes.
The system performance charts provide detailed information about the RAM over time (see Chapter 16.1).
In some cases, tasks/audits remain in the waiting queue:
Too many tasks/audits are started and running at the same time and not enough RAM is available.
The appliance is performing a feed update and is currently loading new VTs.
The appliance was just started and is currently loading the VTs.
When the required RAM is available again, or the loading of the VTs is finished, tasks/audits from the waiting queue are started, following the principle “first in, first out”.
In master-sensor setups, the workload management is subject to both the master and the sensor. Each sensor manages the scan queue as described above and expends resources for executing the vulnerability tests of the scan. The master expends resources for each sensor task that it has to manage.
Warning
If a high number of sensor tasks is started at the same time, for example by the same schedule, the scan queue will not take effect before the RAM is exceeded. This can have a negative impact on system performance, and can cause system crashes.
Footnotes