12 Managing Assets
The assets include hosts, operating systems, and TLS certificates. They are collected during vulnerability scans.
When creating a new task, it is possible to specify whether the host details collected during a scan should be stored in the asset database (see Chapter 9.2.2). The details are stored if the default task settings are used.
12.1 Creating and Managing Hosts
During a scan, information about each scanned host is collected. The hosts are identified by their IP addresses.
For each identified host it is checked whether it already exists in the hosts assets. If not, a new host asset is created.
Both when scanning a newly created host and when scanning an existing host, several host details (host names, IP and MAC addresses, operating systems, SSH keys and X.509 certificates) are added to the host asset as identifiers.
If vhost scanning is enabled – which it is by default – (see Chapter 9.13.4), each vhost will be added as its own asset entry. Thus, due to the nature of vhosts, IP address identifiers may appear multiple times. Such assets must then be distinguished by their other host identifiers.
12.1.1 Creating a Host
Hosts can also be manually added to the asset management to create targets from them (see Chapter 12.1.3).
Except for the IP address, no other details about the host can be defined but further details will be added when scanning the manually added host.
A host can be created as follows:
Select Assets > Hosts in the menu bar.
Create a new host by clicking
 in the upper left corner of the page.
Enter the IP address of the host in the input box Name (see Fig. 12.1).
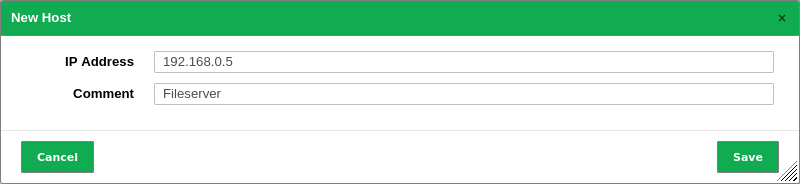
Fig. 12.1 Creating a new host
Click Save.
This feature is also available via GMP (see Chapter 14). The import of hosts from a configuration management database can be achieved using this option.
12.1.2 Managing Hosts
List Page
All existing hosts can be displayed by selecting Assets > Hosts in the menu bar (see Fig. 12.2).
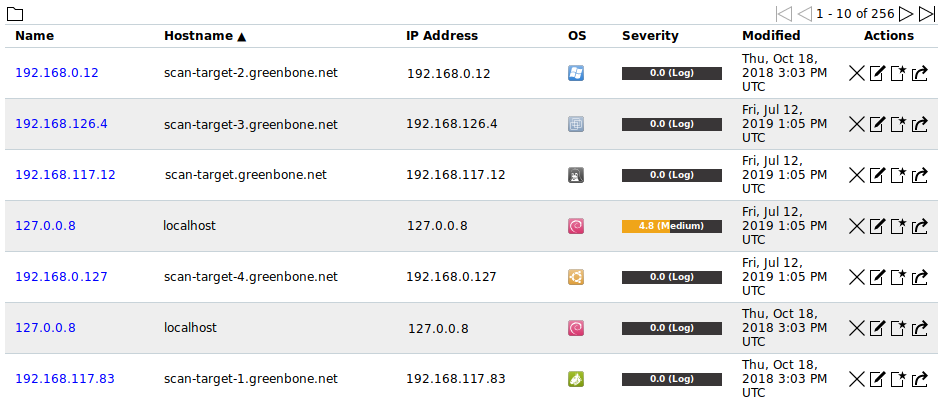
Fig. 12.2 Page Hosts displaying all scanned hosts
For all hosts the following actions are available:
 Delete the host.
 Edit the host.
- Create a new target from the host (see Chapter 12.1.3).
 Export the host as an XML file.
Note
By clicking , or below the list of hosts more than one host can be deleted, exported or used to create a new target at a time. The drop-down list is used to select which hosts are deleted, exported or used to create a new target.
Details Page
Click on the name of a host to display the details of the host. Click  to open the details page of the host.
The following registers are available:
- Information
General information about the host.
Any identifying information collected for the host during scans, for example, host names, IP and MAC addresses, operating systems, SSH keys and X.509 certificates, is displayed in the section All Identifiers (see Fig. 12.3).
Note
If identifiers have duplicates, only the latest identifiers are shown. In this case, the section is named Latest Identifiers and all identifiers can be displayed by clicking Show all Identifiers below the table.
For all host identifiers the following action is available:
- Delete the identifier.
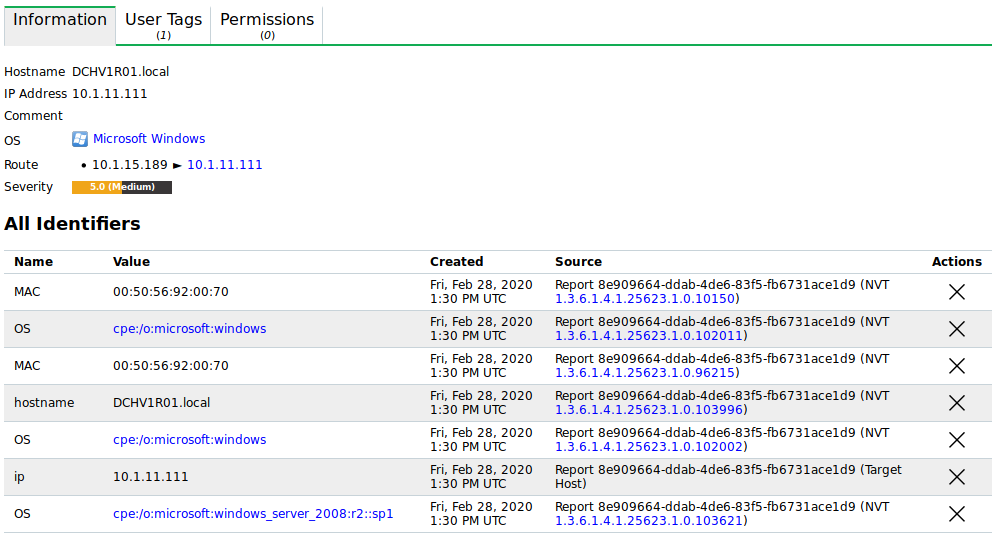
Fig. 12.3 All identifiers
- User Tags
Assigned tags (see Chapter 7.4).
- Permissions
Assigned permissions (see Chapter 8.4).
The following actions are available in the upper left corner:
 Open the corresponding chapter of the user manual.
 Show the list page of all hosts.
- Create a new host (see Chapter 12.1.1).
- Edit the host.
 Delete the host.
- Export the host as an XML file.
 Show the corresponding results.
12.1.3 Creating a Target from Hosts
A target with a set of hosts can be created as follows:
Filter the hosts so that only the hosts that should be used for the target (for example only Microsoft Windows hosts) are displayed (see Chapter 7.3).
Create a new target by clicking
below the list of hosts (see Fig. 12.4).→ The window for creating a target is opened. The input box Hosts is prefilled with the set of displayed hosts.
Fig. 12.4 Creating a target with the displayed hosts
Define the target and click Save.
Tip
For the information to enter in the input boxes see Chapter 9.2.1.
Note
If additional suitable hosts show up in further scans they will not be added to the target.
12.2 Managing Operating Systems
The operating systems view within the asset management provides a different view on the stored data. While the hosts view is centered on the individual hosts, this view focuses on the operating systems detected during all vulnerability scans.
Note
For a reliable operating system identification, VT(s) specific to the operating system(s) in question must be available in the Greenbone Enterprise Feed. If no specific VTs are available, the appliance still tries to identify the operating system(s), but the identification happens with a lower quality of detection and is prone to false-positive detections.
List Page
All operating systems can be displayed by selecting Assets > Operating Systems in the menu bar (see Fig. 12.5).
For all operating systems the following information is displayed:
- Name
CPE (see Chapter 13.2.2) of the operating system.
- Title
Plain name of the operating system.
- Severity – Latest
Severity detected for the operating system during the last scan that found this operating system on a host. Only hosts where the respective operating system was determined to be the best match are taken into account.
- Severity – Highest
Highest severity detected for the operating system during all scans that found this operating system on a host. Only hosts where the respective operating system was determined to be the best match are taken into account.
- Severity – Average
Average severity detected for the operating system during all scans that found this operating system on a host. Only hosts where the respective operating system was determined to be the best match are taken into account.
- Hosts – All
All hosts where the operating system was detected. By clicking on the number of hosts, the page Hosts is opened. A filter is applied to show only the hosts for which the selected operating system was detected.
- Hosts – Best OS
Hosts where the operating system was detected as the best match. By clicking on the number of hosts, the page Hosts is opened. A filter is applied to show only the hosts for which the selected operating system was detected as the best match.
- Modified
Date and time of last modification.
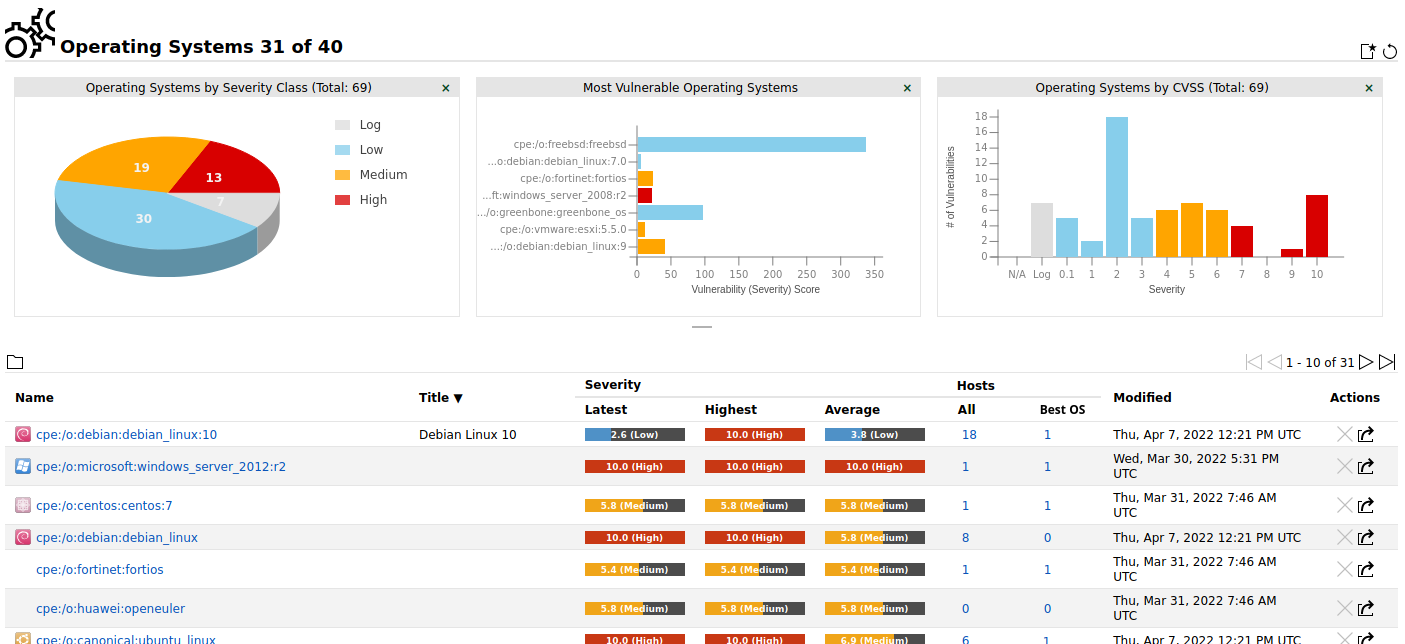
Fig. 12.5 Page Operating Systems displaying all scanned operating systems
For all operating systems the following actions are available:
- Delete the operating system. Only operating systems which are currently not used can be deleted.
- Export the operating system as an XML file.
Note
By clicking or below the list of operating systems more than one operating system can be deleted or exported at a time.
The drop-down list is used to select which operating systems are deleted or exported.
Details Page
Click on the name of an operating system to open the details page of the operating system.
The following registers are available:
- Information
General information about the operating system.
- User Tags
Assigned tags (see Chapter 7.4).
- Permissions
Assigned permissions (see Chapter 8.4).
The following actions are available in the upper left corner:
- Open the corresponding chapter of the user manual.
- Show the list page of all operating systems.
- Delete the operating system. Only operating systems which are currently not used can be deleted.
- Export the operating system as an XML file.
 (left) Show the hosts for which the operating system was detected.
- (right) Show the hosts for which the operating system is the best match.
12.3 Managing TLS Certificates
This view focuses on the TLS certificates collected during all vulnerability scans and provides a quick overview of whether they are valid or expired.
Note
Only basic certificate information (host, port, activation and expiry dates, fingerprints) is included.
There is no support for Online Certificate Status Protocol (OCSP) or Certificate Revocation List (CRL) functionalities.
List Page
All existing TLS certificates can be displayed by selecting Assets > TLS Certificates in the menu bar (see Fig. 12.6).
For all TLS certificates the following actions are available:
- Delete the TLS certificate.
 Download the TLS certificate.
- Export the TLS certificate as an XML file.
Note
By clicking or below the list of TLS certificates more than one TLS certificate can be deleted or exported at a time.
The drop-down list is used to select which TLS certificates are deleted or exported.
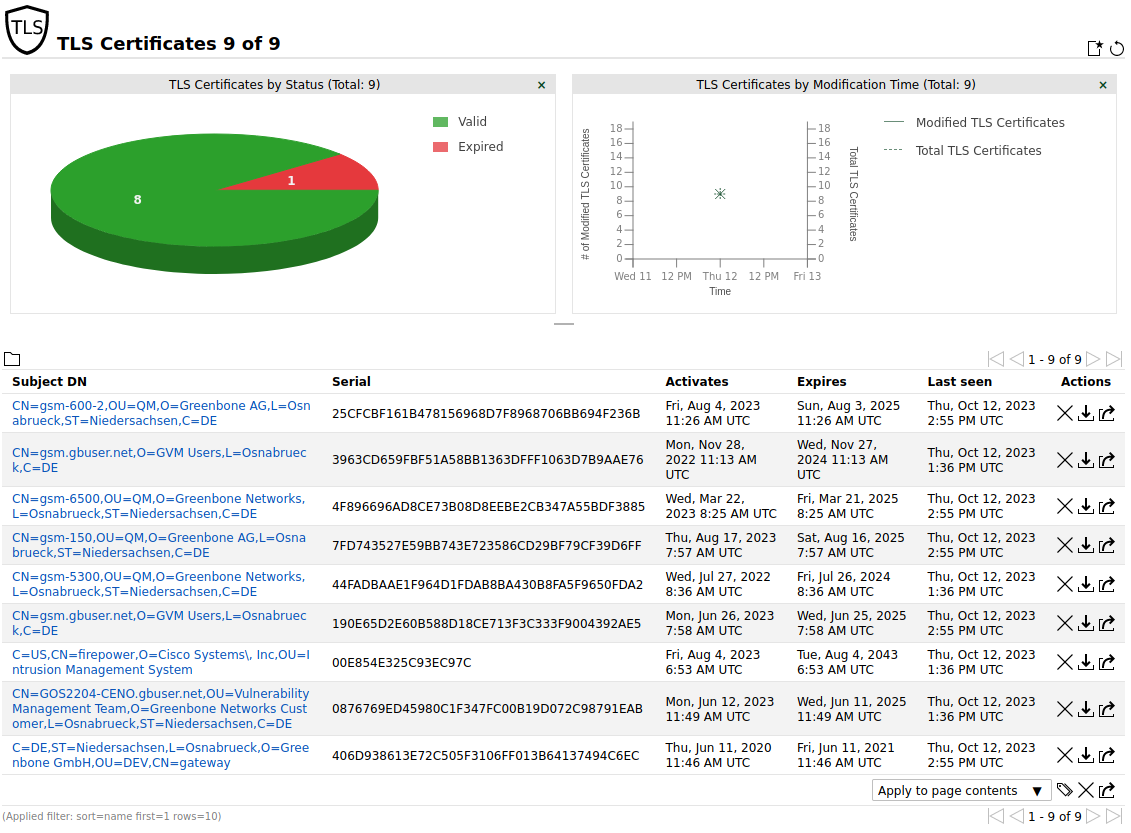
Fig. 12.6 Page TLS Certificates displaying all collected TLS certificates
Details Page
Click on the name of a TLS certificate to display the details of the TLS certificate. Click to open the details page of the TLS certificate.
The following registers are available:
- Information
General information about the TLS certificate.
- User Tags
Assigned tags (see Chapter 7.4).
- Permissions
Assigned permissions (see Chapter 8.4).
The following actions are available in the upper left corner:
- Open the corresponding chapter of the user manual.
- Show the list page of all TLS certificates.
- Delete the TLS certificate.
- Download the TLS certificate.
- Export the TLS certificate as an XML file.