
9. Managing the Web Interface Access
Note
This chapter documents all possible menu options.
However, not all GSM types support all of these menu options. Check the tables in Chapter 3 to see whether a specific feature is available for the used GSM type.
9.1. Users
The Greenbone Security Manager (GSM) allows for the definition and management of multiple users with different roles and permissions. When initializing the GSM, the first user – the web/scan administrator – is already created in the GOS administration menu. With this user, additional users can be created and managed.
- Roles
- The GSM user management supports a role based permission concept when accessing the web interface. Various roles are already set up by default. Additional roles can be created and used by an administrator. The role defines which options of the web interface can be viewed and modified by the user. The role enforcement is not implemented in the web interface but rather in the underlying Greenbone Management Protocol (GMP) and so affects all GMP clients. Read and write access can be assigned to roles separately.
- Groups
- In addition to roles the GSM user management supports groups as well. This serves mainly for logical grouping.
Groups and roles may be used to assign permissions to several users at once.
Each user is assigned an IP address range containing the allowed or denied targets. The GSM appliance will refuse to scan any other IP addresses than the ones specified. Similarly, the access to specific interfaces of the GSM appliance can be allowed or denied.
The user management is completely done with the GSM. External sources for the user management are not supported. However, to support central authentication and to allow password synchronization the GSM can be integrated with a central LDAP or RADIUS server (see Chapter 9.5). The server will only be used to verify the password during the login process of the user. All other settings are performed in the user management of the GSM.
9.1.1. Creating and Managing Users
9.1.1.1. Creating a User
Users can be created as follows:
Note
Only administrators are allowed to create and manage additional users.
Log in as an administrator.
Select Administration > Users in the menu bar.
Create a new user by clicking
 .
.Define the user (see Fig. 9.1).
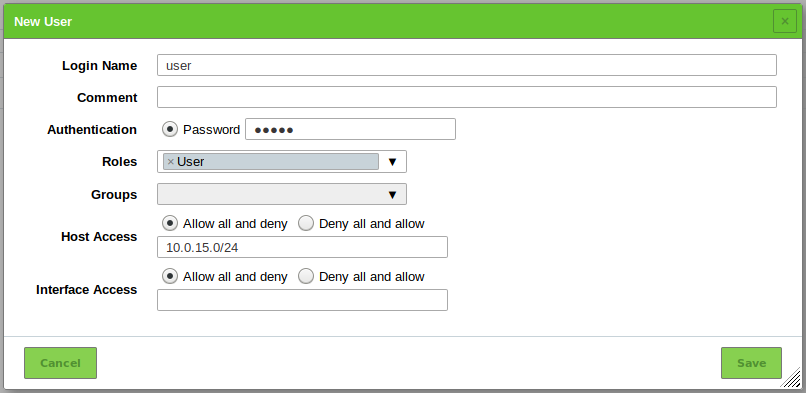
Fig. 9.1 Creating a new user
Click Create.
→ The user is created and displayed on the page Users.
The following details of the user can be defined:
- Login Name
- This is the name used for logging in. When an LDAP or a RADIUS server is used for central password management, the user needs to be created with the identical name (rDN) as used by the server (see Chapter 9.5). The name can contain letters and numbers and can be at most 80 characters long.
- Authentication
This is the password used for logging in. The password can contain any type of character and can be at most 40 characters long.
Note
When using special characters, note that they have to be available on all used keyboards and operating systems.
Note
When a central user management is used, more options are available (see Chapter 9.5).
- Roles
Each user can have multiple roles. The roles define the permissions of a user when using GMP. The roles Admin, User, Info, Observer, Guest and Monitor are available. Additionally, it is possible to add and configure custom roles (see Chapter 9.2.2).
If a user with a custom role should be able to use the web interface, at least the following permissions are necessary for that role:
- authenticate
- get_settings
- help
For further details see Chapter 9.2.
- Groups
- Each user can be a member of multiple groups. Permissions management can be performed using groups as well (see Chapter 9.4).
- Host Access
Hosts on which the user is allowed to run scans. The restrictions also apply to administrators but they are allowed to remove them themselves. Normal users (User) and roles without access to the user management cannot circumvent the restrictions. Basically either a whitelist (deny all and allow) or a blacklist (allow all and deny) is possible.
- Whitelist
- The scanning of all systems is denied in general. Only explicitly listed systems are allowed to be scanned.
- Blacklist
- The scanning of all systems is allowed in general. Only explicitly listed systems are not allowed to be scanned.
Tip
In general the whitelist methodology should be used. This ensures that users do not scan systems lying beyond their responsibility, located somewhere on the Internet or reacting to malfunctioning scans by accident.
System names as well as IPv4 and IPv6 addresses can be entered. Individual IP addresses as well as address ranges and network segments can be specified. The following listing shows some examples:
- 192.168.15.5 (IPv4 address)
- 192.168.15.5-192.168.15.27 (IPv4 range long form)
- 192.168.15.5-27 (IPv4 range short form)
- 192.168.15.128/25 (CIDR notation)
- 2001:db8::1 (IPv6 address)
- 2001:db8::1-2001:db8::15 (IPv6 range long form)
- 2001:db8::1-15 (IPv6 range short form)
- 2001:db8::/120 (CIDR notation)
All options can be mixed and matched and entered as a comma-separated list. The netmask in the CIDR notation is restricted to a maximum of 20 IP addresses for IPv4 and 116 IP addresses for IPv6. In both cases the result is a maximum of 4096 IP addresses.
- Interface Access
- This refers to the input box Network Source Interface when creating a new task (see Chapter 10.2.2). If a task is bound to a certain network interface by its configuration and a user has no access to this network interface, the user is restricted from running the task successfully. A comma-separated list of network adapters can be entered. Similar to Host Access a whitelist or a blacklist methodology is possible (see above).
9.1.1.2. Managing Users
List Page
All existing users can be displayed by selecting Administration > Users in the menu bar when logged in as an administrator.
For all users the following information is displayed:
- Name
- Name of the user.
A global user is marked with

- Roles
- Role of the user (see Chapter 9.2).
- Groups
- Groups to which the user belongs (see Chapter 9.3).
- Host Access
- Hosts on which the user is allowed to run scans.
- Authentication Type
- Type of authentication: Local if a password is used, RADIUS or LDAP if a central user management is used (see Chapter 9.5).
For all users the following actions are available:
 Delete the user. Only users which are currently not logged in can be deleted.
 Edit the user.
 Clone the user.
 Export the user as an XML file.
Note
By clicking or below the list of users more than one user can be deleted or exported at a time. The drop-down-list is used to select which users are deleted or exported.
Details Page
Click on the name of a user to display the details of the user. Click  to open the details page of the user (see Fig. 9.2).
The following registers are available:
- Information
- General information about the user.
- User Tags
- Assigned tags (see Chapter 8.5).
- Permissions
- Permissions of the user or of other users/roles/groups to the resources of the user (see Chapter 9.4).
The following actions are available in the upper left corner:
 Open the corresponding chapter of the user manual.
 Show the list page of all users.
- Create a new user (see Chapter 9.1.1.1).
- Clone the user.
- Edit the user.
- Delete the user. Only users which are currently not logged in can be deleted.
- Export the user as an XML file.
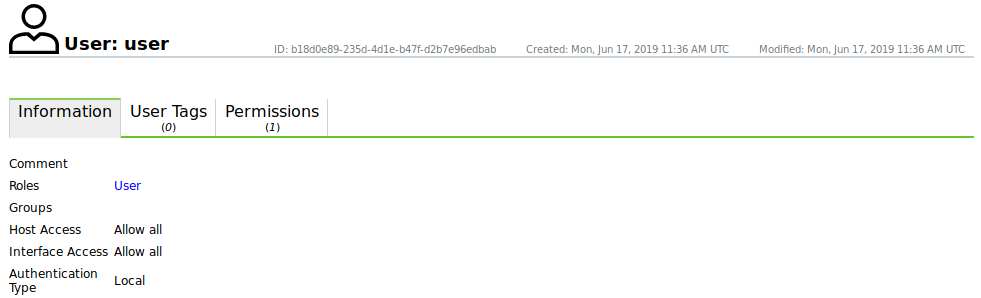
Fig. 9.2 Details of a user
9.1.2. Simultaneous Login
It is possible that two users are logged in at the same time.
If the same user wants to log in more than once at the same time, the login must be performed from a different PC or with a different browser. Another login in the same browser invalidates the first login.
9.1.3. Creating a Guest Login
The guest user is only allowed restricted access to the web interface.
To allow the guest access, a user can be created and assigned the role Guest (see Chapter 9.1.1).
Having knowledge of the password the guest user can now log in and is presented with the page Dashboards.
To allow a guest to log in without needing a password, this feature has to be activated in the GOS administration menu (see Chapter 7.2.1.4).
9.2. Roles
The web interface supports the creation and configuration of own user roles.
The following roles are available by default:
- Admin
- This role has all permissions by default. It is especially allowed to create and manage other users, roles and groups.
- User
- This role has all permissions by default except for user, role and group management. This role is not allowed to synchronize and manage the feeds. In the web interface there is no access to the page Administration.
- Info
- This role (Information Browser) has only read access to the NVTs and SCAP information. All other information is not accessible. The role can modify personal setting, e.g. change the password.
- Guest
- This role corresponds with the role Info but is not allowed to change the user settings.
- Monitor
- This role has access to system reports of the GSM (see Chapter 17.1).
- Observer
- This role has read access to the system but is not allowed to start or create new scans. It has only read access to the scans for which it has been set as an observer.
- Super Admin
- This role has access to all objects of all users. It has no relation to the super user (su/root) in the GOS administration menu. This role cannot be configured in the web interface but in the GOS administration menu (see Chapter 9.2.5).
Note
Only administrators are allowed to create and manage additional roles.
Note
Modifying the default roles is not possible but they can be copied (cloned) and subsequently modified.
This ensures consistent behaviour when updating the software.
9.2.1. Cloning an Existing Role
When an existing role closely reflects the demands, a new role can be created by cloning the existing role:
Log in as an administrator.
Select Administration > Roles in the menu bar.
In the row of an existing role click
.In the row of the clone click
.Enter the name of the role in the input box Name (see Fig. 9.3).
Select the users that should have the role in the drop-down-list Users.
Add a permission by selecting it in the drop-down-list Name and clicking Create Permission.
Add a super permission by selecting the respective group in the drop-down-list Group and clicking Create Permission.
Delete a permission by clicking
 in the list General Command Permissions.
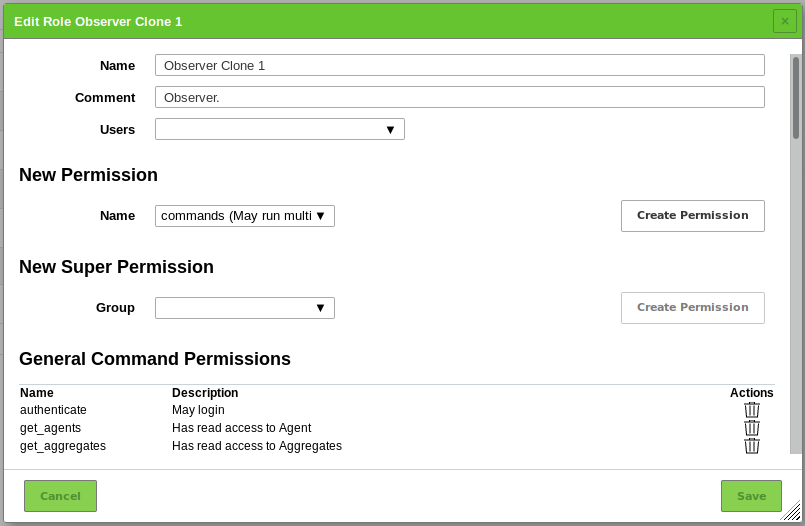
Fig. 9.3 Editing a cloned role
Click Save.
9.2.2. Creating a Role
When a role with only limited functionality should be created, it can be started with a new, empty role:
Log in as an administrator.
Select Administration > Roles in the menu bar.
Create a new role by clicking
.Define the role.
The following details of the role can be defined:
- Name
The name of the role can contain letters and numbers and can be at most 80 characters long.
- Comment (optional)
A comment describes the role in more detail.
- Users
The users with this role can be selected in the drop-down-list Users. Alternatively, roles can be managed in the user profile (see Chapter 9.1.1).
Click Save.
→ The role is created and displayed on the page Roles.
In the row of the newly created role click
.Add a permission by selecting it in the drop-down-list Name and clicking Create Permission.
Note
If users with the role should be able to use the web interface, at least the following permissions are necessary:
- authenticate
- get_settings
- help
The permission write_settings allows users to change their own password, time zone and other personal settings.
Add a super permission by selecting the respective group in the drop-down-list Group and clicking Create Permission.
Delete a permission by clicking
in the list General Command Permissions.Click Save.
Note
Some permissions are required:
- authenticate and get_settings
- These permissions are necessary to log in to the web interface.
- write_settings (optional)
- This allows a user to change its own password, time zone and other personal settings.
9.2.3. Managing Roles
List Page
All existing roles can be displayed by selecting Administration > Roles in the menu bar.
For all roles the following information is displayed:
- Name
- Name of the role.
A global role is marked with .
For all roles the following actions are available:
- Delete the role. Only self-created roles can be deleted.
- Edit the role. Only self-created roles can be edited.
- Clone the role.
- Export the role as an XML file.
Note
By clicking or below the list of roles more than one roles can be deleted or exported at a time. The drop-down-list is used to select which roles are deleted or exported.
Details Page
Click on the name of a role to display the details of the role. Click to open the details page of the role.
The following registers are available:
- Information
- General information about the role.
- General Command Permissions
- GMP commands that can be executed by this role.
- User Tags
- Assigned tags (see Chapter 8.5).
- Permissions
- Permissions of the role or of other users/roles/groups to the role’s resources (see Chapter 9.4).
The following actions are available in the upper left corner:
- Open the corresponding chapter of the user manual.
- Show the list page of all roles.
- Create a new role (see Chapter 9.2.2).
- Clone the role.
- Edit the role. Only self-created roles can be edited.
- Delete the role. Only self-created roles can be deleted.
- Export the role as an XML file.
9.2.4. Assigning Roles to a User
A user can have more than one role to group permissions.
The roles are assigned when creating a new user (see Fig. 9.4, see Chapter 9.1.1). If more than one role is assigned to a user, the permissions of the roles will be added.
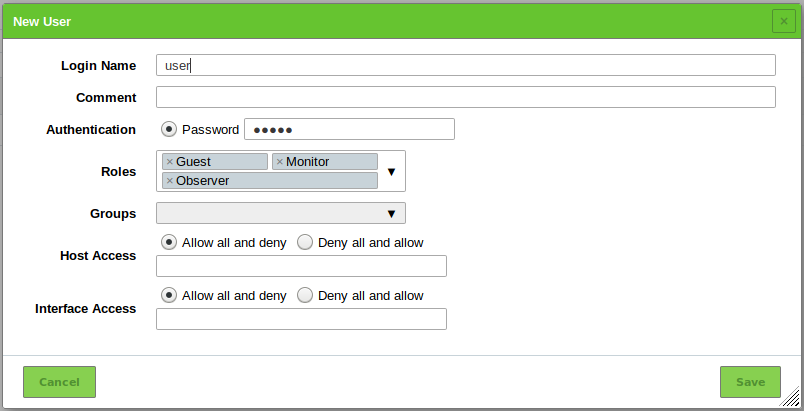
Fig. 9.4 Creating a new user with multiple roles
9.2.5. Creating a Super Administrator
The role Super Admin is the highest level of access.
The role Admin is allowed to create, modify and delete users. Additionally, it can view, modify and delete permissions but is subordinated to those permissions as well. If any user creates a private scan configuration but does not share it, the administrator cannot access it.
The role Super Admin is more suited for diagnostic purposes. The super administrator is excluded from permission restrictions and allowed to view and edit any configuration settings of any user.
The super administrator has to be created in the GOS administration menu (see Chapter 7.2.1.5)
Note
The super administrator can only be edited by the super administrator.
9.3. Groups
Groups are used to logically assemble users. An unlimited number of groups can be created.
Permissions can be assigned for the groups (see Chapter 9.4). By default, no groups are set up.
9.3.1. Creating a Group
A group can be created as follows:
Note
Only administrators are allowed to create and manage groups.
Log in as an administrator.
Select Administration > Groups in the menu bar.
Create a new group by clicking
.Define the group (see Fig. 9.5).
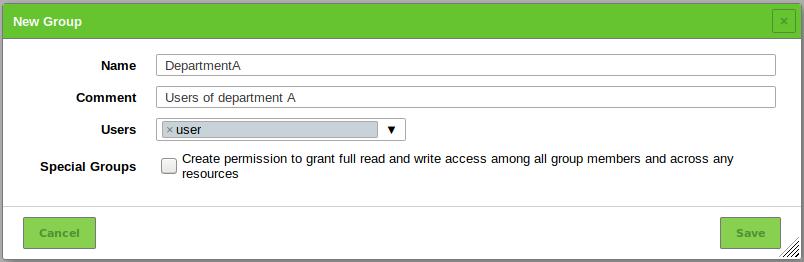
Fig. 9.5 Creating a new group
Click Save.
→ The group is created and displayed on the page Groups.
The following details of the group can be defined:
- Name
- The name of the group can contain letters and numbers and can be at most 80 characters long.
- Comment (optional)
- A comment describes the group in more detail.
- Users
- The members of the group can be selected in the drop-down-list Users. Alternatively, group memberships can be managed in the user profile (see Chapter 9.1.1).
- Special Groups
- Activate the checkbox if all group members should have read and write access to all resources of the group.
9.3.2. Managing Groups
List Page
All existing groups can be displayed by selecting Administration > Groups in the menu bar.
For all groups the following information is displayed:
- Name
- Name of the group.
For all groups the following actions are available:
- Delete the group.
- Edit the group.
- Clone the group.
- Export the group as an XML file.
Note
By clicking or below the list of groups more than one group can be deleted or exported at a time. The drop-down-list is used to select which groups are deleted or exported.
Details Page
Click on the name of a group to display the details of the group. Click to open the details page of the group.
The following registers are available:
- Information
- General information about the group.
- User Tags
- Assigned tags (see Chapter 8.5).
- Permissions
- Permissions of the group or of other users/roles/groups to the resources of the group (see Chapter 9.4).
The following actions are available in the upper left corner:
- Open the corresponding chapter of the user manual.
- Show the list page of all groups.
- Create a new group (see Chapter 9.3.1).
- Clone the group.
- Edit the group.
- Delete the group.
- Export the group as an XML file.
9.4. Permissions
Select Configuration > Permissions to display all permissions assigned on the system. If multiple roles are created, there can easily be hundreds of permissions.
Each permission relates to exactly one subject. A permission enables a subject to perform an associated action.
Subjects can be of the following types:
- Users
- Roles
- Groups
There are two types of permissions:
- Command permissions
- Command permissions are linked to the Greenbone Management Protocol (GMP).
Each command permission applies to a specific GMP command.
The name of the permission is the relevant command.
A command permission is either a command level permission or a resource level permission.
- Command level
- When no resource is specified, a command level permission is created. A command level permission allows the subject to run the given GMP command.
- Resource level
- When a resource is specified, a resource level permission is created. A resource level permission allows the subject to run the given GMP command on a specific resource.
- Super permissions
- (see Chapter 9.4.2)
9.4.1. Creating and Managing Permissions
Note
Usually, permissions are assigned in the web interface using the role management (see Chapter 9.2).
Creating and managing permissions using the page Permissions is only recommended to experienced users looking for a specific permission.
9.4.1.1. Creating a Permission
A new permission can be created as follows:
Select Configuration > Permissions in the menu bar.
Create a new permission by clicking
.Define the permission (see Fig. 9.6).
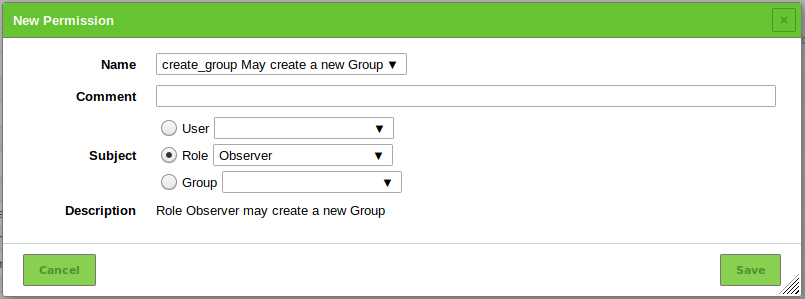
Fig. 9.6 Creating a new permission
Click Save.
→ The permission is created and displayed on the page Permissions.
The following details of the permission can be defined:
- Name
- Permission that should be granted.
- Comment (optional)
- A comment describes the permission in more detail.
- Subject
- Subject (user, role or group) that should be granted with the permission.
Note
The subjects for which permissions can be assigned depend on the role of the currently logged in user. Users can grant permissions to other users, whereas administrators can grant permissions to users, roles and groups.
- Resource Type (only for the permission Super (Has super access))
- Resource type (user, role or group) to which the user/role/group has super access.
- User/role/group ID (only for the permission Super (Has super access))
- ID of the user/role/group to which the user/role/group has super access.
- Description
- Textual description of the permission.
9.4.1.2. Creating Permissions from the Resource Details Page
When accessing a resource details page, e.g. the detail page of a task, permissions for the resource can be granted directly on the details page as follows:
Open the details page of a resource.
Example: Select Scans > Tasks in the menu bar.
Click on the name of a task.
Click
to open the details page of the task.Click on the register Permissions.
Click
in the opened section Permissions.Define the permission (see Fig. 9.7).
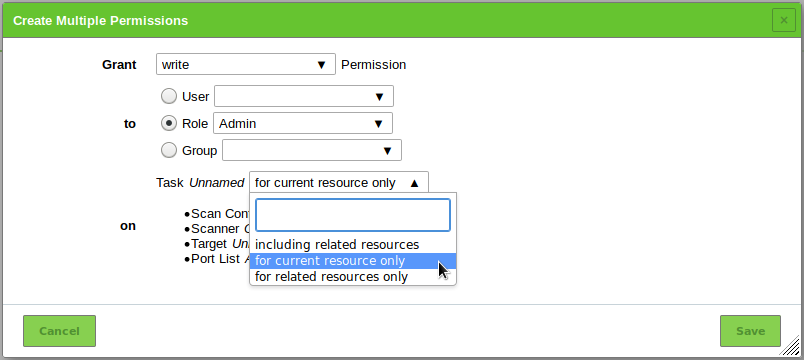
Fig. 9.7 Creating a permission from the resource details page
Click Save.
→ The permission is created and displayed in the section Permissions on the resource details page.
There are two types of permissions that can be granted directly on the resource details page:
- read
- Granting the permission read means allowing to view the resource on list pages and on its details page.
- write
- Granting the permission write means allowing to view and modify (but not delete) the resource.
Some resource types include additional permissions:
- Tasks
- When granting the permission write for a task, the permissions to start (start_task), stop (stop_task) and resume (resume_task) the task are added automatically.
- Alerts
- When granting the permission write for an alert, the permission to test the alert (test_alert) is added automatically.
- Report formats and scanners
- When granting the permission write for a report format or a scanner, the permissions to verify the report format (verify_report_format) or the scanner (verify_scanner) is added automatically.
For some resource types it can be selected whether the permissions should also be granted for related resources (see Fig. 9.7).
- Tasks
- For tasks this includes alerts and their filters, the target as well as its related credentials and port list, the schedule, the scanner and the scan configuration.
- Targets
- For targets this includes credentials and the port list.
- Alerts
- For alerts this includes the filter that is used on the report.
Note
Permissions can also be created only for the related resources.
The details of the related resources are displayed below the drop-down-list.
9.4.1.3. Managing Permissions
List Page
All existing permissions can be displayed by selecting Configuration > Permissions in the menu bar.
For all permissions the following information is displayed:
- Name
- Name of the permission.
A global permission is marked with .
- Description
- Textual description of the permission.
- Resource Type
- Resource type to which the user/role/group has access.
- Resource
- Name of the resource to which the user/role/group has access.
- Subject Type
- Subject type (user/role/group) that is granted with the permission.
- Subject
- Subject that is granted with the permission.
For all permissions the following actions are available:
- Delete the permission. Only self-created permissions can be deleted.
- Edit the permission. Only self-created permissions can be edited.
- Clone the permission. Only self-created permissions can be cloned.
- Export the permission as an XML file.
Note
By clicking or below the list of permissions more than one permission can be deleted or exported at a time. The drop-down-list is used to select which permissions are deleted or exported.
Details Page
Click on the name of a permission to display the details of the permission. Click to open the details page of the permission.
The following registers are available:
- Information
- General information about the permission.
- User Tags
- Assigned tags (see Chapter 8.5).
The following actions are available in the upper left corner:
- Open the corresponding chapter of the user manual.
- Show the list page of all permissions.
- Create a new permission (see Chapter 9.4.1.1).
- Clone the permission. Only self-created permissions can be cloned.
- Edit the permission. Only self-created permissions can be edited.
- Delete the permission. Only self-created permissions can be deleted.
- Export the permission as an XML file.
9.4.2. Granting Super Permissions
Any resource created on the GSM (e.g. task, scan configuration or target) is either global or owned by a specific user.
Global resources are identified by .
Non-global resources can be viewed and used only by their owner. Individual permissions are necessary to make the resources available to other users which is quite tedious.
To avoid that, users, roles and groups can be assigned with super permissions. This makes all objects of other users, roles or groups accessible.
A user can get super permissions for:
- User
- Role
- Group
- Any
These super permissions allow complete access to any resource of the respective user, role, group or effectively all resources.
Note
The super permission Any cannot be set explicitly. It is restricted to the super administrator (see Chapter 9.2.5) and can only be set by creating such.
A user can only set super permissions for self-created objects. Only the super administrator can grant super permissions to any other user, role or group.
Click on the name of the user/role/group on the page Users/Roles/Groups for which super permissions should be assigned.
Open the details page by clicking
.→ The resource ID can be found in the upper right corner (see Fig. 9.8).

Fig. 9.8 ID of a resource
Note or copy the ID.
Select Configuration > Permissions in the menu bar.
Create a new permission by clicking
.In the drop-down-list Name select Super (Has super access) (see Fig. 9.9).
Select the radiobutton of the subject type that should have super permissions.
In the according drop-down-list select the user/role/group that should have super permissions.
Select the resource type for which super permissions should be assigned in the drop-down-list Resource Type.
Enter or paste the previously determined resource ID into the input box ID.
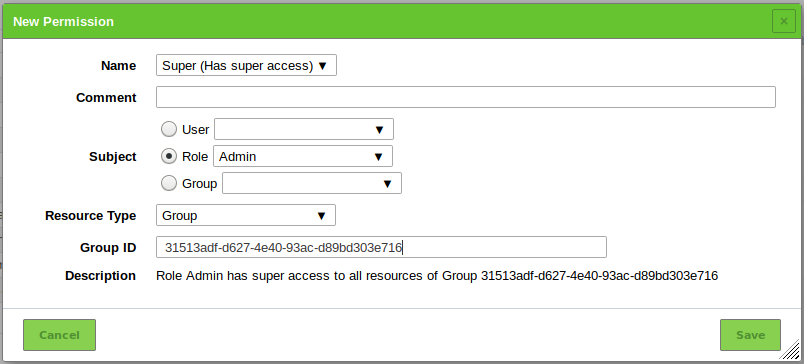
Fig. 9.9 Creating a new super permission
Click Save.
→ The super permission is created and displayed on the page Permissions.
Tip
Super permissions simplify the permission management on the GSM. They can easily be assigned for entire groups. This allows all users of a group to access all resources that are created by other members of the group.
9.4.3. Granting Read Access to Other Users
9.4.3.1. Requirements for Granting Read Access
Every user can share indefinite self-created resources.
To do so, the user requires the global get_users permission as well as the specific get_users permission for the respective user who should obtain read access.
Note
The easiest and recommended way to share self-created resources is to use an administrator account and to create the user accounts that should receive read access with this administrator account.
All other ways described here are cumbersome and time-consuming.
Requirements for Administrators
By default, administrators already have the global get_users permission.
The administrator can get the specific get_users permission for the account that should obtain read access in two ways:
- Create the account oneself because administrators automatically have the specific get_users permission for accounts they created.
- With the help of a super administrator.
A super administrator can grant specific get_users permissions to an administrator as follows:
Log in to the web interface as a super administrator (see Chapters 7.2.1.5 and 9.2.5).
Select Administration > Users in the menu bar.
Click on the name of the account who should obtain read access from the administrator.
Click
.Click on the register Permissions.
Create a new permission by clicking
in the section Permissions.Select read in the drop-down list Grant (see Fig. 9.10).
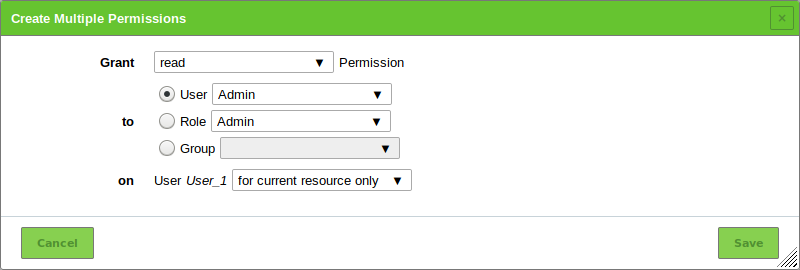
Fig. 9.10 Granting an administrator a specific get_users permission
Select the radio button User.
Select the administrator that should be able to grant read access in the drop-down list User.
Click Save.
→ The specific get_users permission is created and displayed in the list (see Fig. 9.11).
The administrator is now able to grant read access to the respective user as described in Chapter 9.4.3.2.

Fig. 9.11 Specific get_users permission for an administrator
Requirements for Regular Users
Regular users do not have the global get_users permission by default. It can be added as follows:
Log in to the web interface as an administrator.
Select Administration > Roles in the menu bar.
Create a new role by clicking
.Enter
GrantReadPrivin the input box Name.Click Save.
→ The role is created and displayed on the page Roles.
In the row of the newly created role click
.In the drop-down list Name in the section New Permission select get_users (see Fig. 9.12).
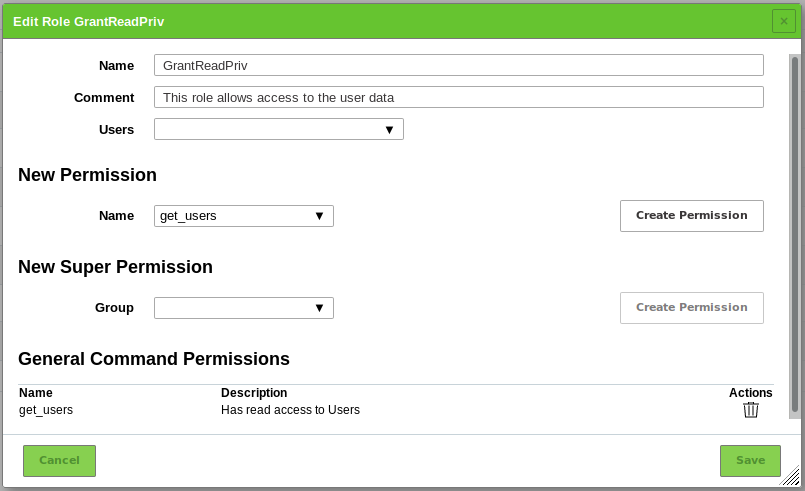
Fig. 9.12 Selecting permissions for a new role
Click Create Permission.
→ The permission is displayed in the section General Command Permissions (see Fig. 9.12).
Click Save.
Select Administration > Users in the menu bar.
In the row of the user which should be assigned the newly created role click
.In the drop-down list Roles add the role GrantReadPriv.
Click Save.
A super administrator can grant specific get_users permissions to a user as follows:
Log in to the web interface as a super administrator (see Chapters 7.2.1.5 and 9.2.5).
Select Administration > Users in the menu bar.
Click on the name of the account who should obtain read access from the user.
Click
.Click on the register Permissions.
Create a new permission by clicking
in the section Permissions.Select read in the drop-down list Grant (see Fig. 9.13).
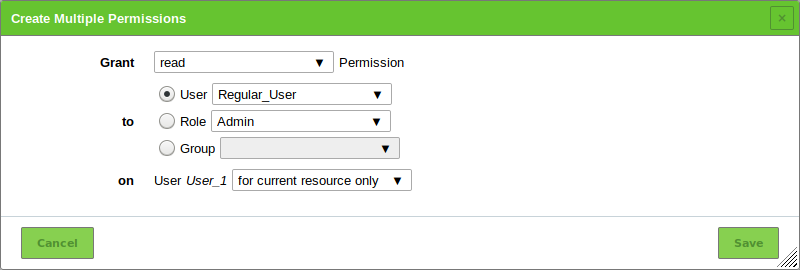
Fig. 9.13 Granting a user a specific get_users permission
Select the radio button User.
Select the user that should be able to grant read access in the drop-down list User.
Click Save.
→ The specific get_users permission is created and displayed in the list (see Fig. 9.14).
The user is now able to grant read access to the respective user as described in Chapter 9.4.3.2.

Fig. 9.14 Specific get_users permission for a user
9.4.3.2. Granting Read Access
When a user has the global and the specific get_users permission (see Chapter 9.4.3.1), the user can share resources as follows:
On the respective page click on the name of the resource which should be shared.
Open the details page by clicking
.→ The object ID can be found in the upper right corner (see Fig. 9.15).
Fig. 9.15 ID of a resource
Note or copy the ID.
Select Configuration > Permissions in the menu bar.
Create a new permission by clicking
.In the drop-down-list Name select the permission for the object to be shared.
- Filter: get_filters
- Scan configuration: get_configs
- Alert: get_alerts
- Note: get_notes
- Override: get_overrides
- Tag: get_tags
- Target: get_targets
- Task with report: get_tasks
- Schedule: get_schedules
Select the radiobutton User (see Fig. 9.16).
In the according drop-down list select the user the object should be shared with.
Enter or paste the previously determined resource ID in the input box ID.
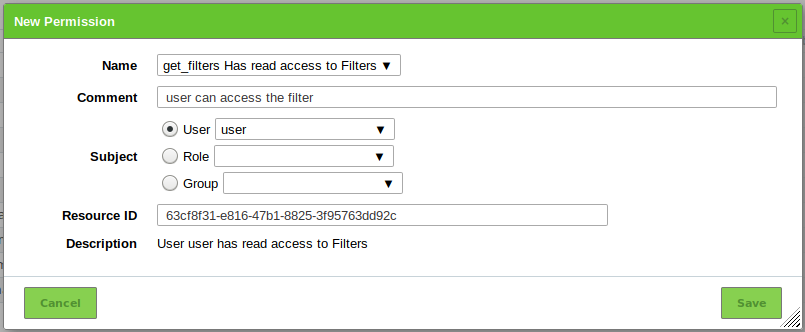
Fig. 9.16 Share objects with other users
Click Save.
→ The permission is created and displayed on the page Permissions.
Note
Additionally, resources can be shared with roles or groups.
For this, the global and specific permissions get_groups – granting read access to a group – or get_roles – granting read access to a role – are required and follow the same principle as described in Chapter 9.4.3.1.
Exception: users with a default role already have the specific get_roles permissions for all default roles.
9.5. Using a Central User Management
Especially in larger environments with multiple users it is often difficult to achieve password synchronization. The effort to create new or reset passwords is often very high. To avoid this, the GSM supports the usage of a central password store using LDAP or RADIUS.
The GSM will use the service only for authentication on a per user basis, i.e. users who should be able to authenticate by the service have to be configured for authentication and to exist on the GSM as well.
Note
Prerequisite for using central authentication is the naming of the users with the same names as the objects in the LDAP tree or the RADIUS server.
9.5.1. LDAP
For the connection to an LDAP tree the GSM uses a very simple interface and a simple bind operation with a hard coded object path. The LDAP authentication is done as follows:
Log in as an administrator.
Select Administration > LDAP in the menu bar.
Click
.Activate the checkbox Enable (see Fig. 9.17).
Enter the LDAP host in the input box LDAP Host.
Note
Only one system can be entered by IP address or by name.
The GSM accesses the LDAP host using SSL/TLS. For verifying the host, the certificate of the host has to be uploaded to the GSM. Without SSL/TLS the LDAP authentication will not be accepted (see Chapter 9.5.2).
Enter the distinguished name (DN) of the objects in the input box Auth. DN.
Note
The wildcard
%sreplaces the user name.Examples for the Auth. DN are:
cn=%s,ou=people,dc=domain,dc=de- This format works for any LDAP server with the correct attributes. The attribute cn (common name) is used. Users in different sub trees or different recursive depths of an LDAP tree are not supported. All users logging into the GSM must be in the same branch and in the same level of the LDAP tree.
uid=%s,ou=people,dc=domain,dc=de- This format works for any LDAP server with the correct attributes. The attribute uid (user ID) is used as a filter. It should be in the first place. The attributes ou=people,dc=domain,dc=de are used as base objects to perform a search and to retrieve the corresponding DN.
%s@domain.de- This format is typically used by Active Directory. The exact location of the user object is irrelevant.
domain.de\%s- This format is typically used by Active Directory. The exact location of the user object is irrelevant.
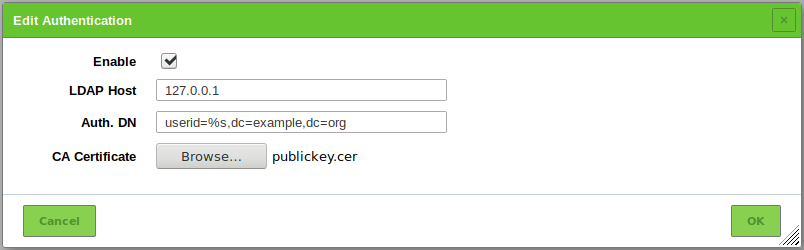
Fig. 9.17 Configuring an LDAP authentication
To verify the host, upload the certificate of the host by clicking Browse….
Click OK.
→ When the LDAP authentication is enabled, the option LDAP Authentication Only is available when creating or editing a user. By default, this option is disabled.
Create a new user or edit an existing user (see Chapter 9.1).
Activate the checkbox LDAP Authentication Only when the user should be allowed to authenticate using LDAP (see Fig. 9.18).
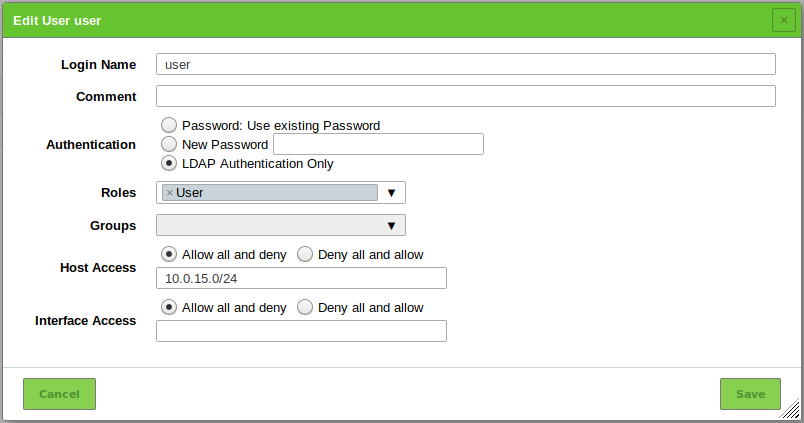
Fig. 9.18 Enabling authentication using LDAP
Note
The user has to exist with the same name in LDAP before the authentication with LDAP can be used. The GSM does not add, modify or remove users in LDAP and it does not automatically grant any user from LDAP access to the GSM.
9.5.2. LDAP with SSL/TLS
The GSM uses either the command StartTLS via LDAP on port 389 or SSL/TLS via LDAPS on port 636. The LDAP server must make its services available to SSL/TLS.
The following references are helpful for the exact configuration of all available LDAP servers:
- Microsoft: https://social.technet.microsoft.com/wiki/contents/articles/2980.ldap-over-ssl-ldaps-certificate.aspx
- OpenLDAP: http://www.openldap.org/doc/admin24/tls.html
To verify the identity of the LDAP server, the GSM has to trust the server’s certificate. For this, the certificate of the issuing certificate authority (CA) must be stored on the GSM.
To do so, the certificate of the CA must be exported as a Base64 encoded file.
A Base64 encoded certificate often has the file extension .pem. The file itself starts with ------BEGIN CERTIFICATE-------.
If the CA is an intermediate CA, the complete certificate chain needs to be imported. This is often true if an official CA is used because the Root CA is separated from the Issuing CA.
In these cases the contents of the file look as follows:
-----BEGIN CERTIFICATE-----
......
Issuing CA
......
-----END CERTIFICATE-----
-----BEGIN CERTIFICATE-----
......
Root CA
......
-----END CERTIFICATE-----
The actual location where the certificate can be found may vary based on the environment.
Univention Corporate Server (UCS)
Here the CA certificate is retrieved from the file
/etc/univention/ssl/ucsCA/CAcert.pem. This file already contains the certificate in the correct format and has to be uploaded when enabling LDAP.Active Directory LDAP
If the Active Directory LDAP service does not yet use LDAPS, the following article may be helpful: https://social.technet.microsoft.com/wiki/contents/articles/2980.ldap-over-ssl-ldaps-certificate.aspx.
The Active Directory LDAP CA certificate can then be exported as follows:
Note
The steps have to be executed from a desktop or server that has access to the CA console.
Open the CA console from any domain-joined computer or server.
Right click the name of the CA and select Properties.
In the CA certificates dialog box, select the tab General.
Select the certificate for the CA that should be accessed.
Click View Certificate.
In the dialog box Certificate, select the tab Certification Authority.
Select the name of the root CA and click View Certificate.
In the dialog box Certificate, select the tab Details.
Click Copy to File.
→ The certificate export wizard is opened.
Click Next.
Select Base-64 encoded X.509 (.CER) on the page Export File Format.
Click Next.
Enter the path and the name for the certificate in the input box File to Export.
Click Next.
Click Finish.
→ The CER file is created in the specified location. A dialog box informs that the export was successful.
Click OK.
The contents of the file must be uploaded when enabling LDAP.
Note
If the LDAP authentication does not work, verify that the entry in LDAP Host matches the commonName of the certificate of the LDAP server. If there are deviations, the GSM refuses using the LDAP server.
9.5.3. RADIUS
The RADIUS authentication is done as follows:
Log in as an administrator.
Select Administration > Radius in the menu bar.
Click
.Activate the checkbox Enable.
Enter the host name or IP address of the RADIUS server in the input box RADIUS Host.
Enter the common preshared secret key in the input box Secret Key.
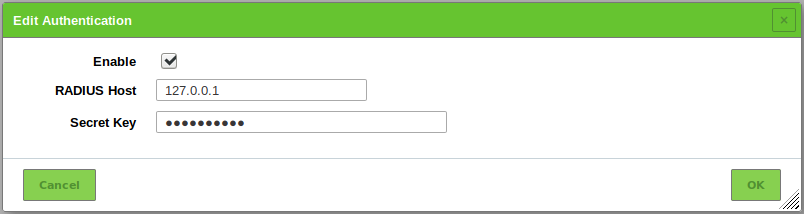
Fig. 9.19 Configuring a RADIUS authentication
Click OK.
→ When the RADIUS authentication is enabled, the option RADIUS Authentication Only is available when creating or editing a user. By default, this option is disabled.
Create a new user or edit an existing user (see Chapter 9.1).
Activate the checkbox RADIUS Authentication Only when the user should be allowed to authenticate using RADIUS (see Fig. 9.20).
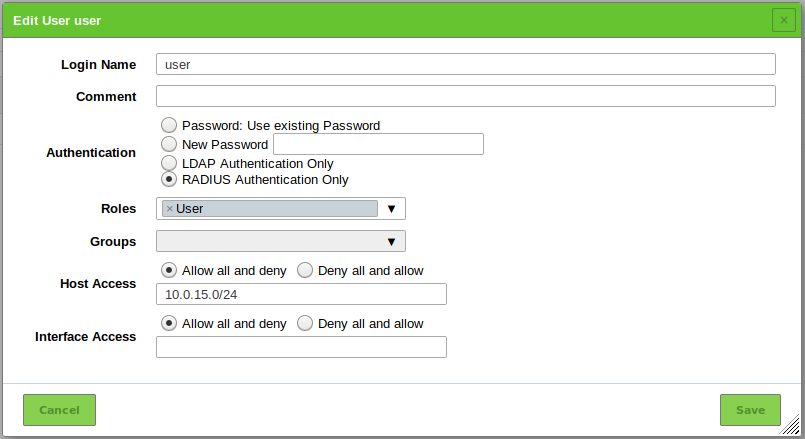
Fig. 9.20 Enabling authentication using RADIUS