
14. Performing Compliance Scans and Special Scans
In information technology (IT) compliance is the main approach for organizations to keep their information and assets protected and secure.
With cybercrime on the rise, governments see the need to protect the identities and assets of their citizens by passing rules and regulations on privacy and IT security. Information security bodies such as the Information Systems Audit and Control Association (ISACA) or the International Organization for Standardization (ISO) publish IT security standards, frameworks and guidelines.
These standards, frameworks and guidelines require organizations to implement the appropriate safeguards to protect themselves and their information assets from attacks. For implementation the organization has to create an IT security framework consisting of policies, standards, baselines, guidelines and detailed procedures.
Vulnerability assessment systems such as the Greenbone Security Manager (GSM) can assist IT security professionals to check their IT security safeguards for the standards, frameworks and guidelines mentioned above.
14.1. Generic Policy Scans
When performing policy scans, there are groups of four NVTs in the NVT family Policy that can be configured accordingly.
At least two of these four policy NVTs are required to run a policy scan.
The four NVT types are:
- Base
- This NVT performs the actual scan of the policy.
- Errors
- This NVT summarizes any items in which some errors occurred when running the base NVT.
- Matches
- This NVT summarizes any items which match the checks performed by the base NVT.
- Violations
- This NVT summarizes any items which did not match the checks performed by the base NVT.
Note
The base NVT must always be selected for a policy check since it performs the actual tests. The other three NVTs may be selected according to the needs. For example, if matching patterns are of no concern then only a NVT of the type Violations should be selected additionally.
14.1.1. Checking File Content
File content checks belong to policy audits which do not explicitly test for vulnerabilities but rather test the compliance of file contents (e.g. configuration files) regarding a given policy.
The GSM provides a policy module to check if a file content is compliant with a given policy.
In general, this is an authenticated scan, i.e. the scan engine will have to log into the target system to perform the check (see Chapter 10.3).
The file content check can only be performed on systems supporting the command grep. Normally this means Linux or Linux-like systems.
Four different NVTs in the NVT family Policy provide the file content check:
- File Content: This NVT performs the actual file content check.
- File Content: Errors: This NVT shows the files in which errors occurred (e.g. the file is not found on the target system).
- File Content: Matches: This NVT shows the patterns and files which passed the file content check (the predefined pattern matches in the file).
- File Content: Violations: This NVT shows the patterns and files which did not pass the file content check (the predefined pattern does not match in the file).
14.1.1.1. Checking File Content Patterns
- Create a reference file with the patterns to check. Following is an example:
filename|pattern|presence/absence
/tmp/filecontent_test|^paramter1=true.*$|presence
/tmp/filecontent_test|^paramter2=true.*$|presence
/tmp/filecontent_test|^paramter3=true.*$|absence
/tmp/filecontent_test_notthere|^paramter3=true.*$|absence
Note
This file must contain the row filename|pattern|presence/absence.
The subsequent rows each contain a test entry.
Each row contains three fields which are separated by |.
The first field contains the path and file name, the second field contains the pattern to check (as a regular expression) and the third field indicates if a pattern has to be present or absent.
In the row of the respective scan configuration click
 .
.In the section Edit Network Vulnerability Test Families click
for the NVT family Policy.→ All NVTs that allow special configuration are listed (see Fig. 14.1).
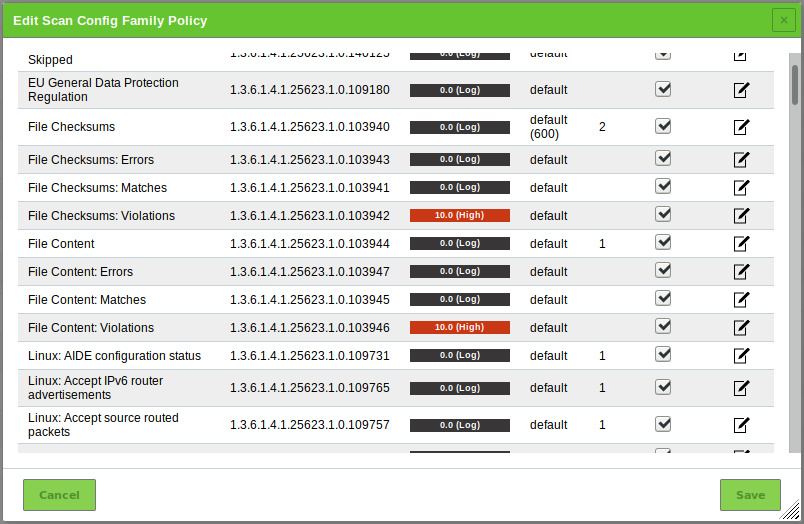
Fig. 14.1 Editing the family of NVTs
Click
for File Content.Activate the checkbox Upload file (see Fig. 14.2).
Tip
If a reference file was already uploaded, the checkbox Replace existing file is displayed instead. The possibility to change the reference file is only available if the scan configuration is currently not used.
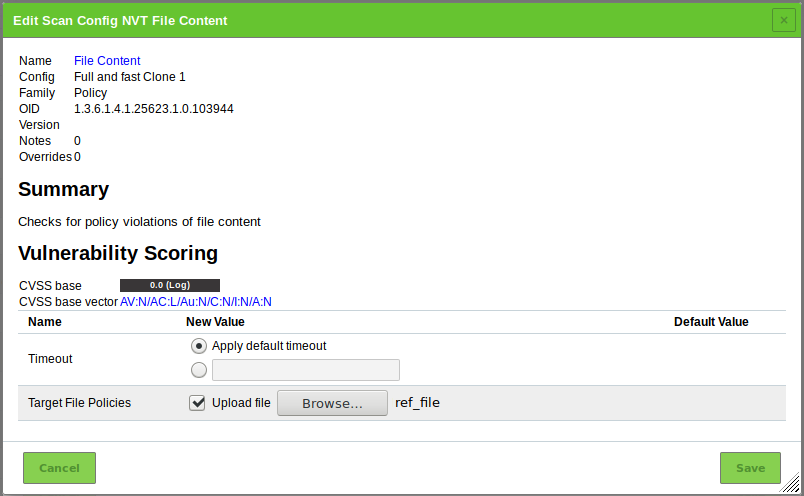
Fig. 14.2 Uploading the reference file
Click Browse… and select the previously created reference file.
Click Save to save the NVT.
Click Save to save the family of NVTs.
Click Save to save the scan configuration.
14.1.1.2. Changing the Severity
The severities of the NVTs depend on the GOS version used. Since GOS 4.2, the NVTs of the type Violations have a default severity of 10.
In the past, these NVTs had a default severity of 0 (log message) and overrides were required for different severities. The new default severity of 10 can be changed using overrides as well (see Chapter 11.8).
By sectioning into three different NVTs it is possible to create distinct overrides for the severity according to the needs.
In the following example the severities of File Content: Violations and File Content: Errors have been changed which will be shown in the reports accordingly (see Fig. 14.3).

Fig. 14.3 Overrides changing the severity
14.1.1.3. Example
Note
The overrides can be created either before or after a scan. The latter is easier since the appropriate override can be created through the result page (see Chapter 11.8.1.1).
Download policy_file_content_example.xml and the correspronding test file filecontent_test.
Important
External links to the Greenbone download website are case-sensitive.
Note that upper cases, lower cases and special characters have to be entered exactly as they are written in the footnotes.
Extract the test file to the
/tmp/directory of the target system.Select Scans > Tasks in the menu bar.
Create a task for the target on which the test file was saved by moving the mouse over
 and clicking New Task.
Note
The scan has to be an authenticated scan with the appropriate SSH credentials (see Chapter 10.3.2).
In the row of the newly created task click
 .
.
14.1.2. Checking Registry Content
The registry is a database in Microsoft Windows containing important information about system hardware, installed programs, settings and user accounts on the computer. Microsoft Windows continually refers to the information in the registry.
Due to the nature of the Microsoft Windows registry every program/application installed under Microsoft Windows will register itself in the Microsoft Windows registry. Even malware and other malicious code usually leave traces within the registry.
The registry can be utilized to search for specific applications or malware related information such as version levels and numbers. Also, missing or changed registry settings could point to a potential security policy violation on an endpoint.
The GSM provides a policy module to verify registry entries on target systems. This module checks for the presence or absence of registry settings as well as registry violations.
Since the registry is unique to Microsoft Windows systems, this check can only be run on these systems.
To access the registry on the target system an authenticated scan has to be run.
Four different NVTs in the NVT family Policy provide the registry content check:
- Windows Registry Check: This NVT performs the actual registry content check on the files.
- Windows Registry Check: Errors: This NVT shows the files in which errors occurred (e.g. registry content not found on the target system).
- Windows Registry Check: OK: This NVT shows the registry settings which passed the registry check (right registry content).
- Windows Registry Check: Violations: This NVT shows the registry content which did not pass the registry check (wrong registry content).
14.1.2.1. Checking Registry Content Patterns
- Create a reference file with the reference registry content. Following is an example:
Present|Hive|Key|Value|ValueType|ValueContent
TRUE|HKLM|SOFTWARE\Macromedia\FlashPlayer\SafeVersions|8.0|REG_DWORD|33
TRUE|HKLM|SOFTWARE\Microsoft\Internet Explorer
TRUE|HKLM|SOFTWARE\Microsoft\Internet Explorer|Version|REG_SZ|9.11.10240.16384
TRUE|HKLM|SOFTWARE\Microsoft\Windows\CurrentVersion\Policies\
 System|LocalAccountTokenFilterPolicy|REG_DWORD|1
FALSE|HKLM|SOFTWARE\Virus
TRUE|HKLM|SOFTWARE\ShouldNotBeHere
TRUE|HKLM|SOFTWARE\Macromedia\FlashPlayer\SafeVersions|8.0|REG_DWORD|*
Note
This file must contain the row Present|Hive|Key|Value|ValueType|ValueContent.
The subsequent rows each contain a test entry.
Each row contains six fields which are separated by |.
The first field sets whether a registry entry should be present or not, the second the hive the registry entry is located in, the third the key, the fourth the value, the fifth the value type and the sixth the value content. If a star * is used in the last column any value is valid and accepted for existence or non-existence.
In the row of the respective scan configuration click
.In the section Edit Network Vulnerability Test Families click
for the NVT family Policy.→ All NVTs that allow special configuration are listed (see Fig. 14.4).
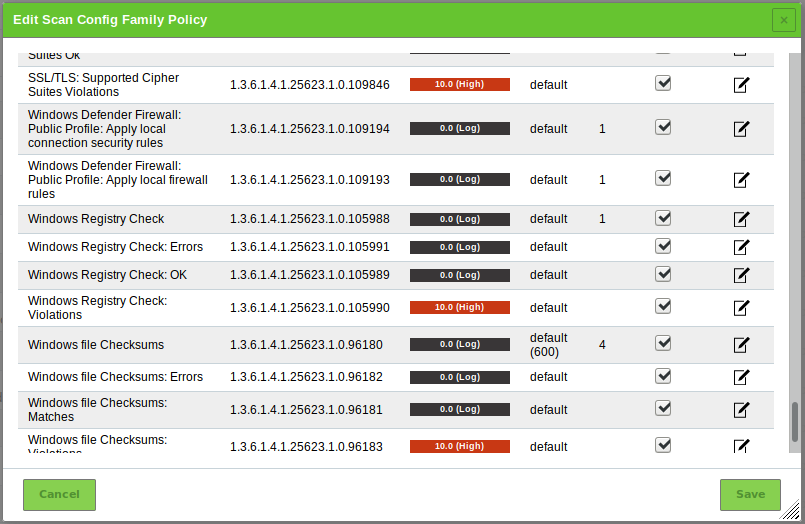
Fig. 14.4 Editing the family of NVTs
Click
for Windows Registry Check.Activate the checkbox Upload file (see Fig. 14.5).
Tip
If a reference file was already uploaded, the checkbox Replace existing file is displayed instead. The possibility to change the reference file is only available if the scan configuration is currently not used.
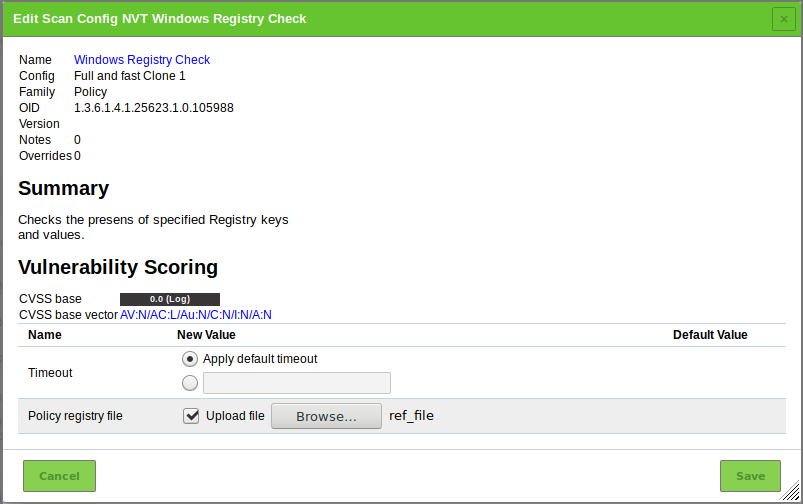
Fig. 14.5 Uploading the reference file
Click Browse… and select the previously created reference file.
Click Save to save the NVT.
Click Save to save the family of NVTs.
Click Save to save the scan configuration.
14.1.2.2. Changing the Severity
The severities of the NVTs depend on the GOS version used. Since GOS 4.2, the NVTs of the type Violations have a default severity of 10.
In the past, these NVTs had a default severity of 0 (log message) and overrides were required for different severities. The new default severity of 10 can be changed using overrides as well (see Chapter 11.8).
By sectioning into three different NVTs it is possible to create distinct overrides for the severity according to the needs.
In the following example the severities of Windows Registry Check: Violations and Windows Registry Check: Errors have been changed which will be shown in the reports accordingly (see Fig. 14.6).

Fig. 14.6 Overrides changing the severity
14.1.2.3. Example
Note
The overrides can be created either before or after a scan. The latter is easier since the appropriate override can be created through the result page (see Chapter 11.8.1.1).
Download policy_registry_ScanConfig.xml and the correspronding test file registry_test.
Important
External links to the Greenbone download website are case-sensitive.
Note that upper cases, lower cases and special characters have to be entered exactly as they are written in the footnotes.
Extract the test file to the
/tmp/directory of the target system.Select Scans > Tasks in the menu bar.
Create a task for the target on which the test file was saved by moving the mouse over
and clicking New Task.Note
The scan has to be an authenticated scan with the appropriate SSH credentials (see Chapter 10.3.2).
In the row of the newly created task click
.
14.1.3. Checking File Checksums
File checksum checks belong to policy audits which do not explicitly test for vulnerabilities but rather for file integrity.
The GSM provides a policy module to verify file integrity on target systems. This module checks the file content by MD5 or SHA1 checksums.
In general, this is an authenticated check, i.e. the scan engine will have to log into the target system to perform the check.
The file checksum check can only be performed on systems supporting checksums. Normally this means Linux or Linux-like systems. However, the GSM provides a module for checksum checks for Microsoft Windows systems as well (see Chapter 14.1.3.4).
Four different NVTs in the NVT family Policy provide the file checksum check:
- File Checksums: This NVT performs the actual checksum check on the files.
- File Checksums: Errors: This NVT shows the files in which errors occurred (e.g. file not found on the target system).
- File Checksums: Matches: This NVT shows the files which passed the checksum check (checksum matches).
- File Checksums: Violations: This NVT shows the files which did not pass the checksum check (wrong checksum).
14.1.3.1. Checking File Checksum Patterns
Create a reference file with the reference checksums. Following is an example:
Checksum|File|Checksumtype
6597ecf8208cf64b2b0eaa52d8169c07|/bin/login|md5
ed3ed98cb2efa9256817948cd27e5a4d9be2bdb8|/bin/bash|sha1
7c59061203b2b67f2b5c51e0d0d01c0d|/bin/pwd|md5
Note
This file must contain the row Checksum|File|Checksumtype.
The subsequent rows each contain a test entry.
Each row contains three fields which are separated by |.
The first field contains the checksum in hex, the second field the path and file name and the third field the checksum type. Currently MD5 and SHA1 checksums are supported.
Important
Checksums and checksum types must be lowercase.
In the row of the respective scan configuration click
.In the section Edit Network Vulnerability Test Families click
for the NVT family Policy.→ All NVTs that allow special configuration are listed (see Fig. 14.7).
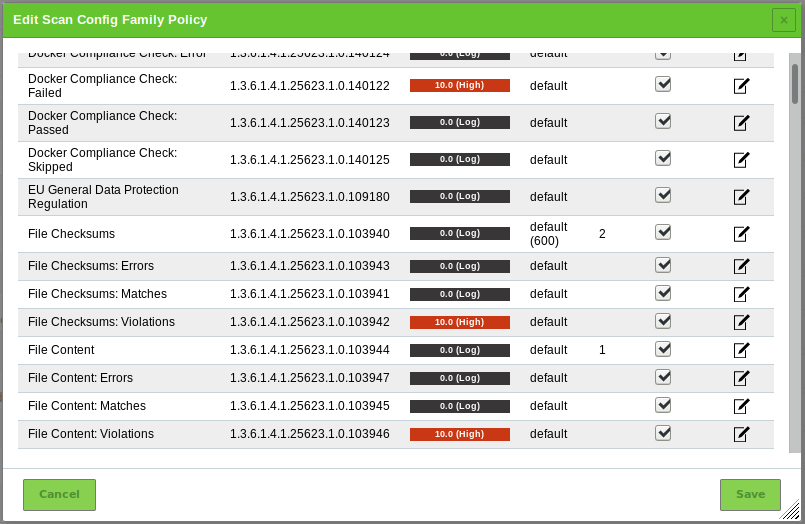
Fig. 14.7 Editing the family of NVTs
Click
for File Checksums.Activate the checkbox Upload file (see Fig. 14.8).
Tip
If a reference file was already uploaded, the checkbox Replace existing file is displayed instead. The possibility to change the reference file is only available if the scan configuration is currently not used.
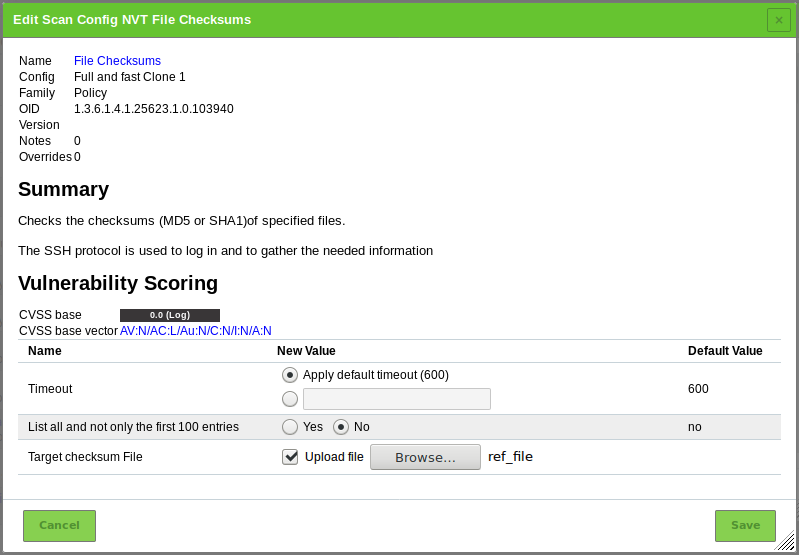
Fig. 14.8 Uploading the reference file
Click Browse… and select the previously created reference file.
Click Save to save the NVT.
Click Save to save the family of NVTs.
Click Save to save the scan configuration.
14.1.3.2. Changing the Severity
The severities of the NVTs depend on the GOS version used. Since GOS 4.2, the NVTs of the type Violations have a default severity of 10.
In the past, these NVTs had a default severity of 0 (log message) and overrides were required for different severities. The new default severity of 10 can be changed using overrides as well (see Chapter 11.8).
By sectioning into three different NVTs it is possible to create distinct overrides for the severity according to the needs.
In the following example the severities of File Checksum: Violations and File Checksum: Errors have been changed which will be shown in the reports accordingly (see Fig. 14.9).

Fig. 14.9 Overrides changing the severity
14.1.3.3. Example
Note
The overrides can be created either before or after a scan. The latter is easier since the appropriate override can be created through the result page (see Chapter 11.8.1.1).
Download policy_file_checksums_example.xml and the correspronding test file policy_file_checksums_testfiles.
Important
External links to the Greenbone download website are case-sensitive.
Note that upper cases, lower cases and special characters have to be entered exactly as they are written in the footnotes.
Extract the test file to the
/tmp/directory of the target system.Select Scans > Tasks in the menu bar.
Create a task for the target on which the test file was saved by moving the mouse over
and clicking New Task.Note
The scan has to be an authenticated scan with the appropriate SSH credentials (see Chapter 10.3.2).
In the row of the newly created task click
.
14.1.3.4. Checking File Checksum Patterns for Microsoft Windows
The GSM provides a similar module for Microsoft Windows systems for file checksum checks.
Since Microsoft Windows does not provide an internal program for creating checksums it has to be installed one either manually or automatically by the NVT. The GSM uses ReHash for creating checksums on Microsoft Windows systems.
Note
There are two operating modes for these checks:
- Using a tool that was installed on the target system manually.
- The tool ReHash will automatically be installed and deinstalled as well if requested on the target system during the checking routine.
As for Linux systems the NVTs for checksum checks are located in the NVT family Policy.
Create a reference file with the patterns to check. Following is an example:
Checksum|File|Checksumtype
6597ecf8208cf64b2b0eaa52d8169c07|/bin/login|md5
ed3ed98cb2efa9256817948cd27e5a4d9be2bdb8|/bin/bash|sha1
7c59061203b2b67f2b5c51e0d0d01c0d|/bin/pwd|md5
In the row of the respective scan configuration click
.In the section Edit Network Vulnerability Test Families click
for the NVT family Policy.→ All NVTs that allow special configuration are listed (see Fig. 14.10).
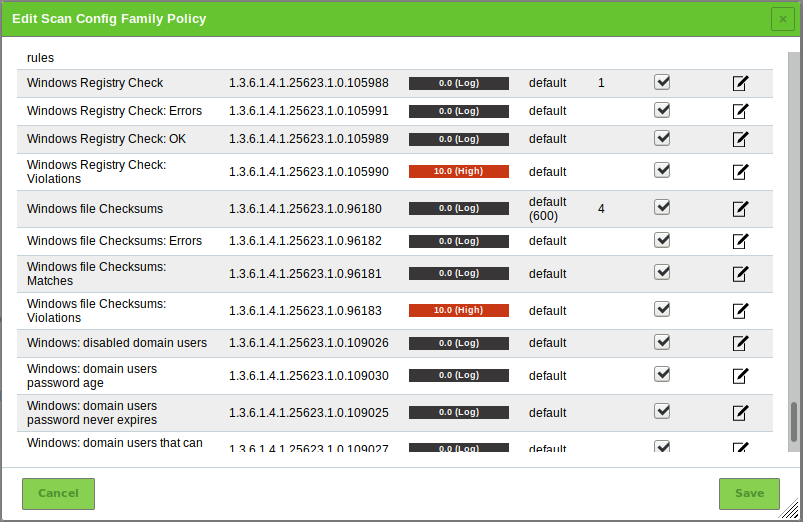
Fig. 14.10 Editing the family of NVTs
Click
for Windows file Checksums.For Delete hash test Programm after the test select the radiobutton Yes if the checksum program ReHash should be deleted after the check (see Fig. 14.11).
Tip
The program can be left on the target system, e.g. to speed up recurring tests and therefore does not have to be transferred each time.
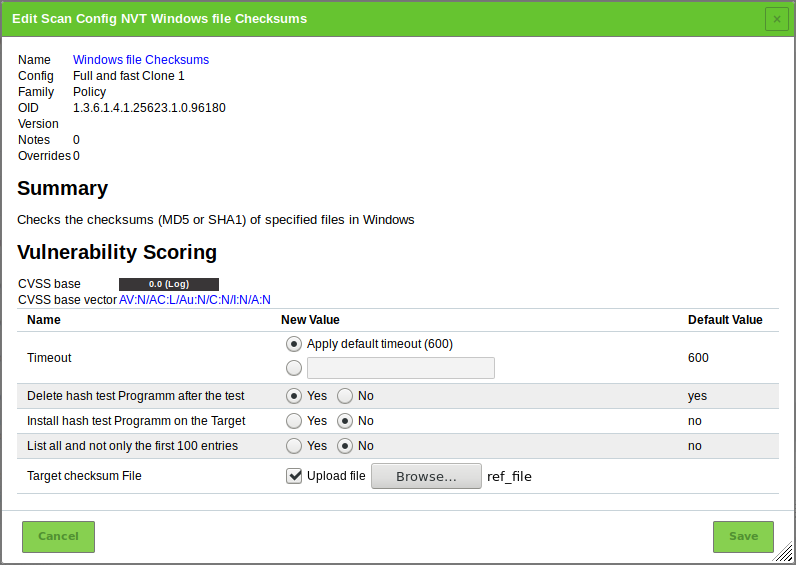
Fig. 14.11 Uploading the reference file
For Install hash test Programm on the Target select the radiobutton Yes if the checksum program ReHash should be installed on the target system automatically.
Note
If it is not installed automatically, it has to be installed manually under
C:\\Windows\\system32(on 32-bit systems) orC:\\Windows\\SysWOW64(on 64-bit systems) and has to be executable for the authenticated user.Activate the checkbox Upload file.
Tip
If a reference file was already uploaded, the checkbox Replace existing file is displayed instead. The possibility to change the reference file is only available if the scan configuration is currently not used.
Click Browse… and select the previously created reference file.
Click Save to save the NVT.
Click Save to save the family of NVTs.
Click Save to save the scan configuration.
14.1.3.5. Example for Microsoft Windows
Note
The overrides can be created either before or after a scan. The latter is easier since the appropriate override can be created through the result page (see Chapter 11.8.1.1).
Download sample_config-Windows_file_Policy.xml and the correspronding test file windows_checksums_testfiles.zip.
Important
External links to the Greenbone download website are case-sensitive.
Note that upper cases, lower cases and special characters have to be entered exactly as they are written in the footnotes.
Extract the test file to the
C:\directory of the target system.Select Scans > Tasks in the menu bar.
Create a task for the target on which the test file was saved by moving the mouse over
and clicking New Task.Note
The scan has to be an authenticated scan with the appropriate SSH credentials (see Chapter 10.3.2).
In the row of the newly created task click
.
14.1.4. Performing CPE-Based Checks
For detailed information about Common Platform Enumeration (CPE) see Chapter 13.2.2.
14.1.4.1. Simple CPE-Based Checks for Security Policies
With any executed scan, CPEs for the identified products are stored. This happens independently of whether the product actually reveals a security problem or not. On this basis it is possible to describe simple security policies and the checks for compliance with these.
With the Greenbone Security Manager it is possible to describe policies to check for the presence as well as for the absence of a product. These cases can be associated with a severity to appear in the scan report.
The examples demonstrate how to check the compliance of a policy regarding specific products in an IT infrastructure and how the reporting with the corresponding severity can be done.
The information about whether a certain product is present on the target system is gathered by a single Network Vulnerability Test (NVT) or even independently by a number of special NVTs. This means that for a certain product an optimized scan configuration that only concentrates on this product and does not do any other scan activity can be specified.
- Advantages
- The advantage of such a special scan configuration is a considerably faster execution of the scan compared to a comprehensive scan configuration such as Full and fast.
- Disadvantages
- The disadvantage of a special scan configuration is that some experience is required to select the right set of NVTs to maximize the probability of success. Initially it is easier to apply a comprehensive scan configuration. In this case it is not necessary to care about the product character, only the CPE identifier is entered.
14.1.4.2. Detecting the Presence of Problematic Products
This example demonstrates how the presence of a certain product in an IT infrastructure is classified as a severe problem and reported as such.
Select Configuration > Scan Configs in the menu bar.
Create a new scan configuration by clicking
.Define the name of the scan configuration (see Fig. 14.12).
Select the radiobutton Full and fast.
Note
This is necessary because Full and fast is a pre-configured scan configuration and thus cannot be modified.
When choosing a general scan like Full and fast both cases are treated the same, presence of the product as a running service and presence of the product on a hard drive.
This essentially means that if it should be sure the desired product indeed runs as a service, running NVTs that check for the simple presence on the file system or in a registry should be avoided.
If such details are not desired right now, the report details can still be checked for false positives and false negatives.
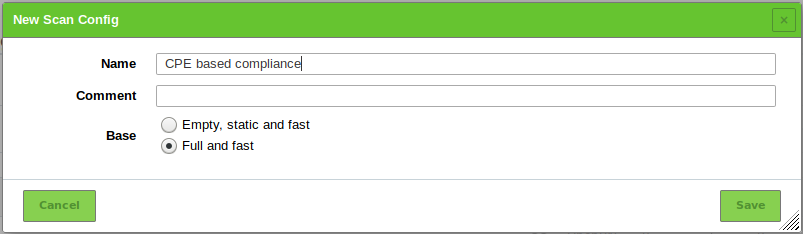
Fig. 14.12 Creating a new scan configuration
Click Save.
→ The scan configuration is created and displayed on the page Scan Configs.
In the row of the scan configuration click
.Unfold the section Network Vulnerability Test Preferences by clicking
 .
.→ All NVTs that allow special configuration are listed (see Fig. 14.13).
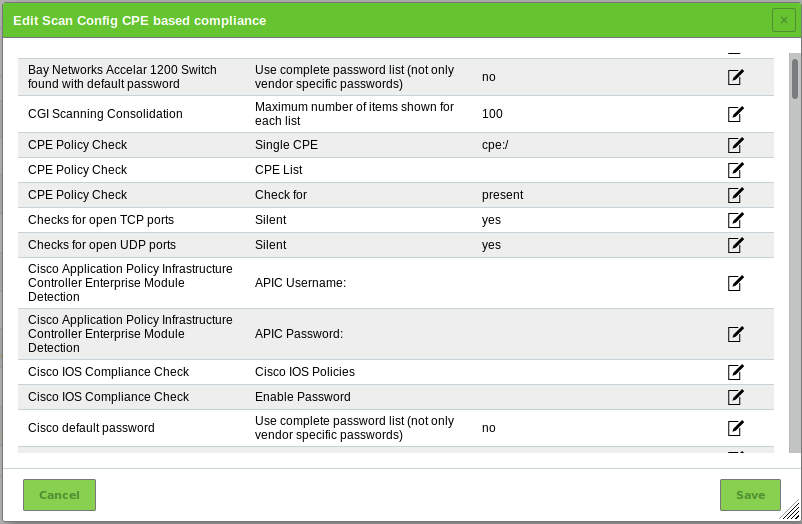
Fig. 14.13 Overview of NVTs
A single CPE (Internet Explorer 6) will be searched.
Click
for the NVT CPE Policy Check – Single CPE.Tip
This short-cut avoids having to click through the family structures in the section Edit Network Vulnerability Test Families to get to the desired NVT (the here used NVT is in the NVT family Policy).
Enter
cpe:/a:microsoft:ie:6in the input box Single CPE (see Fig. 14.14).For this example the stated CPEs must be present to comply.
Select the radiobutton present.
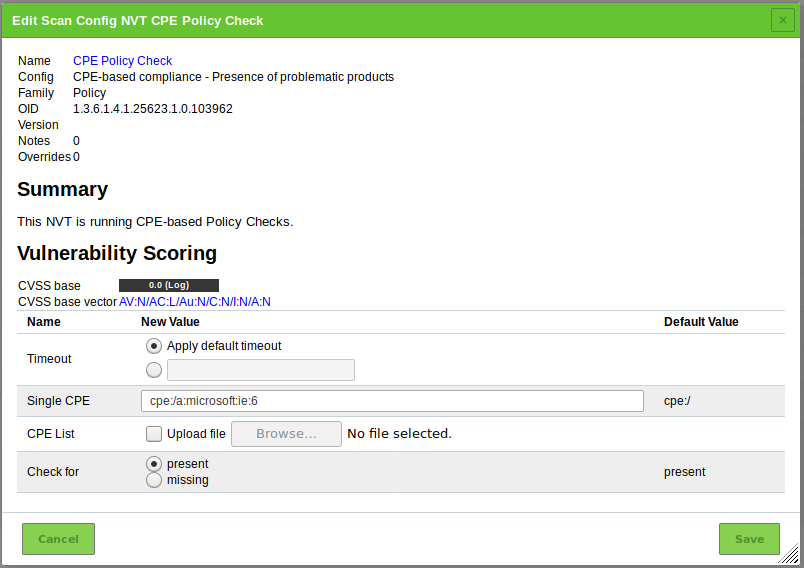
Fig. 14.14 Editing CPE Policy Check – Single CPE
Click Save to save the NVT.
Click Save to save the scan configuration.
Note
The severities of the NVTs depend on the GOS version used. Since GOS 4.2, the NVTs of the type Violations have a default severity of 10.
In the past, these NVTs had a default severity of 0 (log message) and overrides were required for different severities. The new default severity of 10 can be changed using overrides as well (see Chapter 11.8).
Note
In case the mere availability of a product should be considered it is required to configure remote access using credentials to apply local security checks (see Chapter 10.3.2). If just running network services should be searched it normally does not help but rather increase the number of false positives.
Create a new target, create a new task and run the task as described in Chapter 10.2.
When creating the task, use the previously created scan configuration.
When the scan is completed select Scans > Reports in the menu bar.
Tip
To show only the results of the CPE-based policy checks, a suitable filter can be applied.
Enter
cpein the input box Filter.→ The reports for CPE-based policy checks are displayed.
Click on the date of a report.
→ The report for CPE-based policy checks is displayed.
The report can be used as described in Chapter 11.2.1.
In this example: if Internet Explorer 6 was found on one of the target systems it is reported as a problem.
14.1.4.3. Detecting the Absence of Important Products
This example shows how the absence of a certain product in the IT infrastructure is defined and reported as a severe problem.
Select Configuration > Scan Configs in the menu bar.
Create a new scan configuration by clicking
.Define the name of the scan configuration (see Fig. 14.15).
Select the radiobutton Full and fast.
Note
This is necessary because Full and fast is a pre-configured scan configuration and thus cannot be modified.
When choosing a general scan like Full and fast both cases are treated the same, presence of the product as a running service and presence of the product on a hard drive.
This essentially means that if it should be sure the desired product indeed runs as a service, running NVTs that check for the simple presence on the file system or in a registry should be avoided.
If such details are not desired right now, the report details can still be checked for false positives and false negatives.
Fig. 14.15 Creating a new scan configuration
Click Save.
→ The scan configuration is created and displayed on the page Scan Configs.
In the row of the scan configuration click
.Unfold the section Network Vulnerability Test Preferences by clicking
.→ All NVTs that allow special configuration are listed (see Fig. 14.16).
Fig. 14.16 Overview of NVTs
A single CPE (Norton Antivirus) will be searched.
Click
for the NVT CPE Policy Check – Single CPE.Tip
This short-cut avoids having to click through the family structures in the section Edit Network Vulnerability Test Families to get to the desired NVT (the here used NVT is in the NVT family Policy).
Enter
cpe:/a:symantec:norton_antivirusin the input box Single CPE (see Fig. 14.17).For this example the stated CPEs must be missing to comply.
Select the radiobutton missing.
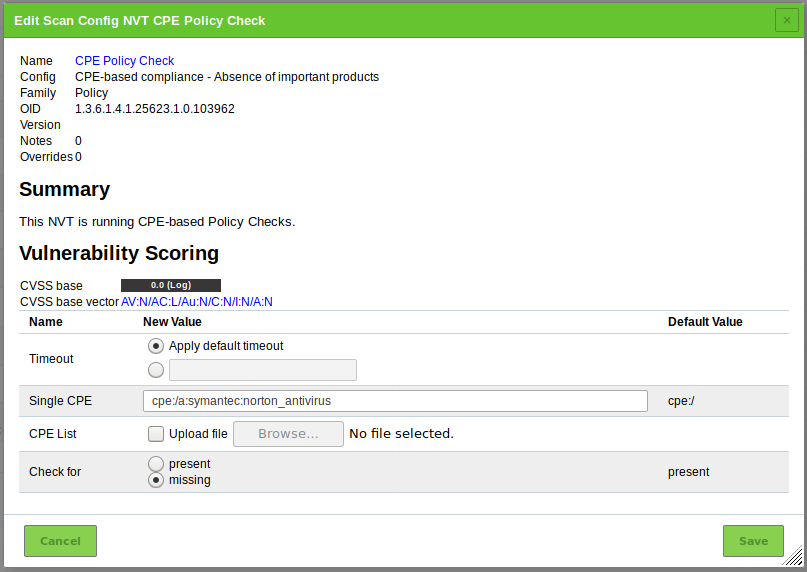
Fig. 14.17 Editing CPE Policy Check – Single CPE
Click Save to save the NVT.
Click Save to save the scan configuration.
Note
The severities of the NVTs depend on the GOS version used. Since GOS 4.2, the NVTs of the type Violations have a default severity of 10.
In the past, these NVTs had a default severity of 0 (log message) and overrides were required for different severities. The new default severity of 10 can be changed using overrides as well (see Chapter 11.8).
Note
In case the mere availability of a product should be considered it is required to configure remote access using credentials to apply local security checks (see Chapter 10.3.2). If just running network services should be searched it normally does not help but rather increase the number of false positives.
Create a new target, create a new task and run the task as described in Chapter 10.2.
When creating the task, use the previously created scan configuration.
When the scan is completed select Scans > Reports in the menu bar.
Tip
To show only the results of the CPE-based policy checks, a suitable filter can be applied.
Enter
cpein the input box Filter.→ The reports for CPE-based policy checks are displayed.
Click on the date of a report.
→ The report for CPE-based policy checks is displayed.
The report can be used as described in Chapter 11.2.1.
In this example: if Norton Antivirus was not found on one of the target systems it is reported as missing.
14.2. Checking Standard Policies
14.2.1. IT-Grundschutz
The German Federal Office for Information Security (BSI) publishes the IT-Grundschutz catalogs, a collection of documents that provide useful information for detecting weaknesses and combating attacks on IT environments.
The Greenbone Security Manager (GSM) can be used to automatically check either the IT-Grundschutz catalogs or the modernized IT-Grundschutz compendium.
The current “15. Ergänzungslieferung” with tests for over 80 measures is supported for the IT-Grundschutz catalogs. That is the maximum number of measures which is possible to support with automatic tests.
Some measures are quite comprehensive and actually consist of several single tests. A couple of measures address a specific operating system and hence will only be applied to those. The number and type of tested systems remains irrelevant for the GSM.
A check can be installed for breaches as a permanent background process.
14.2.1.1. Checking IT-Grundschutz
An IT-Grundschutz scan (IT-Grundschutz catalogs or IT-Grundschutz compendium) can be carried out as follows:
Download the scan configuration IT-Grundschutz Scan.
For verinice integration use the scan configuration IT-Grundschutz Scan incl. Discovery for verinice.
Important
External links to the Greenbone download website are case-sensitive.
Note that upper cases, lower cases and special characters have to be entered exactly as they are written in the footnotes.
Select Configuration > Scan Configs in the menu bar.
Click
 .
.Click Browse… and select the previously downloaded scan configuration (see Fig. 14.18).
Click Import.
→ The imported scan configuration is displayed on the page Scan Configs.
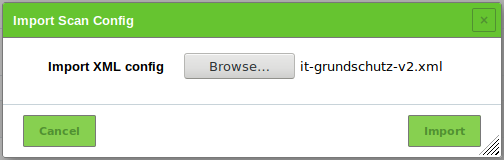
Fig. 14.18 Importing a scan configuration
Note
This covers the settings to execute all checks. The actual checks are not explicitly selected so that rather a summary result is generated.
In the row of the scan configuration click
.
- Test for IT-Grundschutz Catalogs
In the section Edit Network Vulnerability Test Families click
for Compliance.→ All NVTs that allow special configuration are listed. Two NVTs are selected per default: Compliance Tests and IT-Grundschutz, 15. EL (see Fig. 14.19).

Fig. 14.19 NVTs of the family Compliance
Click
for Compliance Tests.For Launch IT-Grundschutz (15. EL) select the radiobutton Yes.
Click Save to save the NVT.
Click
for IT-Grundschutz, 15. EL.For Berichtformat select the radiobutton of the desired report format (see Fig. 14.20).
- Text: textual report format
- Tabellarisch: tabular report format
- Text und Tabellarisch: textual and tabular report format
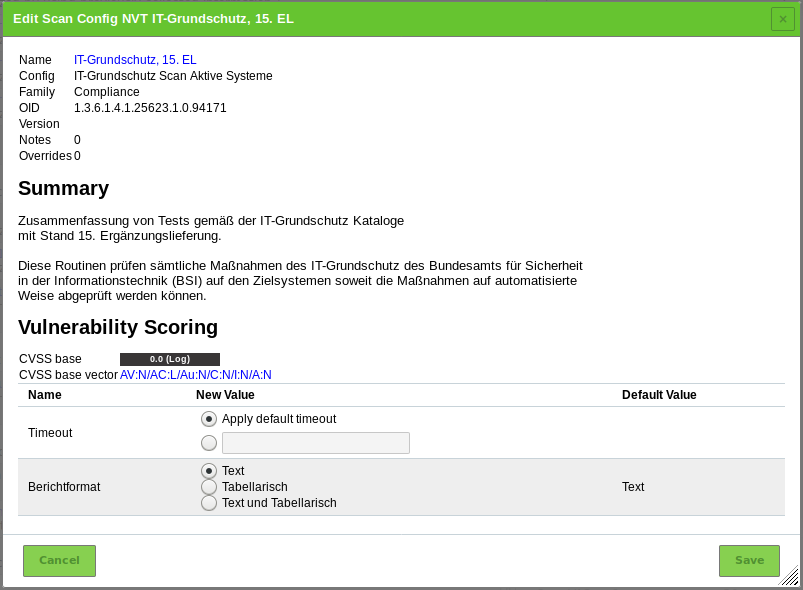
Fig. 14.20 Selecting the report format
Click Save to save the NVT.
Click Save to save the family of NVTs.
Click Save to save the scan configuration.
- Test for IT-Grundschutz Compendium
In the section Edit Network Vulnerability Test Families click
for Compliance.→ All NVTs that allow special configuration are listed (see Fig. 14.21).
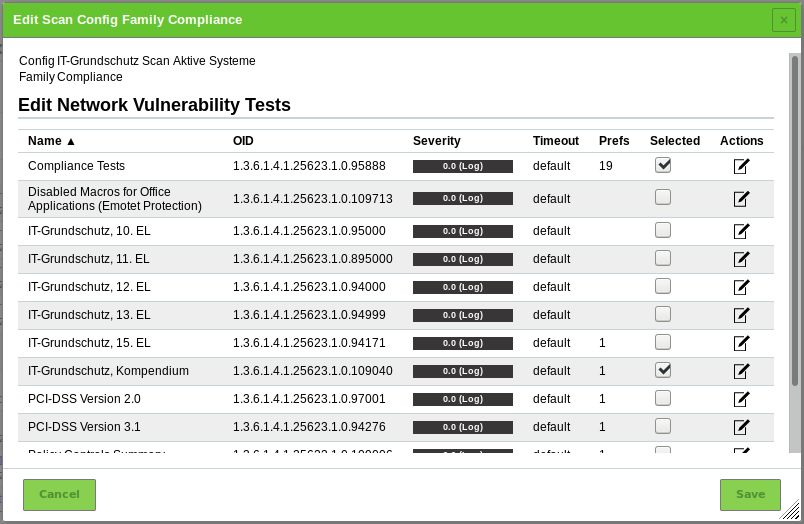
Fig. 14.21 NVTs of the family Compliance
Activate the checkboxes for Compliance Tests and IT-Grundschutz, Kompendium. Deactivate the checkbox for IT-Grundschutz, 15. EL.
Click
for Compliance Tests.For Launch latest IT-Grundschutz version select the radiobutton Yes.
For Level of Security (IT-Grundschutz) select the radiobutton of the level which was introduced in the modernized IT-Grundschutz compendium.
Click Save to save the NVT.
Click
for IT-Grundschutz, Kompendium.For Berichtformat select the radiobutton of the desired report format (see Fig. 14.22).
- Text: textual report format
- Tabellarisch: tabular report format
- Text und Tabellarisch: textual and tabular report format

Fig. 14.22 Selecting the report format
Click Save to save the NVT.
Click Save to save the family of NVTs.
Click Save to save the scan configuration.
Note
The majority of checks for the measures is based on local security checks. For these respective access needs to be configured (see Chapter 10.3.2).
Create a new target, create a new task and run the task as described in Chapter 10.2.
When creating the task, use the previously imported scan configuration.
When the scan is completed select Scans > Reports in the menu bar.
Click on the date of the report (see Fig. 14.23).
→ The report for the IT-Grundschutz scan is displayed.
The report can be used as described in Chapter 11.2.1.

Fig. 14.23 Report for the IT-Grundschutz scan
Note
For the textual form of the report the severity Low has to be enabled in the filter. For the tabular form of the report the severity Log has to be enabled in the filter.
To do so, click
in the filter bar.→ The window for editing the filter is opened.
For Severity (Class) activate the checkbox Low or Log.
Click Update.
Note
The number of reports depends on the selected report format. The entry in the column Location is general/IT-Grundschutz for the textual report and general/IT-Grundschutz-T for the tabular report.
If both report formats were chosen, they both appear with the same name but with their corresponding entry in the column Location (see Fig. 14.24).

Fig. 14.24 Report for IT-Grundschutz scan in both report formats
14.2.1.2. Importing Results into a Spreadsheet Application
The results can be imported into a spreadsheet application, e.g. Microsoft Excel, Apache OpenOffice Calc or LibreOffice Calc as follows:
Select Scans > Reports in the menu bar.
Click on the date of the report.
→ The report for the IT-Grundschutz scan is displayed.
Click
 .
.For Include activate the checkbox Notes to include attached notes and the checkbox Overrides to label enabled overrides and include their text field (see Chapter 11.2.2).
Select ITG in the drop-down-list Report Format.
Click OK and download the CSV file.
Open the spreadsheet application and open the previously exported CSV file.
Note
This example shows the import using LibreOffice Calc 5.2.7.2.
Select Unicode (UTF-8) in the drop-down-list Character set.
Select the radiobutton Separated by, activate the checkbox Other and enter
|(vertical line) in the input box.Select “ in the drop-down-list Text delimiter.
Mark the last column in the preview window and select Text in the drop-down-list Column type.
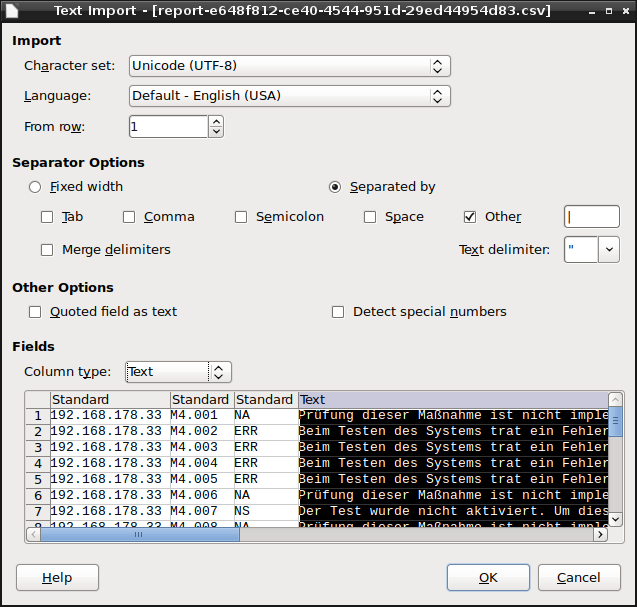
Fig. 14.25 Adjusting the import settings
Click OK.
→ The report is opened in the spreadsheet application and can be used for further analysis.
14.2.1.3. Importing Results into IT-Grundschutz Tools
There is a number of tools available to assist the IT-Grundschutz processes and provide a structured approach for data collection and management.
The German Federal Office for Information Security (BSI) offers an overview on IT-Grundschutz tools on its website.
Note
For importing the results of an IT-Grundschutz scan into one of these tools contact the vendor of the corresponding tool. For additional questions do not hesitate to contact the Greenbone Networks Support.
14.2.1.4. Result Classes of IT-Grundschutz Checks
The following result classes can occur for a check:
- Not fulfilled (FAIL)
It was detected that the target system does not fulfill the measure.
- Fulfilled (OK)
It was detected that the target system does fulfill the measure.
- Error (ERR)
It was not possible to execute the test routine properly.
Example: some checks require credentials. If the credentials are missing, the check cannot be executed for technical reasons. In case no credentials are provided, many of the checks will have this status.
- Check of this measure is not available (NA)
In general it is assumed that this measure can automatically be checked for, but an implementation is not available yet. For newly released “Ergänzungslieferungen” this is initially true for a number of measures. However, the Greenbone Security Feed is updated continuously and eventually all measures will be implemented.
- Check of the measure is not implemented (NI)
A number of measures of the IT-Grundschutz catalogs are kept too general to create an explicit automatic check. Other measures describe checks that can only be done physically and cannot be implemented at all.
- Check not suited for the target system (NS)
Some measures refer exclusively to a special type of operating system. If the target system runs another operating system type, the measure does not apply.
- Measure is deprecated (DEP)
Some updates (“Ergänzungslieferungen”) removed measures without a replacement. Old IDs of such deprecated measures are never re-used. The results marked as DEP can be ignored but the entries remain for completeness.
14.2.1.5. Supported Measures
This overview refers to the current “Ergänzungslieferung” by the German Federal Office for Information Security (BSI).
The following test types are distinguished:
- Remote: for the check it is only necessary to have network connection to the target system.
- Credentials: for the check it is required to use an account on the target system.
M 4 Hardware and Software
| BSI reference | Title | Test type | Note |
|---|---|---|---|
| M 4.2 | Screen lock | Credentials | Microsoft Windows: can only test for local accounts. Linux: only default screen savers in Gnome and KDE. |
| M 4.3 | Use of virus protection programs | Credentials | |
| M 4.4 | Correct handling of drives for removable media and external data storage | Credentials | |
| M 4.5 | Logging for PBX systems | Credentials | |
| M 4.7 | Change of preset passwords | Remote | Test only via SSH and telnet. |
| M 4.9 | Use of the security mechanisms of X Windows | Credentials | |
| M 4.14 | Mandatory password protection under Unix | Credentials | |
| M 4.15 | Secure login | Credentials | |
| M 4.16 | Restriction on access to user IDs and/or terminals | Credentials | |
| M 4.17 | Blocking and erasure of unneeded accounts and terminals | Credentials | |
| M 4.18 | Administrative and technical means to control access to the system-monitor and single-user mode | Credentials | |
| M 4.19 | Restrictive allocation of attributes for Unix system files and directories | Credentials | |
| M 4.20 | Restrictive allocation of attributes for Unix user files and directories | Credentials | |
| M 4.21 | Preventing unauthorised acquisition of administrator rights | Credentials | |
| M 4.22 | Prevention of loss of confidentiality of sensitive data in the Unix system | Credentials | |
| M 4.23 | Secure invocation of executable files | Credentials | |
| M 4.33 | Use of a virus scanning program on exchange of data media and during data transfer | Credentials | |
| M 4.36 | Blocking fax recipient numbers | Credentials | Cisco devices can only be tested via telnet because they do not support blowfish-cbc encryption. |
| M 4.37 | Blocking fax sender numbers | Credentials | Cisco devices can only be tested via telnet because they do not support blowfish-cbc encryption. |
| M 4.40 | Preventing unauthorised use of computer microphones and cameras | Credentials | Only implemented for Linux. It is not possible to determine the status of the microphone via registry/WMI on Microsoft Windows. |
| M 4.48 | Password protection under Windows systems | Credentials | |
| M 4.49 | Protection of the boot procedure for a Windows system | Credentials | |
| M 4.52 | Device protection under Windows NT/2000/XP | Credentials | |
| M 4.57 | Disabling automatic CD-ROM recognition | Credentials | |
| M 4.80 | Secure access mechanisms for remote administration | Remote | |
| M 4.94 | Protection of the web server files | Remote | |
| M 4.96 | Deactivating DNS | Credentials | |
| M 4.97 | One service per server | Remote | |
| M 4.98 | Restricting communication to a minimum with packet filters | Credentials | Microsoft Windows: firewall is tested. For Microsoft Windows Vista or higher any firewall that is installed conforming to the system. |
| M 4.106 | Activation of system logging | Credentials | |
| M 4.135 | Restrictive granting of access rights to system files | Credentials | |
| M 4.147 | Secure use of EFS under Windows | Credentials | |
| M 4.200 | Handling of USB storage media | Credentials | |
| M 4.227 | Use of a local NTP server for time synchronisation | Credentials | |
| M 4.238 | Use of local packet filters | Credentials | Microsoft Windows: firewall is tested. For Microsoft Windows Vista or higher any firewall that is installed conforming to the system. |
| M 4.244 | Secure configuration of Windows client operating systems | Credentials | |
| M 4.277 | Protection of SMB, LDAP, and RPC communication under Windows Servers | Credentials | |
| M 4.284 | Handling of services under Windows Server 2003 and higher | Credentials | |
| M 4.285 | De-installation of unnecessary client functions of Windows Server 2003 | Credentials | |
| M 4.287 | Secure administration of VoIP middleware | Remote | |
| M 4.300 | Information security for printers, copiers, and all-in-one devices | Remote | |
| M 4.305 | Use of storage restrictions (storage quotas) | Credentials | |
| M 4.310 | Setting up LDAP access to directory services | Remote | |
| M 4.313 | Provision of secure domain controllers | Credentials | |
| M 4.325 | Deletion of swap files | Credentials | |
| M 4.326 | Ensuring the NTFS file properties on a Samba file server | Credentials | |
| M 4.328 | Secure basic configuration of a Samba server | Credentials | |
| M 4.331 | Secure configuration of the operating system of a Samba server | Credentials | |
| M 4.332 | Secure configuration of the access controls for a Samba server | Credentials | |
| M 4.333 | Secure configuration of Winbind under Samba | Credentials | |
| M 4.334 | SMB message signing and Samba | Credentials | |
| M 4.338 | Use of File and Registry Virtualisation for clients running Windows Vista and higher | Credentials | Only a general test whether file and registry virtualization is enabled. |
| M 4.339 | Prevention of unauthorised use of removable media in Windows Vista and Windows 7 | Credentials | |
| M 4.340 | Use of Windows User Account Control UAC in Windows Vista and higher | Credentials | |
| M 4.341 | Integrity protection in Windows Vista and higher versions | Credentials | Where possible technically implemented (active UAC and protected mode in different zones). |
| M 4.342 | Activation of the Last Access time stamp under Windows Vista and higher | Credentials | |
| M 4.344 | Monitoring of Windows systems running Windows Vista and Windows Server 2008 and higher | Credentials | |
| M 4.368 | Regular audits of the terminal server environment | Credentials |
M 5 Communication
| BSI reference | Title | Test type | Note |
|---|---|---|---|
| M 5.8 | Regular security check of the network | Remote | Only a message is displayed informing that tests should be performed with up-to-date plug-ins. |
| M 5.17 | Use of the NFS security mechanisms | Credentials | |
| M 5.18 | Use of the NIS security mechanisms | Credentials | |
| M 5.19 | Use of the sendmail security mechanisms | Remote, Credentials | |
| M 5.20 | Use of the security mechanisms of rlogin, rsh, and rcp | Credentials | |
| M 5.21 | Secure use of the telnet, ftp, tftp, and rexec | Credentials | |
| M 5.34 | Use of one-time passwords | Credentials | |
| M 5.59 | Protection against DNS spoofing in authentication mechanisms | Credentials | |
| M 5.63 | Use of GnuPG or PGP | Credentials | |
| M 5.64 | Secure shell | Remote | |
| M 5.66 | Client-side use of TSL/SSL | Remote | |
| M 5.72 | Deactivation of unnecessary network services | Credentials | Only displays the services in question. |
| M 5.90 | Use of IPSec under Windows | Credentials | |
| M 5.91 | Use of personal firewalls for clients | Credentials | Microsoft Windows: firewall is tested. For Microsoft Windows Vista or higher any firewall that is installed conforming to the system. Linux systems: displaying the iptables rules, if possible. |
| M 5.109 | Use of an e-mail scanner on the mail server | Remote | |
| M 5.123 | Securing network communication in Windows | Credentials | |
| M 5.131 | Protection of IP protocols under Windows Server 2003 | Credentials | |
| M 5.145 | Secure use of CUPS | Credentials | |
| M 5.147 | Protection of communications with directory services | Remote |
14.2.2. BSI TR-03116: Kryptographische Vorgaben für Projekte der Bundesregierung
The German Federal Office for Information Security (BSI) published a technical guideline “TR-03116: Kryptographische Vorgaben für Projekte der Bundesregierung”. Part 4 of this guideline describes the security requirements for services of the federal government using the cryptographic protocols SSL/TLS, S/MIME and OpenPGP.
The requirements are based on forecasts for the security of the algorithms and key lengths for the next seven years including 2022.
Greenbone Networks provides a scan configuration for testing the compliance of services with the technical guideline “TR-03116”. This scan configuration has to be imported to the Greenbone Security Manager subsequently.
The scan configuration tests if the scanned hosts and services use SSL/TLS. If this is the case, the compliance with the guideline is tested.
At least the following ciphers must be supported to pass the test:
- TLS_ECDHE_ECDSA-WITH_AES_128_CBC_SHA256
- TLS_ECDHE_RSA_WITH_AES_128_CBC_SHA256
- TLS_ECDHE_ECDSA_WITH_AES_128_GCM_SHA256
- TLS_ECDHE_RSA_WITH_AES_128_GCM_SHA256
If a preshared key is used by the application one of the following ciphers is required in addition to the SSL/TLS algorithm:
- TLS_RSA_PSK_WITH_AES_128_CBC_SHA256
- TLS_ECDHE_PSK_WITH_AES_128_CBC_SHA256
A BSI TR-03116 scan can be carried out as follows:
Download the scan configuration BSI TR-03116 Scan Config.
Important
External links to the Greenbone download website are case-sensitive.
Note that upper cases, lower cases and special characters have to be entered exactly as they are written in the footnotes.
Select Configuration > Scan Configs in the menu bar.
Click
.Click Browse… and select the previously downloaded scan configuration (see Fig. 14.26).
Click Import.
→ The imported scan configuration is displayed on the page Scan Configs.
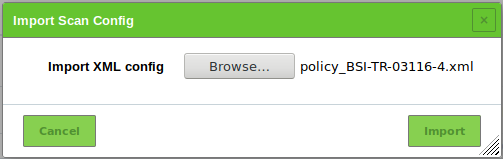
Fig. 14.26 Importing a scan configuration
In the row of the scan configuration click
.In the section Edit Network Vulnerability Test Families click
for Policy.→ All NVTs that allow special configuration are listed.
Click
for the NVT BSI-TR-03116-4 Policy.For Perform check select the radiobutton Yes (see Fig. 14.27).
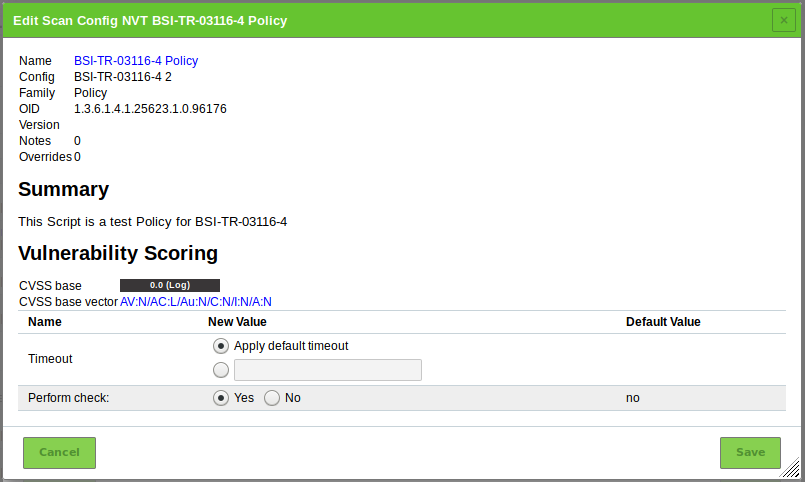
Fig. 14.27 Editing a NVT
Click Save to save the NVT.
Click Save to save the family of NVTs.
Click Save to save the scan configuration.
Create a new target, create a new task and run the task as described in Chapter 10.2.
When creating the task, use the previously imported scan configuration.
When the scan is completed select Scans > Reports in the menu bar.
Click on the date of the report.
→ The report for the BSI TR-03116 scan is displayed.
The report can be used as described in Chapter 11.2.1.
Note
The severities of the NVTs depend on the GOS version used. Since GOS 4.2, the NVTs of the type Violations have a default severity of 10.
In the past, these NVTs had a default severity of 0 (log message) and overrides were required for different severities. The new default severity of 10 can be changed using overrides as well (see Chapter 11.8).
14.2.3. Cyber Essentials
The Cyber Essentials are simple but yet effective requirements to protect organizations of any size against the most common cyber attacks. This UK government scheme, launched in 2014, addresses internet-based threats to cyber security, i.e. hacking, phishing and password guessing. It reduces the risk of successful attacks which use widely available tools and demand little skill.
The Cyber Essentials specify the requirements under five technical control themes:
- Firewalls (boundary and/or host-based)
- Secure Configuration
- User Access Control
- Malware Protection
- Patch Management
The requirements for each technical control theme can be found here.
A Cyber Essentials scan can be carried out as follows:
Download the scan configuration Cyber Essentials Scan Config.
Important
External links to the Greenbone download website are case-sensitive.
Note that upper cases, lower cases and special characters have to be entered exactly as they are written in the footnotes.
Select Configuration > Scan Configs in the menu bar.
Click
.Click Browse… and select the previously downloaded scan configuration (see Fig. 14.28).
Click Import.
→ The imported scan configuration is displayed on the page Scan Configs.

Fig. 14.28 Importing a scan configuration
Create a new target, create a new task and run the task as described in Chapter 10.2.
When creating the task, use the previously imported scan configuration.
When the scan is completed select Scans > Reports in the menu bar.
Click on the date of the report.
→ The report for the Cyber Essentials scan is displayed.
The report can be used as described in Chapter 11.2.1.
The results are divided:
- Cyber Essentials: only appears if the tests cannot be run against one hosts for any reason.
- Cyber Essentials: Error: summarizes requirements with errors (if any).
- Cyber Essentials: Fail: summarizes requirements the host does not comply with (if any).
- Cyber Essentials: Ok: summarizes requirements the host does comply with (if any).
Note
The technical control theme Malware Protection includes requirements for application whitelisting. This can be done with CPE-based scans (see Chapter 14.1.4).
14.2.4. General Data Protection Regulation
The General Data Protection Regulation (GDPR) regulates the processing of personal data (relating to individuals in the EU) by another individual, a company or an organization for any use outside the personal sphere. For example, it applies to financial activities.
Personal data is any information that relates to an identified or identifiable living individual, e.g.:
- (Sur-)Name
- E-mail address belonging to an individual
- IP address
- Home address
Since the regulation does not refer to any technology, it applies to both digital and analog processing/storage of personal data. For more information see the webpage of the European Commission regarding the GDPR.
There are no official technical requirements published for the GDPR. As stated in Art. 32 GDPR, the organization “shall implement appropriate technical and organizational measures to ensure a level of security appropriate to the risk” of personal data. Many checklists for GDPR compliance are available which contain considerations for password management, auditing/logging and handling of removable media devices.
Following technical settings can be tested automatically using the Greenbone Security Manager:
- Min. password length
- Max. password age
- Password complexity enforcement
- Handling of removable media
- Logging policy
A GDPR scan can be carried out as follows:
Download the scan configuration GDPR Scan Config.
Important
External links to the Greenbone download website are case-sensitive.
Note that upper cases, lower cases and special characters have to be entered exactly as they are written in the footnotes.
Select Configuration > Scan Configs in the menu bar.
Click
.Click Browse… and select the previously downloaded scan configuration (see Fig. 14.29).
Click Import.
→ The imported scan configuration is displayed on the page Scan Configs.
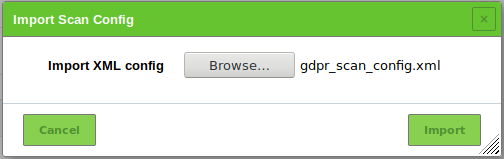
Fig. 14.29 Importing a scan configuration
Create a new target, create a new task and run the task as described in Chapter 10.2.
When creating the task, use the previously imported scan configuration.
When the scan is completed select Scans > Reports in the menu bar.
Click on the date of the report.
→ The report for the GDPR scan is displayed.
The report can be used as described in Chapter 11.2.1.
Important
The settings found on the host have to comply with the organization’s guidelines.
14.3. Running a Mail Server Online Test
In September 2014 the Bavarian State Office for Data Protection performed the online test Mailserver: STARTTLS & Perfect Forward Secrecy. The organizations which were found to be affected by this test were asked to remove the security risks.
An organization can test itself if its own mail servers comply with the security criteria using the Greenbone Security Manager or OpenVAS respectively. Execute the following steps to perform the test:
Download the scan configuration Mailserver Online Test Scan Config.
Important
External links to the Greenbone download website are case-sensitive.
Note that upper cases, lower cases and special characters have to be entered exactly as they are written in the footnotes.
Select Configuration > Scan Configs in the menu bar.
Click
.Click Browse… and select the previously downloaded scan configuration.
Click Import.
→ The imported scan configuration is displayed on the page Scan Configs.
Select Configuration > Port Lists in the menu bar.
Create a new port list by clicking
.Define the port list and enter
T:25in the input box Port Ranges – Manual.Click Save.
Create a new target, create a new task and run the task as described in Chapter 10.2.
When creating the target, use the mailserver that should be tested and select the previously created port list in the drop-down-list Port List. Depending on the network settings it could make sense to select Consider Alive in the drop-down-list Alive Test.
When creating the task, use the previously imported scan configuration.
When the scan is completed select Scans > Reports in the menu bar.
Click on the date of the report.
→ The report for the mail server online test is displayed.
The report can be used as described in Chapter 11.2.1.
The report contains different log entries for each mail server.
Tip
The missing StartTLS will initially only be displayed as a log message as it is a policy question how it should be assessed. For example, an override for this NVT can be created defining it as a high risk (see Chapter 11.8). The override can then be expanded to all hosts and possibly all tasks.
Note
Should monitoring be established, a schedule for this task can be created (e.g. every week on Sundays) as well as an alert (e.g. an e-mail). Combined with the respective overrides an automated warning system is being created in the background.
14.4. Running a TLS-Map Scan
The TLS (Transport Layer Security) protocol ensures the confidentiality, authenticity and integrity of communication in insecure networks. It establishes confidential communication between sender and receiver, e.g. web server and web browser.
With the Greenbone Security Manager (GSM) it is possible to identify systems that offer services using SSL/TLS protocols. Additionally, the GSM detects the protocol versions and offers encryption algorithms. Further details about the service can be achieved in case it can be properly identified.
14.4.1. Preparing the Scan
For a simplified export of the scan results Greenbone Networks prepared a special report format plug-in. The resulting data file makes it easy to further process the data.
Download the TLS-Map Report Format Plug-in.
Important
External links to the Greenbone download website are case-sensitive.
Note that upper cases, lower cases and special characters have to be entered exactly as they are written in the footnotes.
Select Configuration > Report Formats in the menu bar.
Click
 .
.Click Browse… and select the previously downloaded report format plug-in.
Click Save.
→ The imported report format is displayed on the page Report Formats.
In the row of the report format click
 to verify it.
In the row of the report format click
.For Active select the radiobutton Yes.
Click Save.
14.4.2. Checking for TLS and Exporting the Scan Results
For an overview on TLS usage in the network or on single systems Greenbone Networks recommends using one of the following scan configurations:
- TLS-Map scan configuration
- This scan configuration identifies the used protocol versions and the offered encryption algorithms but does not try to identify in-depth details of the service.
- TLS-Map with service detection
- This scan configuration identifies the used protocol versions and the offered encryption algorithms. Additionally, it tries to identify in-depth details of the service. This identification takes more time and produces more network traffic compared to the simple scan configuration mentioned above.
Important
External links to the Greenbone download website are case-sensitive.
Note that upper cases, lower cases and special characters have to be entered exactly as they are written in the footnotes.
Download one of the scan configurations according to the needs.
Select Configuration > Scan Configs in the menu bar.
Click
.Click Browse… and select the previously downloaded scan configuration.
Click Import.
→ The imported scan configuration is displayed on the page Scan Configs.
Select Configuration > Port Lists in the menu bar to have a look at the pre-configured port lists.
Note
By clicking
own port lists can be created (see Chapter 10.7.1).Choose a suitable list of ports that should be scanned.
Note
Pay attention that all ports of interest are covered by the list.
The more extensive the list the longer the scan will take but this may also detect services at unusual ports.
Consider that the TLS protocol is based on the TCP protocol. A port list with UDP ports will slow down the scan without benefits. If any TCP ports should be covered All TCP should be selected.
Create a new target, create a new task and run the task as described in Chapter 10.2.
When creating the task, use the previously imported scan configuration.
When the scan is completed select Scans > Reports in the menu bar.
Click on the date of the report.
→ The report for the TLS-Map scan is displayed.
The report can be used as described in Chapter 11.2.1.
To export the report click
.For Include activate the checkbox Notes to include attached notes and the checkbox Overrides to label enabled overrides and include their text field (see Chapter 11.2.2).
Select TLS Map in the drop-down-list Report Format.
Click OK and download the CSV file.
→ The report can be used in spreadsheet applications.
The file contains one line per port and systems where an SSL/TLS protocol is offered:
IP,Host,Port,TLS-Version,Ciphers,Application-CPE
192.168.12.34,www.local,443,TLSv1.0;SSLv3,SSL3_RSA_RC4_128_SHA;TLS1_RSA_RC4_128_SHA,
  cpe:/a:apache:http_server:2.2.22;cpe:/a:php:php:5.4.4
192.168.56.78,www2.local,443,TLSv1.0;SSLv3,SSL3_RSA_RC4_128_SHA;TLS1_RSA_RC4_128_SHA,
  cpe:/a:apache:http_server:2.2.22
Separated by commas, each line contains the following information:
- IP
- The IP address of the system where the service was detected.
- Host
- The DNS name of the system in case it is available.
- Port
- The port where the service was detected.
- TLS-Version
- The protocol version offered by the service. In case more than one is offered, the versions are separated with semicolons.
- Ciphers
- The encryption algorithms offered by the service. In case more than one is offered, the algorithms are separated with semicolons.
- Application-CPE
- The detected application in CPE format. In case more than one is identified, the applications are separated with semicolons.
14.5. Running an OVAL System Characteristics Scan
The Open Vulnerability and Assessment Language (OVAL) is an approach for a standardized description of the (security) state of an IT system. OVAL files describe a vulnerability and define tests to identify the state in which a system is vulnerable. They usually refer to specific versions of software products for which a known vulnerability exists.
In order to check for vulnerabilities described in an OVAL definition, information about the current state of the system is required. This information is collected in a standardized format as well: the OVAL System Characteristics (SC).
There is a number of solutions which perform checks based on OVAL definitions and SC files. OVAL definitions are provided by various vendors. MITRE provides the OVAL Repository with more than 13,000 entries.
14.5.1. Preparing the Scan
Each OVAL SC file contains only information about one system. Collecting a large number of SCs from many different systems in one single step is possible when using the Greenbone Security Manager (GSM).
Greenbone Networks provides two report format plug-ins:
- OVAL System Characteristics: produces a single SC file in XML format.
- OVAL System Characteristics Archive: can be used for an arbitrary number of SCs which are collected in a ZIP folder. The names of the individual SC files contain the IP address of the target system.
Download the desired report format plug-in.
Important
External links to the Greenbone download website are case-sensitive.
Note that upper cases, lower cases and special characters have to be entered exactly as they are written in the footnotes.
Select Configuration > Report Formats in the menu bar.
Click
.Click Browse… and select the previously downloaded report format plug-in.
Click Save.
→ The imported report format is displayed on the page Report Formats (see Fig. 14.30).

Fig. 14.30 Imported report formats
In the row of the report format click
to verify it.In the row of the report format click
.For Active select the radiobutton Yes.
Click Save.
14.5.2. Collecting and Exporting Scan Results as OVAL SCs
During a scan the GSM collects large amounts of data about the target system. This information is managed in an optimized data pool. Parts of this information are usable as a component of an OVAL SC.
The creation of OVAL SC files is not enabled by default. A scan configuration can be used for enabling.
Download the scan configuration Collect OVAL SC Scan Config.
Important
External links to the Greenbone download website are case-sensitive.
Note that upper cases, lower cases and special characters have to be entered exactly as they are written in the footnotes.
Select Configuration > Scan Configs in the menu bar.
Click
.Click Browse… and select the previously downloaded scan configuration (see Fig. 14.31).
Click Import.
→ The imported scan configuration is displayed on the page Scan Configs.
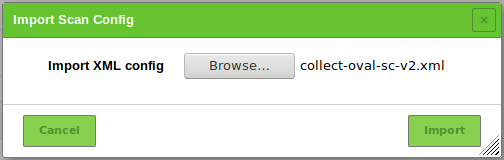
Fig. 14.31 Importing a scan configuration
Note
The most comprehensive results of a target system can be collected using authenticated scans. For this using credentials to apply local security checks is required (see Chapter 10.3.2).
Ensure that the account has the necessary privileges. For unixoid systems an account with low privileges is usually sufficient, for Windows system administrative privileges are required.
Create a new target, create a new task and run the task as described in Chapter 10.2.
When creating the task, use the previously imported scan configuration.
When the scan is completed, select Scans > Reports in the menu bar.
Click on the date of the report.
→ The report for the OVAL SC scan is displayed.
The report can be used as described in Chapter 11.2.1.
Note
The results are returned in the severity Log. By default, the severity Log is not displayed and has to be enabled in the filter (see Chapter 8.4).
To do so, click
in the filter bar.For Severity (Class) activate the checkbox Log.
Click Update.
To export the report click
.For Include activate the checkbox Notes to include attached notes and the checkbox Overrides to label enabled overrides and include their text field (see Chapter 11.2.2).
Select OVAL-SC or OVAL-SC Archive in the drop-down-list Report Format.
Click OK.
→ The report is exported as an XML file or as a ZIP folder containing XML files.
14.6. Running a Policy Control Scan
Using the Greenbone Security Manager it is possible to test a specific setting to compare a desired configuration with the current configuration.
Download the scan configuration Policy Controls Scan Configuration.
Important
External links to the Greenbone download website are case-sensitive.
Note that upper cases, lower cases and special characters have to be entered exactly as they are written in the footnotes.
Select Configuration > Scan Configs in the menu bar.
Click
.Click Browse… and select the previously downloaded scan configuration (see Fig. 14.32).
Click Import.
→ The imported scan configuration is displayed on the page Scan Configs.
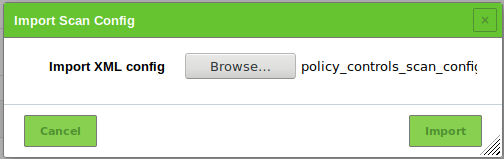
Fig. 14.32 Importing a scan configuration
In the row of the scan configuration click
.In the section Edit Network Vulnerability Test Families click
for Policy.Activate the checkboxes of the NVTs that should be executed.
Click Save to save the family of NVTs.
Click Save to save the scan configuration.
Create a new target, create a new task and run the task as described in Chapter 10.2.
When the scan is completed, select Scans > Reports in the menu bar.
Click on the date of the report.
→ The report for the policy control scan is displayed.
The report can be used as described in Chapter 11.2.1.
Note
The results are returned in the severity Log. By default, the severity Log is not displayed and has to be enabled in the filter (see Chapter 8.4).
To do so, click
in the filter bar.For Severity (Class) activate the checkbox Log.
Click Update.