5 Importing Data
An OPENVAS SCAN appliance must be connected to OPENVAS REPORT to import vulnerability data from it.
5.1 Preparing the Appliance
5.1.1 Connection Requirements
SSH (port 22/TCP) and the Greenbone Management Protocol (GMP) must be activated on the appliance that should be connected to OPENVAS REPORT.
Instructions for enabling the services can be found here in the appliance user manual.
5.1.2 Tagging Scan Tasks
OPENVAS REPORT only imports asset and vulnerability data from scan tasks that have a tag with the name openvas-data.
The corresponding tag must be assigned to the desired scan tasks on the appliance.
There are three options for tagging a task on the appliance:
Access the details page of a task, select the tab User Tags and create a new tag with the name
openvas-datafor the task.The instruction for this can be found here in the appliance user manual.
Create a tag with the name
openvas-data, access the list page of all tasks and link the previously created tag to one or multiple task(s).The instruction for creating a tag can be found here in the appliance user user manual.
The instruction for linking a tag via the list page can be found here in the appliance user manual.
Create a tag with the name
openvas-dataand – during creation – directly select the task(s) to which the tag should be linked.The instruction for this can be found here in the appliance user manual.
Note
Only tasks for vulnerability scans should be tagged, for example tasks using the scan configuration Full and fast.
Tasks for discovery scans, for example tasks using the scan configuration Discovery, should not be tagged. These scan configurations only use tests that provide information about the target system. No vulnerabilities are being detected.
As OPENVAS REPORT always displays the latest data, an import of a discovery task would result in no vulnerabilities being shown at all for the affected assets.
Data from container tasks cannot be imported into OPENVAS REPORT.
It is recommended to create and save a task filter on the appliance with the name OPENVAS REPORT that filters for the tag
openvas-data. With this filter, all data that is synchronized with OPENVAS REPORT is easily and quickly visible on the appliance. The instruction for creating such a filter can be found here in the appliance user manual.
5.2 Connecting an Appliance to OPENVAS REPORT
An appliances can be connected to OPENVAS REPORT as follows:
Select Import > Sources in the menu.
Click + Add appliance.
Fill in the input boxes (see Fig. 5.1):
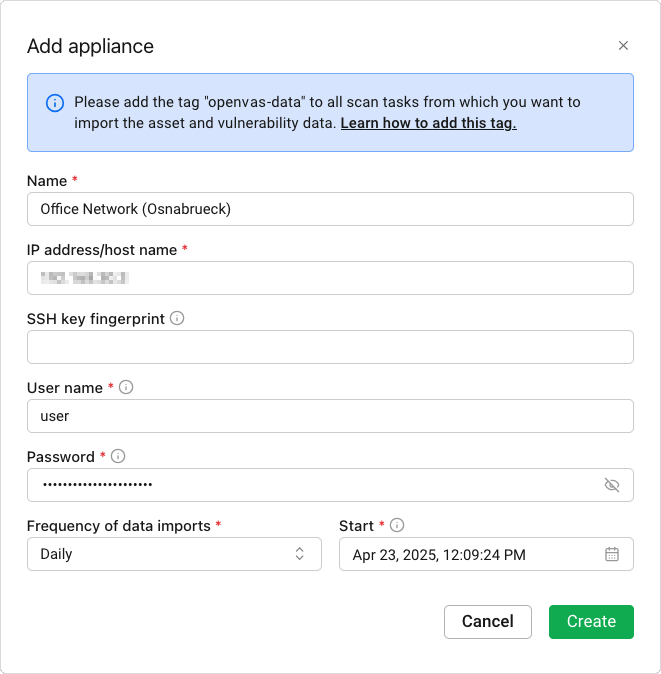
Fig. 5.1 Connecting an appliance
- Name
The name can be chosen freely. A descriptive name should be chosen if possible.
This input box is mandatory.
- IP address/host name
IP address or host name of the appliance.
This input box is mandatory.
- SSH key fingerprint
Fingerprint of the SSH key of the appliance.
This input box is optional. If no fingerprint of the SSH key is provided, OPENVAS REPORT will retrieve the fingerprint of the SSH key automatically.
Note
Data will only be imported from an appliance when the fingerprint of the appliance’s SSH key is stored in OPENVAS REPORT and both fingerprints match.
- User name
User name of the web user of the appliance.
This input box is mandatory.
- Password
Password of the web user of the appliance.
This input box is mandatory.
- Frequency of data imports
Frequency of the data imports, for example, Every 12 hours or Daily. The default is Once.
This input box is mandatory.
- Start
Date and the time of the first import. All subsequent import times are calculated based on the specified frequency.
This input box is mandatory.
Note
When selecting the start time, the following must be observed:
It is recommended to schedule the imports when users do not use OPENVAS REPORT, for example during the night.
The appliance must have finished its regular vulnerability scans, and a certain buffer should be planned in case scan tasks take longer than usual.
Click Create.
If no fingerprint was provided in step 3, check the retrieved fingerprint as described in the appliance user manual and click Accept fingerprint (see Fig. 5.2).
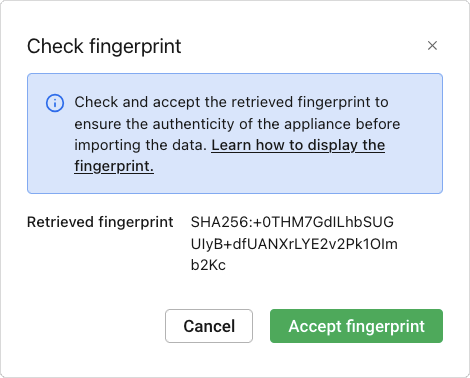
Fig. 5.2 Connecting an appliance
→ The appliance is connected and displayed on the Appliances page.
5.3 Importing Data from an Appliance
OPENVAS REPORT imports data from an appliance based on a schedule (see Chapter 5.2), or when the import is triggered manually:
Select Import > Sources in the menu.
Click
 in the Action column and select Import data from the drop-down list.
→ The import of the data from the appliance is started.
Note
Vulnerabilities with the severity classes Log and False Positive on the appliance are not imported into OPENVAS REPORT.
Depending on the amount of data to be imported, this action may take a while.
5.4 Managing All Connected Appliances
5.4.1 Viewing All Connected Appliances
All connected appliances can be displayed by selecting Import > Sources in the menu (see Fig. 5.3).
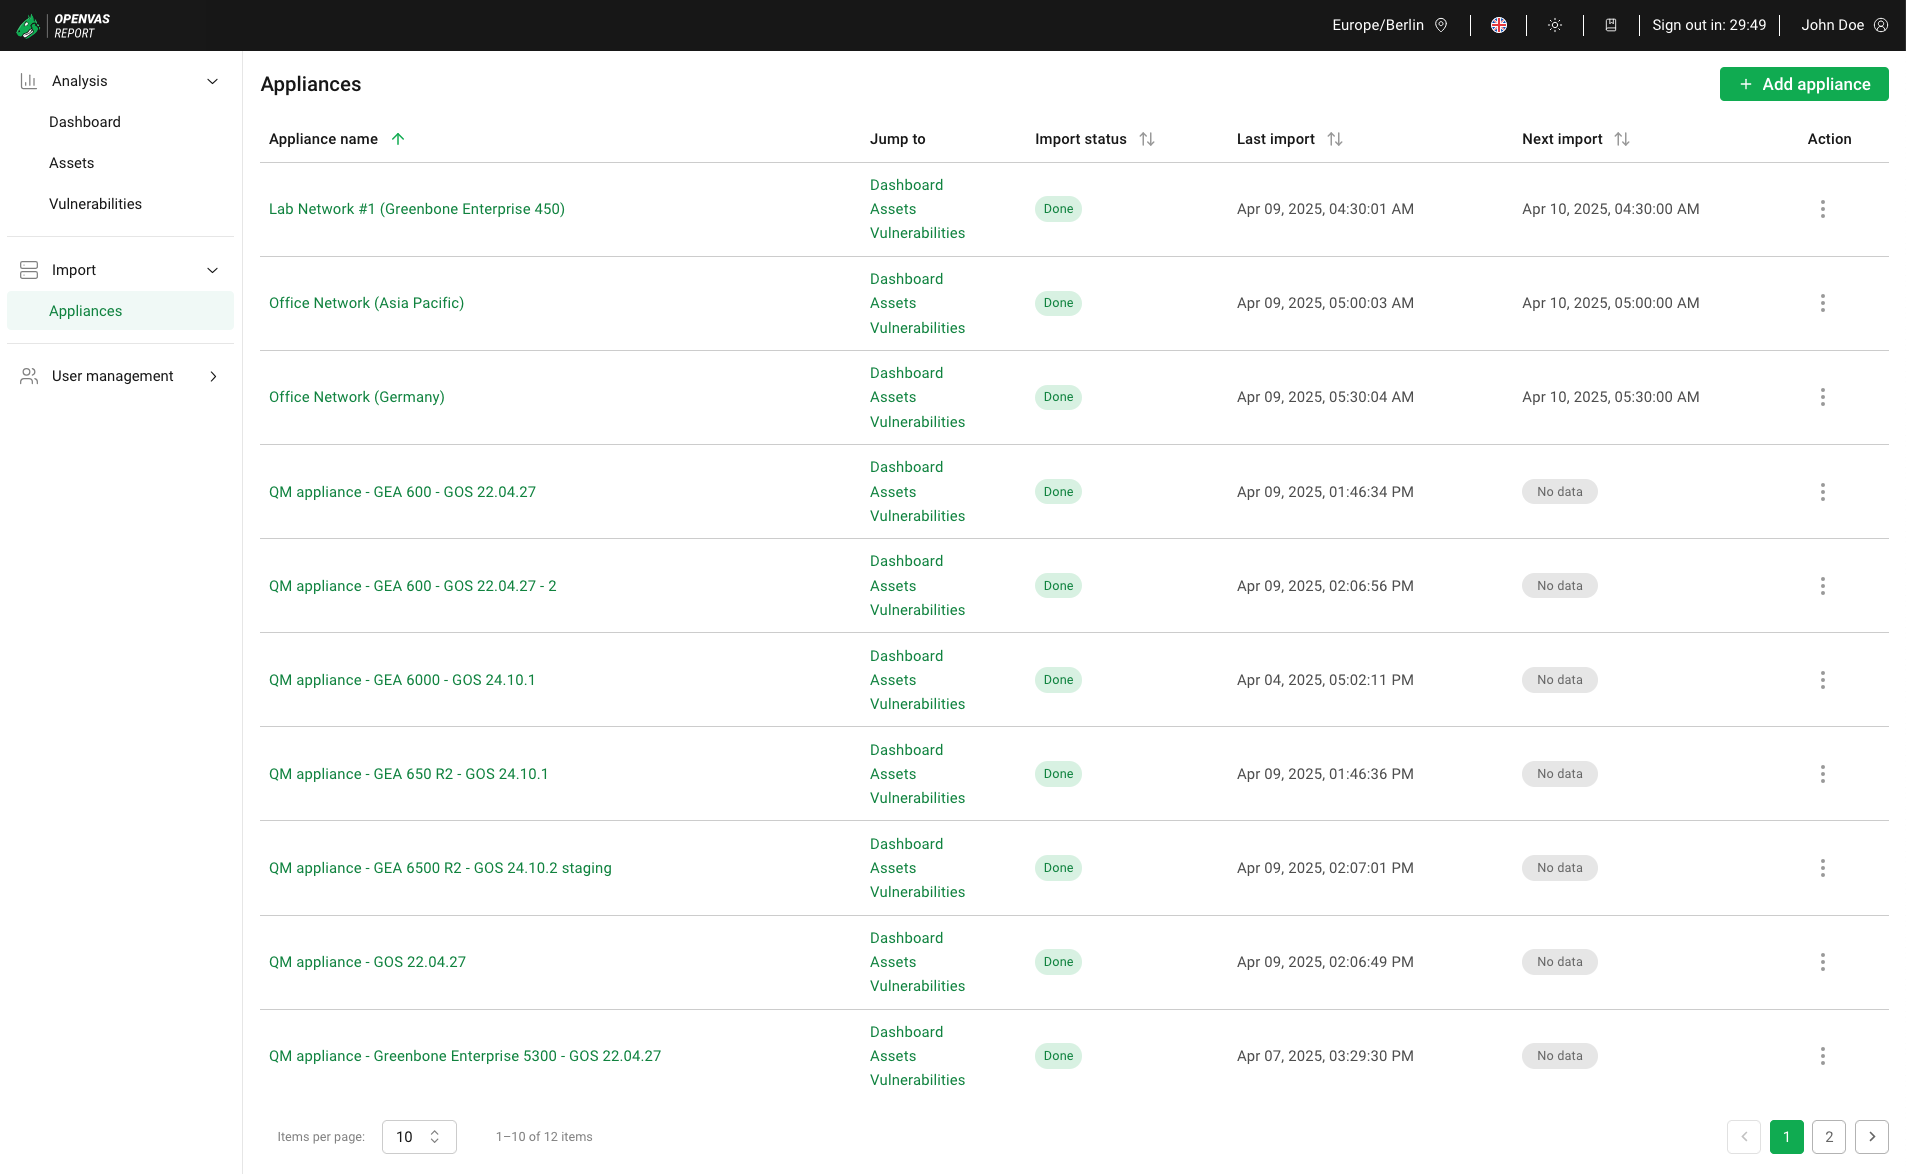
Fig. 5.3 Appliances page displaying all connected appliances
For all appliances, the following information is displayed:
- Appliance name
Name that was specified for the appliance when it was connected to OPENVAS REPORT (see Chapter 5.2).
Clicking on the appliance name opens the web interface of the connected appliance.
- Jump to
Links to the dashboard (see Chapter 6.1), the assets overview page (see Chapter 6.2.2.1) and the vulnerabilities overview page (see Chapter 6.4.1.1). The respective page that is accessed is already filtered to show only the results for the selected appliance.
- Import status
The status of the import can be one of the following:
 There was no import yet.
 An import is currently running.
 The last import was successful.
 The last import was not successful.
Moving the cursor over
The last import was not successful.
Moving the cursor over  displays more information about the reason for the failure:
The appliance could not be reached due to a technical problem like a network outage. If applicable, analyze and fix the problem and then start the import again (see Chapter 5.3).
The authentication failed, for example because the password of the web user of the appliance has changed. Update the user name and/or password in OPENVAS REPORT (see Chapter 5.4.2) and then start the import again (see Chapter 5.3).
The fingerprint of the SSH key of the appliance does not match the fingerprint stored in OPENVAS REPORT, for example because the SSH key on the appliance has changed. Update the SSH key fingerprint in OPENVAS REPORT (see Chapter 5.4.2) and then start the import again (see Chapter 5.3).
- Last import
Date and the time of the last successful import.
The last import is displayed as
 if there was no import yet.
- Next import
Date and time of the next scheduled import.
The next import is displayed as
if there is no import scheduled in the future.
When clicking the following actions are available:
Import data (see Chapter 5.3).
Edit the appliance (see Chapter 5.4.2).
Delete the appliance (see Chapter 5.4.3).
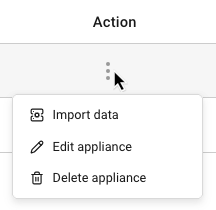
Fig. 5.4 Actions for all connected appliances
5.4.2 Editing an Appliance
Editing an appliance may be necessary in the following cases:
Changing the appliance name.
Changing the host name when the host name of the appliance was changed.
Changing the user name and/or password when the credentials of the web user of the appliance were changed.
Changing the fingerprint of the SSH key when the SSH key of the appliance was changed.
Changing the frequency and/or time of the data import.
An appliance can be edited as follows:
Select Import > Sources in the menu.
Click
in the Action column and select Edit appliance from the drop-down list.Update the required information (see Chapter 5.2).
Note
When renaming an appliance, all imported data for the appliance must be updated as well. This may take a while. It is therefore possible that filters for the new appliance name do not yet work, although the new name is already displayed on the Appliances page.
Click Save.
→ The appliance information is updated.
Tip
If the SSH key of the appliance was changed, remove the fingerprint in OPENVAS REPORT and click Save. This will retrieve the fingerprint of the SSH key automatically to check and accept it.
5.4.3 Deleting an Appliance
Note
When deleting an appliance from OPENVAS REPORT, all data imported from this appliance will be removed permanently.
Deleting an appliance may be necessary in the following cases:
Data should not be imported anymore, for example test data.
An appliance does not exist anymore, for example when it was replaced by another appliance.
Select Import > Sources in the menu.
Click
in the Action column and select Delete appliance from the drop-down list.→ A warning dialog is displayed asking to confirm the deletion.
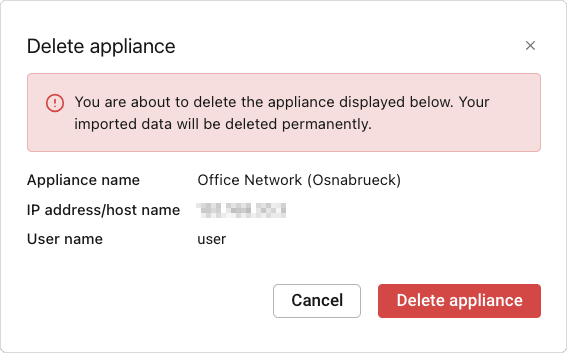
Fig. 5.5 Deleting an appliance
Click Delete appliance.
→ The appliance and its imported data is deleted from OPENVAS REPORT. The appliance is not displayed in the list of appliances anymore.