10 Performing Agent-Based Scans
Important
Agent-based scanning is currently available as a technology preview feature only. More information about technology preview features can be found in Chapter 2.4.
Before it can be used, the feature must be enabled in the GOS administration menu (see Chapter 6.2.17).
An agent is a piece of software that is installed on a target system. It is installed as a service with required rights and runs in the background. Its task is to identify installed software products.
When the agent scans the target system, it detects all products installed on it and collects this information in a Software Bill of Materials (SBOM). This SBOM is sent from the agent to the agent controller, which sends the SBOM to Skiron.
Skiron is a scan service. It scans the SBOM for known vulnerabilities and sends a scan report back to the agent controller.
The agent controller stores the report. The most recent report is always saved, and the previous report is overwritten.
When an agent task is run, the latest report is requested from the agent controller and made available as a scan report in OPENVAS SCAN.
Agent-based scanning removes the need to configure credentials on the appliance to run authenticated scans. Additionally, it allows scanning target systems which the actual scanner of the appliance has no network route to.
Note
The agents connect to the agent controller on port 8443. This port must be allowed in the firewall and proxy settings.
A feed import owner must be set in order for agent-based scanning to work (see Chapter 6.2.1.10.1).
Agent-based scanning is supported for the following target operating systems:
Debian 11 and higher
Ubuntu 22.04 LTS and higher
Red Hat Enterprise Linux 8 and higher
SUSE Linux Enterprise Server 15 and higher
Microsoft Windows 10 and higher
Microsoft Windows Server 2016 and higher
The following steps have to be executed to configure an agent-based scan:
Optional: creating an agent controller (see Chapter 10.1)
Installing the agent on the target system (see Chapter 10.2)
Creating an agent group (see Chapter 10.4)
Creating an agent task (see Chapter 10.5)
Running the agent task (see Chapter 10.6)
10.1 Setting up an Agent Controller
The agent controller has the function to receive data from the agents and to store the scan results of the latest agent scan.
Note
Usually, the appliance itself acts as the agent controller.
Therefore, a default agent controller named Agent Controller Default with the host localhost is already available.
It is displayed on the Scanners page.
10.1.1 Creating an Agent Controller
If an agent controller other than the default agent controller should be used, it must be set up as a new scanner as follows:
Select Configuration > Scanners in the menu.
Click
 .
.Enter a name for the agent controller.
Select Agent Controller in the drop-down list Scanner Type.
Enter the host name and the port in the input boxes Host and Port.
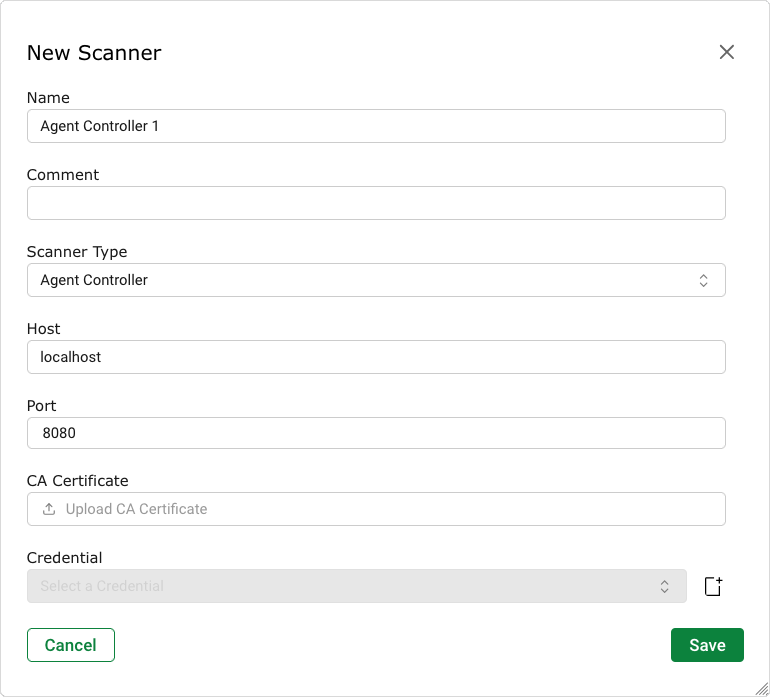
Fig. 10.1 Creating a new agent controller
Click Save.
10.1.2 Changing the Default Configuration of the Agent Controller and the Agents
The default configuration of the agent controller and the agents connected to an agent controller can be changed.
Note
The default configuration for the agents is only applied when initially registering an agent with the agent controller. Later changes to the default configuration of the agent controller will not change the configuration of already registered agents.
The agent controller can be configured as follows:
Select Configuration > Scanners in the menu.
Click on the name of an agent controller to display the details of the agent controller.
Click
 to open the details page of the agent controller.
Click on the tab Agent Default Configuration.
Click
 for the setting that should be edited and make the desired change.
Note
The settings Scheduler Cron Time, Interval (seconds) (heartbeat) and Update to Latest can also be configured for a single agent and for an agent group.
Setting
Description
Retry Attempts
Number of attempts the agent performs when the result of a scan cannot be submitted to the agent controller.
Retry Delay
Delay in seconds the agent takes after each retry.
Max Jitter
Seconds the retry should jitter on each retry to avoid peaks of agents retrying.
Bulk Size
Number of application identification scripts run in parallel on the agent.
Bulk Throttle Time
Time in milliseconds after which an identification should have finished.
Indexer Directory Depth
Depth to search through directories on the target system to find binaries.
Scheduler Cron Time
Standard time an agent performs a scan on the target system. The time is specified with a cron expression.
Interval
Default interval the agent tries to reach the agent controller.
Misses Until Inactive
Number of heartbeats an agent can miss until it is considered inactive.
Update to Latest
Whether software updates should automatically be installed on an agent.
Click
 .
.
10.2 Setting up an Agent
An agent is a piece of software that is installed on a target system. Its task is to identify installed software products.
For installing an agent, the following requirements have to be fulfilled on the target system:
Linux-based systems:
The user installing the agent has root/sudo privileges.
The tool
curlorwgetis installed.CPU: AMD64 or ARM64 architecture
RAM: ~ 50 MB when idle, ~ 150 MB for processing/scanning
Disk space: 100 MB
Microsoft Windows systems:
The user installing the agent has admin privileges.
Powershell 5.1 or higher is installed.
The tool
curlis installed.CPU: AMD64 architecture
RAM: ~ 80 MB when idle, ~ 250 MB for processing/scanning
Disk space: 100 MB
Note
The agents connect to the agent controller on port 8443. This port must be allowed in the firewall and proxy settings.
10.2.1 Installing an Agent on the Target System
An agent can be installed using an install script that is downloaded from the appliance.
The install script detects the platform and architecture of the target system. It then finds a reachable server endpoint (IP address or DNS) and downloads the appropriate install package (DEB/RPM for Linux-based systems, MSI for Microsoft Windows-based systems). Afterwards, the downloaded package is installed and the agent is configured to connect to the agent controller.
An agent can be installed on the target system as follows:
Select Configuration > Agent Installers in the menu.
Select the agent controller that the agent should be connected to in the drop-down list Agent Controller.
Under Quick Install, click
 for the command for the desired operating system.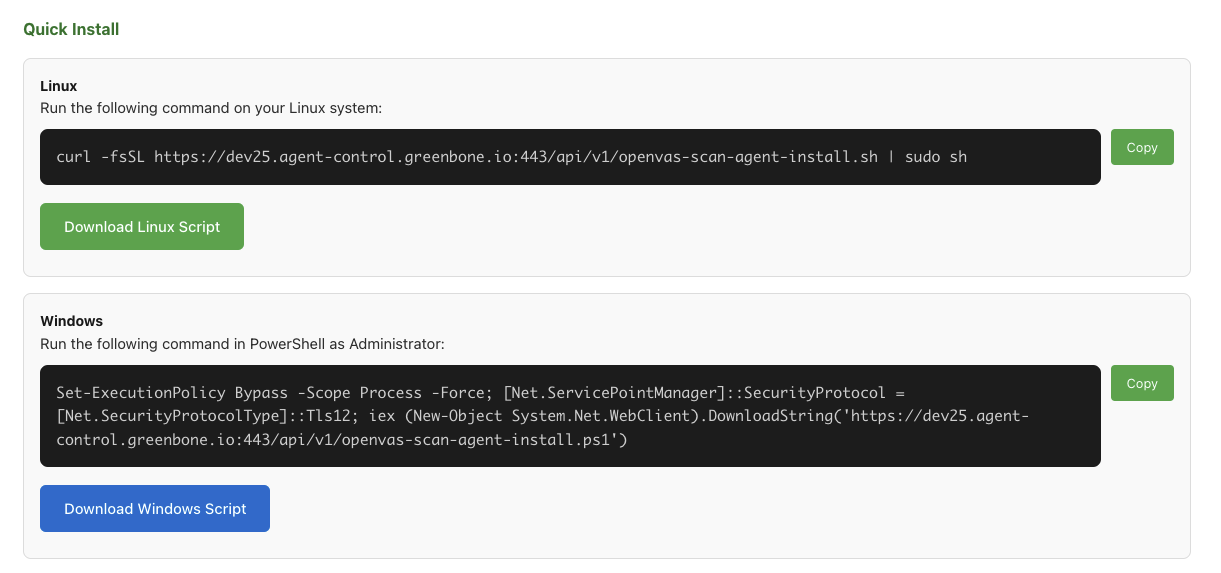
Fig. 10.2 Copying the agent install script
Open a CLI/shell on the target system that should be scanned.
Paste and run the previously copied command.
Note
The command will run the install script for the agent.
Alternatively, the script can directly be downloaded by clicking Download Linux Script or Download Windows Script, and run on the target system.
→ The agent is installed on the target system and contacts the agent controller selected in step 1.
Select Configuration > Agents in the menu.
Note
The list of agents is updated every five minutes. The date and time of the last update is displayed in the upper left corner.
Click
 in the upper left corner for an instant update.
→ The previously installed agent is displayed on the Agents page. The agent ID shown in the column Agent consists of the target system’s host name and a random eight-digit alphanumeric string.
The Authorized status is
 .
.In the row of the agent, click
 .
.Note
All unauthorized agents on a page can be authorized at the same time by clicking
below the table.
10.2.2 Configuring an Agent
Note
On installation, an agent receives the default settings from the agent controller (see Chapter 10.1.2). This includes how often the agent contacts the agent controller, and whether software updates should be installed automatically on the agent.
However, these settings can also be changed for a single agent.
An agent can be configured as follows:
Select Configuration > Agents in the menu.
Note
The list of agents is updated every five minutes. The date and time of the last update is displayed in the upper left corner.
Click
in the upper left corner for an instant update.In the row of the agent, click
.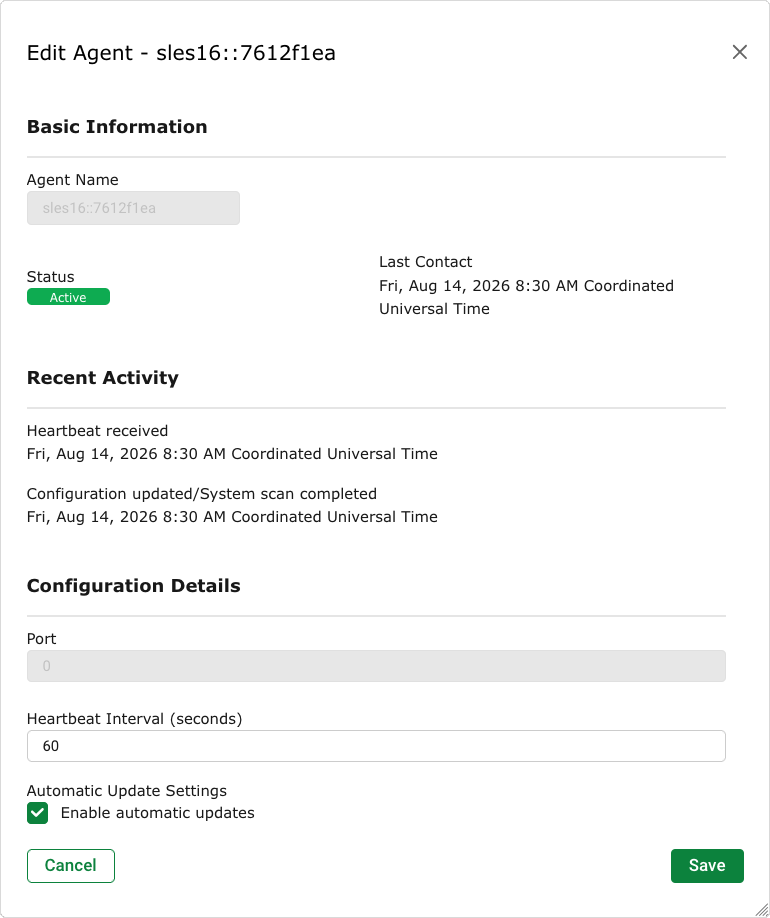
Fig. 10.3 Configuring an agent
The agent regularly contacts the agent controller to request configuration and setting changes.
Enter the desired time interval in seconds in the input box Heartbeat Interval.
Activate the checkbox Enable automatic updates if the agent should automatically be updated if a new software version is available.
Click Save.
10.2.3 Additional Installation Options and Information
The Agents Installers page provides the following additional installation options and information:
- Self-signed Certificate / Testing (skip SSL verification)
These commands can be used if OPENVAS SCAN is using a self-signed certificate. Self-signed certificates are not automatically classified as trusted by the client, so the SSL verification fails.
These certificates should only be used for testing purposes. Alternatively, a certificate authority (CA) must be installed on the client machines.
- Proxy Configuration
If the target system on which the agent should be installed requires that traffic is routed through a proxy, the install script automatically detects the proxy settings from the target system.
The install script first attempts a direct connection and then falls back to the proxy.
The flag
--proxy-primary(Linux)/-ProxyPrimary(Microsoft Windows) can be used for “proxy-first” fallback mode.The flag
--proxy(Linux)/-Proxy(Microsoft Windows) can be used if only the specified proxy should be used. In this case, the script does not attempt a direct connection.
- Verified Install (with automatic checksum verification)
These commands can be used if a bootstrap script should be used instead of directly downloading and running the install script. The bootstrap script downloads the install script and verifies its checksum before running it.
- Script Checksums (for manual verification)
The checksums can be used for manual verification.
- Configuration
The table shows the configured host addresses (DNS names and IP addresses) that the install script uses to connect to OPENVAS SCAN from the target system. The install script will try DNS names first.
The server certificate fingerprint can be used for the manual installation of the packages under Available Packages.
10.2.4 Saving a Specific Installer Package
The installer is distributed via the OPENVAS ENTERPRISE FEED. Only the latest version of each installer is included there.
The feed is updated every day. Therefore, if multiple agents are installed over the course of several days, their versions may differ from one another.
If a specific version of the installer needs to be available for future use, it must therefore be downloaded from the Available Packages table.
10.3 Installing Agents Using Microsoft Configuration Manager
Multiple agents can be distributed at the same time on Microsoft Windows via Microsoft Configuration Manager (ConfigMgr), formerly System Center Configuration Manager (SCCM).
For installing multiple agents using the Microsoft Configuration Manager, the following requirements have to be fulfilled:
The Microsoft Configuration Manager is accessible on the site server.
The agent MSI installer file is available on a network share accessible by the Microsoft Configuration Manager server (for example,
\\server\share\OpenVAS_ScanAgent.msi).At least one configured Distribution Point (DP) is available.
The target systems have the Microsoft Endpoint Configuration Manager (MECM), formerly System Center Configuration Manager (SCCM), installed and configured to report to the site.
Appropriate Microsoft Configuration Manager and Microsoft Endpoint Configuration Manager permissions are granted (“Application Administrator” or “Full Administrator” role).
The agent requires two mandatory parameters during installation: SERVER_ENDPOINT and SERVER_CERT_FINGERPRINT.
To retrieve those values, open Configuration > Agent Installers on the web interface. The values can be found the Configuration table. One of the displayed server endpoints is required.
The following requirements have to be fulfilled on the target system:
Microsoft Windows systems:
The user installing the agent has admin privileges.
Powershell 5.1 or higher is installed.
The tool
curlis installed.CPU: AMD64 architecture
RAM: ~ 80 MB when idle, ~ 250 MB for processing/scanning
Disk space: 100 MB
10.3.1 Creating the Application
Open the Microsoft Configuration Manager.
Navigate to Software Library > Overview > Application Management > Applications in the left menu.
Click Create Application in the upper left corner.
→ The Create Application Wizard is opened.
Select the radio button Automatically detect information about this application from installation files.
Select Windows Installer (*.msi file) in the drop-down list Type.
Click Browse… and select the MSI file on the network share.
Click Next >.
→ The wizard will automatically extract the application metadata from the MSI file.
Review the imported information.
Application name: OpenVAS Scan Agent
Deployment type name: Windows Installer (*.msi file)
Content location: UNC path to the source files
Installation program: msiexec command line
Click Next >.
→ The auto-populated installation command must be modified to include a server endpoint and the server certificate fingerprint.
Note
Both values can be retrieved from the Configuration table on the Agent Installers page of the web interface.
One of the displayed server endpoints is required.
Change the entry in the input box Installation program as follows:
msiexec /i "OpenVAS_ScanAgent.msi" /qn SERVER_ENDPOINT=<SERVER_ENDPOINT> SERVER_CERT_FINGERPRINT=<CERT_FINGERPRINT>
Example:
msiexec /i "OpenVAS_ScanAgent.msi" /qn SERVER_ENDPOINT=https://openvas.example.com:9390 SERVER_CERT_FINGERPRINT=A1:B2:C3:D4:E5:F6:...
Select Install for system or Install for user in the drop-down list Install behavior.
Click Next >.
Review all settings on the Summary page and click Next >.
→ The application is created.
Click Close.
→ The application is displayed in the table. The status is Active.
10.3.2 Distributing the Content to Distribution Points
Before the agent can be deployed to clients, the content must be distributed to one or more distribution points.
Right-click on the application and select Distribute Content.
→ The Distribute Content Wizard is opened.
Verify that the application content is listed.
Click Next >.
On the Content Destination page, click Add and select Distribution Point.
Select the distribution point server and click OK.
Click Next >.
Review all settings on the Summary page and click Next >.
Click Close.
→ The content is distributed to the distribution point.
Navigate to Monitoring > Overview > Distribution Status > Content Status in the left menu.
Select OpenVAS Scan Agent in the table.
Verify that the distribution was successful. This is indicated by a green circle in the lower right section Completion Statistics.
10.3.3 Creating a Device Collection (Optional)
If a dedicated collection for the deployment target is required, it can be created as follows:
Navigate to Assets and Compliance > Overview > Device Collections in the left menu.
Right-click on the menu item Device Collections and select Create Device Collection.
→ The Create Device Collection Wizard is opened.
Enter a name for the collection.
Select the desired item in the drop-down list Limiting collection.
Click Next >.
Add membership rules as required.
Review all settings on the Summary page and click Next >.
Click Close.
→ The device collection is created.
10.3.4 Deploying the Application
The application can be deployed as follows:
Navigate to Software Library > Overview > Application Management > Applications in the left menu.
Right-click on the application and select Deploy.
→ The Deploy Software Wizard is opened.
OpenVAS Scan Agentis already entered in the input box Software.Click Browse… next to the input box Collection and select the target system collection, for example, All Users or a custom device collection.
Click Next >.
Select Install in the drop-down list Action.
Select Required or Available in the drop-down list Purpose.
Required: deployments will install automatically according to the schedule.
Available: deployments will appear in Software Center for users to install at their convenience.
Click Next >.
Select Display in Software Center and show all notifications in the drop-down list User notifications.
If applicable, configure the behavior for Windows Embedded devices.
Click Next >.
Review all settings on the Summary page and click Next >.
Click Close.
→ The deployment is created.
10.3.5 Veryfing the Deployment on the Target System
The successful deployment on the target system can be verified as follows:
Connect to a target system (for example, via Remote Desktop Protocol).
Navigate to C:Program Files in the explorer.
Verify that the agent files are located in the folder.
Navigate to C:WindowsCCM in the explorer.
Verify that the agent is installed.
Open the Software Center.
Select the tab Available Software.
Verify that the agent deployment appears there.
Note
If the deployment does not appear immediately on the target system, a policy refresh from the Microsoft Configuration Manager can be forced.
Open the Microsoft Configuration Manager.
Navigate to Assets and Compliance > Overview > Devices in the left menu.
Right-click on the target device and select Client Notification > Download Computer Policy.
or
On the target system itself, open the Microsoft Control Panel.
Click Configuration Manager.
Select the tab Actions.
Run Machine Policy Retrieval & Evaluation Cycle.
10.3.6 Monitoring the Deployment Status
The deployment progress can be monitored as follows:
Open the Microsoft Configuration Manager.
Navigate to Monitoring > Deployments in the left menu.
Select the OpenVAS Scan Agent deployment.
Check the Compliance statistics for success/failure counts.
Navigate to Assets and Compliance > Overview > Devices in the left menu.
Verify the target system activity and status.
10.4 Creating an Agent Group
Any agent that should be used for scanning must belong to an agent group.
A new agent group can be created as follows:
Select Configuration > Agent Groups in the menu.
Click
.Enter a name for the agent group.
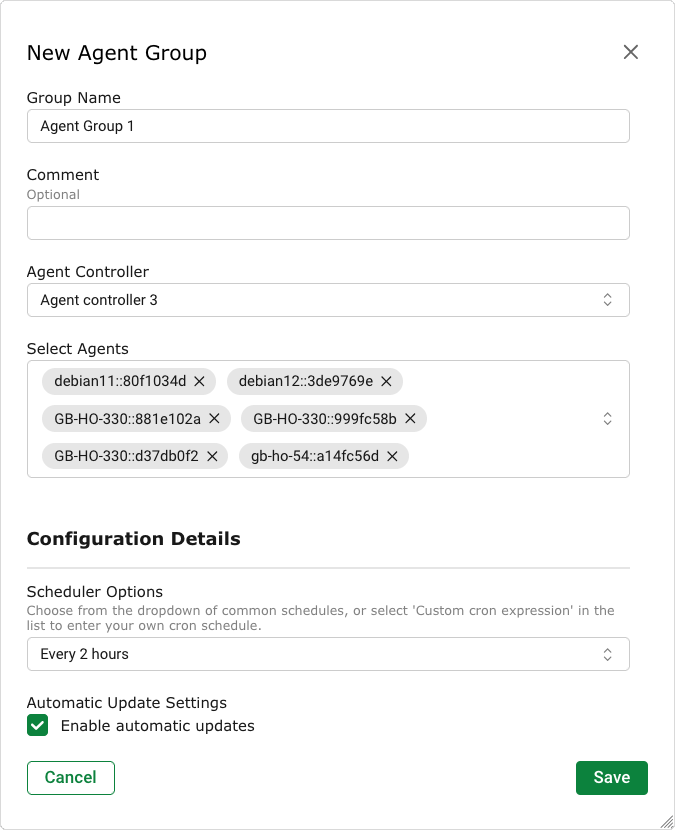
Fig. 10.4 Creating a new agent group
Select the agent controller (see Chapter 10.1) the agents are connected to in the drop-down list Agent Controller.
Select the agents that should be in this group in the drop-down list Select Agents.
Note
On installation, an agent receives the default settings from the agent controller (see Chapter 10.1.2). This includes how often the agent executes a scan on the target system.
However, this setting can also be changed for all agents in an agent group.
Select how often the agents in this group should execute a scan on the target system in the drop-down list Scheduler Options.
Each predefined option is based on a cron expression.Example: Every 6 hours means 0:00, 6:00, 12:00, 18:00.For an individual schedule, a custom cron expression can also be specified. This expression must follow the formatminute hour day month weekday.Example:0 0,12 1 */2 *means “at midnight and noon on the first day of every second month”.Click Save.
→ The agent group is created and displayed on the page Agent Groups.
10.5 Creating an Agent Task
With an agent task, the latest report from an agent is retrieved from the agent controller and converted to a scan report.
A new agent task can be created as follows:
Select Scans > Tasks in the menu.
Click
and select New Agent Task in the drop-down list.Define the agent task (see Fig. 10.5).
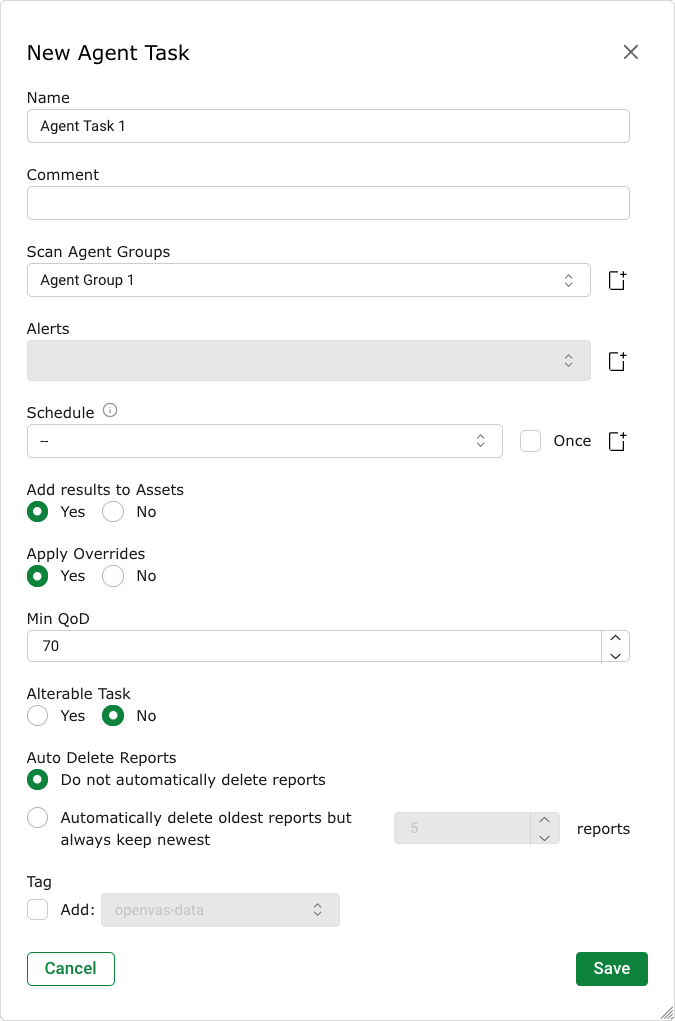
Fig. 10.5 Creating a new agent task
Click Save.
→ The agent task is created and displayed on the page Tasks.
The following information can be entered:
- Name
The name can be chosen freely. A descriptive name should be chosen if possible.
- Comment
The optional comment allows for the entry of background information. It simplifies understanding the task later.
- Scan Agent Groups
Select a previously configured agent group from the drop-down list (see Chapter 10.4).
Alternatively, the agent group can be created on the fly by clicking
next to the drop-down list.- Alerts
Select a previously configured alert from the drop-down list (see Chapter 9.13). Status changes of a task can be communicated via e-mail, Syslog, HTTP or a connector.
Alternatively, an alert can be created on the fly by clicking
next to the drop-down list.- Schedule
Select a previously configured schedule from the drop-down list (see Chapter 9.11). The task can be run once or repeatedly at a predetermined time, for example every Monday morning at 6:00 a.m.
Alternatively, a schedule can be created on the fly by clicking
next to the drop-down list.- Add results to Assets
Selecting this option will make the systems available to the appliance’s asset management automatically (see Chapter 13). This selection can be changed at a later point as well.
- Apply Overrides
Overrides can be directly applied when adding the results to the asset database (see Chapter 11.8).
- Min QoD
Minimum quality of detection for the inclusion of the results in the asset database (see Chapter 11.2.6).
- Alterable Task
Allow for modification of the selected agent group, even if reports were already created. The consistency between reports can no longer be guaranteed if tasks are altered.
- Auto Delete Reports
Maximum number of reports to store. If the maximum is exceeded, the oldest report is automatically deleted. The factory setting is Do not automatically delete reports.
- Tag
Select a previously configured tag from the drop-down list (see Chapter 7.4) to link it to the task.
10.6 Starting the Agent Task
In the row of the newly created task, click  .
.
Note
For scheduled tasks,  is displayed additionally.
The task is starting at the time that was defined in the schedule (see Chapter 9.11).
is displayed additionally.
The task is starting at the time that was defined in the schedule (see Chapter 9.11).
→ The task is added to the waiting queue. Afterwards, the latest report is requested from the agent controller and made available as a scan report.
Note
The agent task refers to generating a scan report with the data stored in the agent controller. It does not describe the scan process of the agent on the target system itself.
Note
For the status of a task, see Chapter 9.8.
The report of a task can be displayed as soon as the task has been started by clicking the bar in the column Status. For reading, managing and downloading reports see Chapter 11.
As soon as the status changes to Done the complete report is available. At any time the intermediate results can be reviewed (see Chapter 11.2.1).
Note
It can take a while for the report generation to complete. The page is refreshing automatically if new data is available.
10.7 Managing Agents
All existing targets can be displayed by selecting Configuration > Agents in the menu.
Note
The list of agents is updated every five minutes. The date and time of the last update is displayed in the upper left corner.
Click in the upper left corner for an instant update.
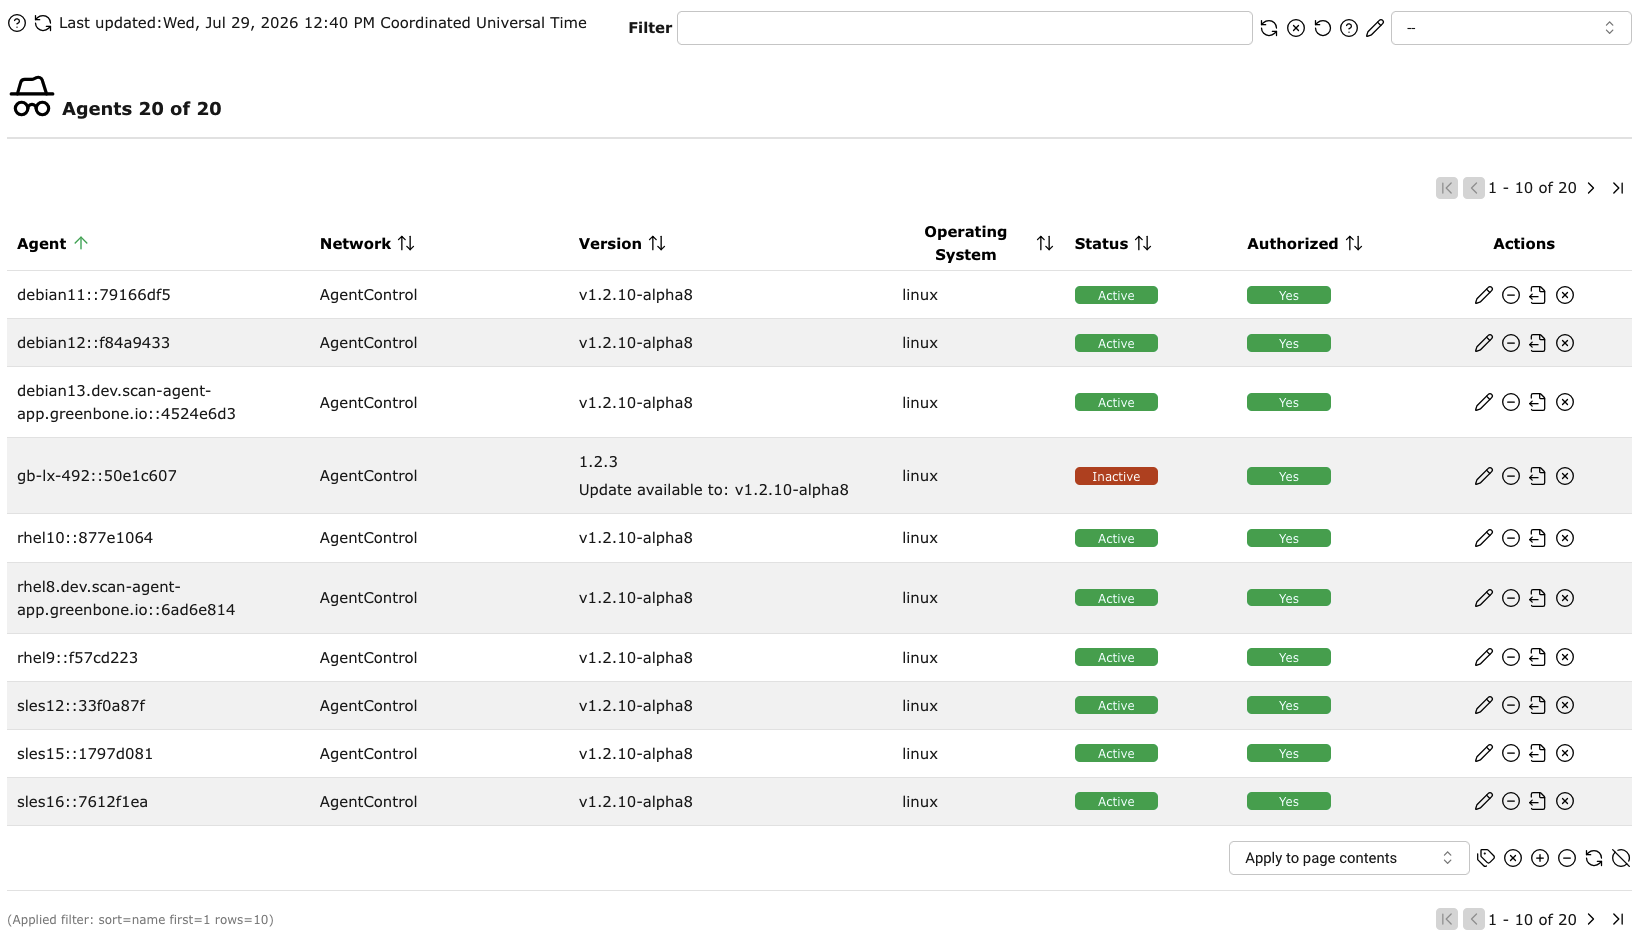
Fig. 10.6 Page Agents displaying all agents
For all agents, the following information is displayed:
- Agent
Name of the agent consisting of the target system’s host name and a random eight-digit alphanumeric string.
Moving the cursor over the name shows the IP address of the target system the agent is installed on.
- Network
Name of the agent controller the agent is connected to.
- Version
Software version of the agent. Available updates are displayed below the version.
Automatic updates can be enabled or disabled by editing the agent or with the bulk action below the table.
- Operating System
Operating system of the target system the agent is installed on.
- Status
The agent regularly contacts the agent controller to request configuration and setting changes (heartbeat).
 If the agent is regularly sending heartbeats, it is considered active.
 If an agent has missed a defined number of heartbeats, it is considered inactive.
This setting can be configures in the Agent Default Configuration of the agent controller (see Chapter 10.1.2).
If an agent has missed a defined number of heartbeats, it is considered inactive.
This setting can be configures in the Agent Default Configuration of the agent controller (see Chapter 10.1.2).
Moving the cursor over the status shows the date and time of the last heartbeat.
- Authorized
Authorization status of the agent. The authorization confirms that the agent is known.
- The agent has not been authorized yet or the authorization has been revoked.
 The agent has been authorized.
For all agents, the following actions are available:
- Configure the agent (see Chapter 10.2.2).
- Authorize the agent.
 Revoke the agent.
 Create an agent support bundle (see Chapter 10.8).
 Delete the agent.
The following bulk actions are available below the table:
 Add a tag to multiple agents (see Chapter 7.4.2).
- Delete multiple agents.
- Authorize multiple agents.
- Revoke multiple agents.
- Enable automatic software updates for multiple agents.
 Disable automatic software updates for multiple agents.
Note
The drop-down list is used to select a sub-set of agents.
10.8 Downloading an Agent Support Bundle
Sometimes Greenbone’s development team needs additional information about an agent to troubleshoot and support customers. The required data is collected in the form of an agent support bundle.
It contains the latest scan data, logs, the agent configuration and the agent heartbeat information.
Optionally, the agent support bundle can be encrypted using the Greenbone development team’s GPG public key.
Note
Only Greenbone’s development team is able to decrypt the agent support bundle.
An agent support bundle can be created as follows:
Select Configuration > Agents in the menu.
In the row of the agent, click
.Select the appropriate radio button, depending on whether the support package should be encrypted or not.
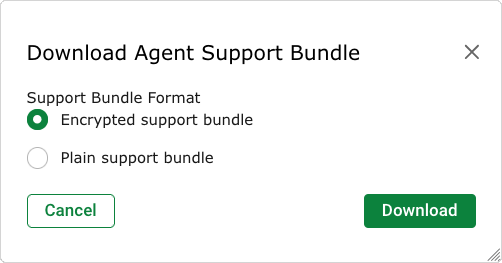
Fig. 10.7 Downloading an agent support bundle
Click Download.
→ The agent support bundle is downloaded.
Send the downloaded file to the Greenbone Support Team.
10.9 Configuring a Master-Sensor Setup with Agents
In a master-sensor setup with agents, the sensor appliance works as the agent controller. It receives data from the agents and stores the scan results of the latest agent scan.
The agent task is created and run on the master with this agent controller. With the agent task, the latest report is requested from the agent controller (the sensor) and made available as a scan report on the master.
A master-sensor setup with agents can be set up as follows:
Configure a master-sensor setup as described in Chapter 16.1.
On the web interface of the master, create a new agent controller as described in Chapter 10.1.1.
Use the following settings:
Select Agent Sensor in the drop-down list Scanner Type.
Enter the IP address or the host name of the sensor in the input box Host.
The connection between master and sensor is established using the Secure Shell (SSH) protocol via port 22/TCP. Port 22 is already set.
Note
This agent controller will be called “agent sensor” from now on.
Select Configuration > Agent Installers in the menu.
Select the agent sensor in the drop-down list Agent Controller.
Follow Chapter 10.2.1, starting with step 3.
Note
When the appliance model OPENVAS SCAN SENSOR is used as the sensor, the command for self-signed certificates must be used (see Chapter 10.2.3). Since OPENVAS SCAN SENSOR does not have a web interface, it does not have an HTTPS certificate.
On Microsoft Windows, the agents can also be installed using Microsoft Configuration Manager (see Chapter 10.3). Make sure to use the server endpoint and the server certificate fingerprint of the agent sensor from the Configuration table on the Agent Installers page.
Note
The connected agents are synchronized between the sensor and the master every five minutes.
Click
in the upper left corner on the master’s web interface for an instant update.Create a new agent group as described in Chapter 10.4.
Select the previously created agent sensor.
Create a new agent task as described in Chapter 10.5.
Select the previously created agent group.
Start the agent task as described in Chapter 10.6.
Note
The Agent Default Configuration of the agent controller/agent sensor can be changed from both the sensor and the master (see Chapter 10.1.2).
However, when editing the agent sensor on the master by clicking on the Scanners page, settings like the name, comment, or host are stored only on the master.
Example: if the host is changed, the master will try to connect to the agent controller of the sensor using that new host.
The agents connected to the agent controller/agent sensor can only be configured on the master. This includes authorizing or revoking agents, updating them to the latest version, generating an agent support bundle, and deleting them.
Creating agent groups and tasks, running tasks, and retrieving the results can only be done on the master.