4 Configuring the User, Team, and Account Settings
All users of the Greenbone Cloud Service can manage their own settings for scans and the platform.
4.1 Changing the Language
The language of the platform can be changed in the upper right corner.
Note
Alternatively, the language can be selected when logging in (see Chapter 3.2).
4.2 Setting up Notifications
Users can receive summaries of all performed scans or notifications including reports when scans are finished.
4.2.1 Scan Summaries
Notifications including scan summaries can be set up as follows:
Select Notifications (category User Settings) in the menu panel.
Select the interval at which notifications should be received: daily, weekly, and/or monthly (see Fig. 4.1).
Note
The notification time for each interval is predefined.
Multiple intervals can be selected at the same time.
If no selection is made, scan summaries are disabled.
→ The selection is applied immediately. The notifications are sent to the e-mail address that is used for logging in.
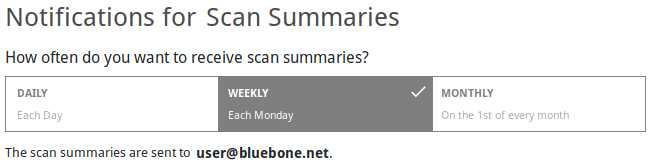
Fig. 4.1 Setting up scan summaries
4.2.2 Completed Scans
Notifications for completed scans can be set up as follows:
Select Notifications (category User Settings) in the menu panel.
Select the channel on which the notifications should be received and provide further details if necessary (see Fig. 4.2).
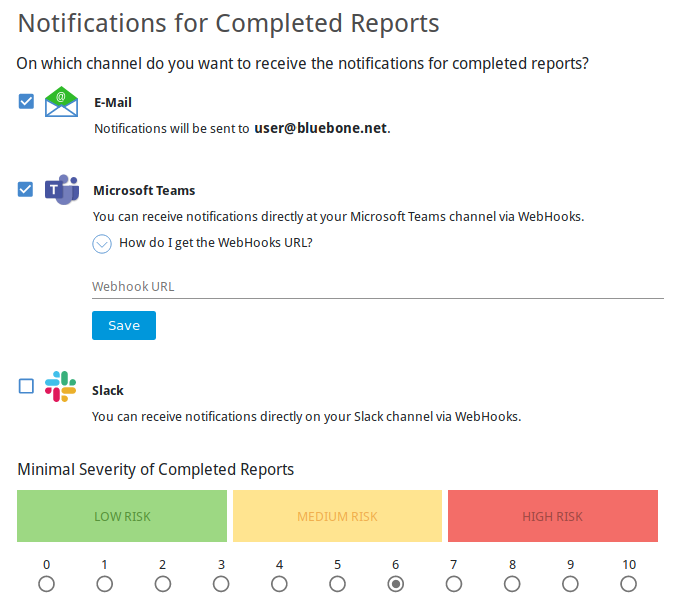
Fig. 4.2 Setting up notifications for completed scans
Note
Multiple channels can be selected at the same time.
Select the minimum overall severity that a report must have for a notification to be sent.
→ The selection is applied immediately.
4.3 Changing the Security Settings
4.3.1 Changing the User Password
The password used for logging in can be changed as follows:
Select Security (category User Settings) in the menu panel.
Enter the current password in the input box Password.
Enter the new password in the input box New Password.
Repeat the password in the input box Confirmation.
Click Save.
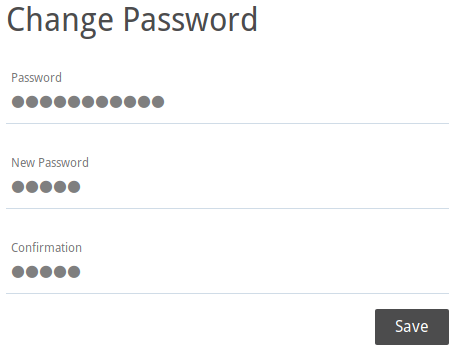
Fig. 4.3 Changing the user password
4.3.2 Setting up a Two-Factor Authentication
To make logging in more secure, a two-factor authentication can be set up as follows:
Download one of the following apps for smartphones:
FreeOTP (available for Android)
Google Authenticator (available for Android and iOS)
Finish the initial setup of the app.
Select Security (category User Settings) in the menu panel.
Scan the QR code displayed in the section Authenticator (see Fig. 4.4).
Enter the one-time code provided by the authenticator app in the input box One-time code.
Click Save.
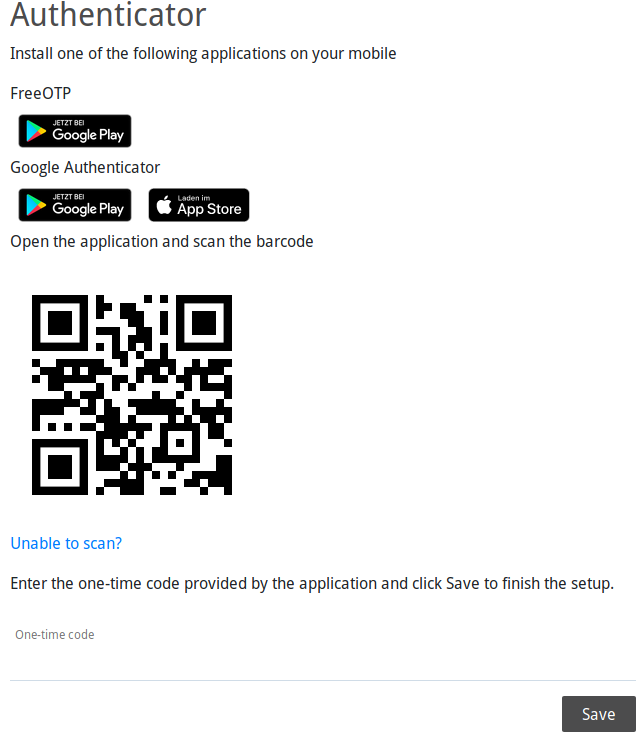
Fig. 4.4 Setting up a two-factor authentication
4.4 Creating and Managing Teams
A main user whose account was created either by a vMSP or by the user themselves (see Chapter 3.1) can invite other users to their team. All users of a team are operating with the same permissions and use the subscription of the main user.
4.4.1 Adding Users to a Team
Select Team (category Team Settings) in the menu panel.
Select Invites.
Click + Create New Invite.
Enter the e-mail address of the user who should be invited.
Click Send Invite.
→ Invited users receive an e-mail, can create an account and join the team.
Joined users are displayed when selecting Members.
Note
The invite expires after 24 hours.
If a user does not receive the e-mail or the invite has expired, the e-mail can be resend by clicking  in the column Actions.
4.4.2 (De)activating Team Members
Deleting individual users or the main user of a team is not possible. Users can only be deactivated.
Note
Only the main user can (de)activate other users.
A user can be activated or deactivated as follows:
Select Team (category Team Settings) in the menu panel.
Click the slider in the column Status.
→ The change is applied immediately.
A deactivated user is no longer able to log in.
4.4.3 Changing the Main User
The main user of a team, meaning the account whose subscription is used, can be changed, for example, in case the respective employee is leaving the company.
The new main user must be an active user, deactivated users cannot be set as the main user (see Chapter 4.4.2).
Note
Only the main user can change the main user.
Alternatively, the vMSP can be contacted for changing the main user.
The main user can be changed as follows:
Select Team (category Team Settings) in the menu panel.
Note
The current main user is indicated by
 in front of the e-mail address.
In the row of the user who should be the main user, click
 in the column Action.
→ A message is displayed, asking to confirm the change.
Click Ok.
4.4.4 Deleting the Account
Deleting individual users or the main user of a team is not possible, they can only be deactivated (see Chapter 4.4.2). Deleting an account will result in the following:
The main user as well as all other users of the team are deleted.
The main user as well as all other users will no longer be able to log in and use the Greenbone Cloud Service.
All user, team and customer data are deleted permanently.
All targets and reports are deleted.
Active subscriptions expire at the end of the current billing period.
Note
Only the main user can delete the account.
Alternatively, the vMSP can be contacted for deleting the account.
Select Team (category Team Settings) in the menu panel.
In the section Delete Account, click Delete Account.
→ A message is displayed, asking to confirm the deletion.
Click Ok.
→ An e-mail is sent to the e-mail address of the main user, containing a link for confirming the deletion.
4.5 Configuring the Subscription
The current subscription is displayed by selecting Subscription (category Team Settings) in the menu panel (see Fig. 4.5).
Note
In case of a managed-service account, changing or terminating the subscription is not supported. In this case, the vMSP must be contacted.
4.5.1 Changing the Subscription Scope
Note
Switching to a less extensive subscription is only possible by the end of the current booking month.
Upgrading to a more extensive subscription is possible at any time.
The subscription can be changed as follows:
Select Subscription (category Team Settings) in the menu panel.
Click Upgrade.
Enter the desired total number of IP addresses (sum of external and internal) in the input box Total IP’s (see Fig. 4.5).
Move the slider to distribute the total number between internal and external IP addresses as desired.
→ The composition of the price is displayed in the overview.
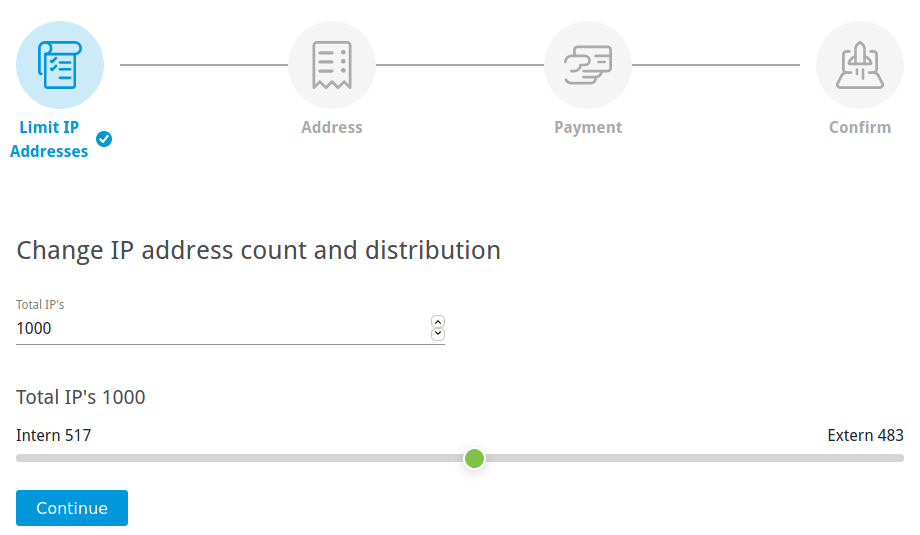
Fig. 4.5 Changing the subscription
Click Continue.
Enter the contact data in the according input boxes.
Tip
A different address for billing can be used, see step 8.
Enter the VAT number in the input box Value Added Tax Identification (VAT-ID).
Optional: select the checkbox Use a Different Billing Address and enter the data in the according input boxes.
Click Continue.
Select the radio button of the desired payment method. If necessary, provide further payment details, for example, credit card information.
Click Continue.
→ The order summary is displayed (see Fig. 4.6).
Optional: activate the checkbox Upgrade instantly if the new subscription should be used immediately.
Click Confirm.
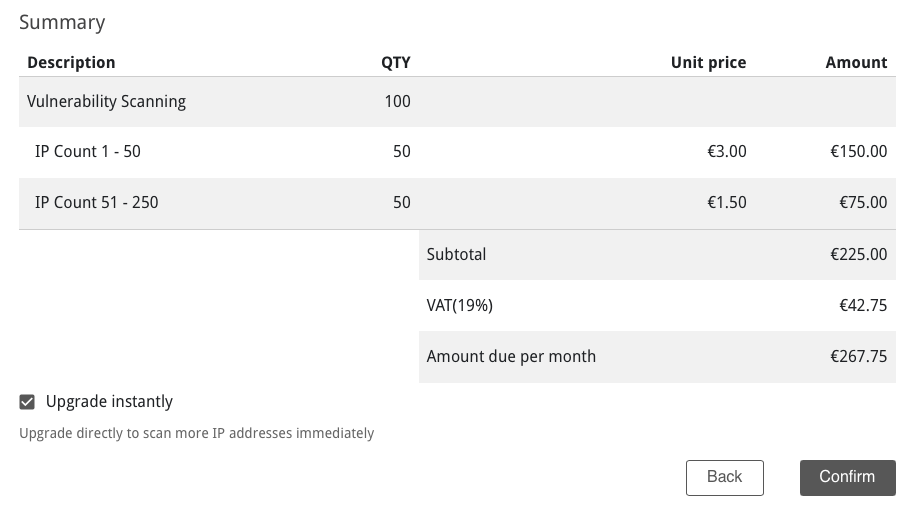
Fig. 4.6 Confirming the subscription
4.5.2 Terminating the Subscription
An active subscription can be terminated as follows:
Select Billing (category Team Settings) in the menu panel.
Click Terminate Subscription.
Optional: provide feedback, for example, about why the subscription is cancelled.
Click Terminate Subscription.
4.6 Changing the Billing Information
The client data can be changed as follows:
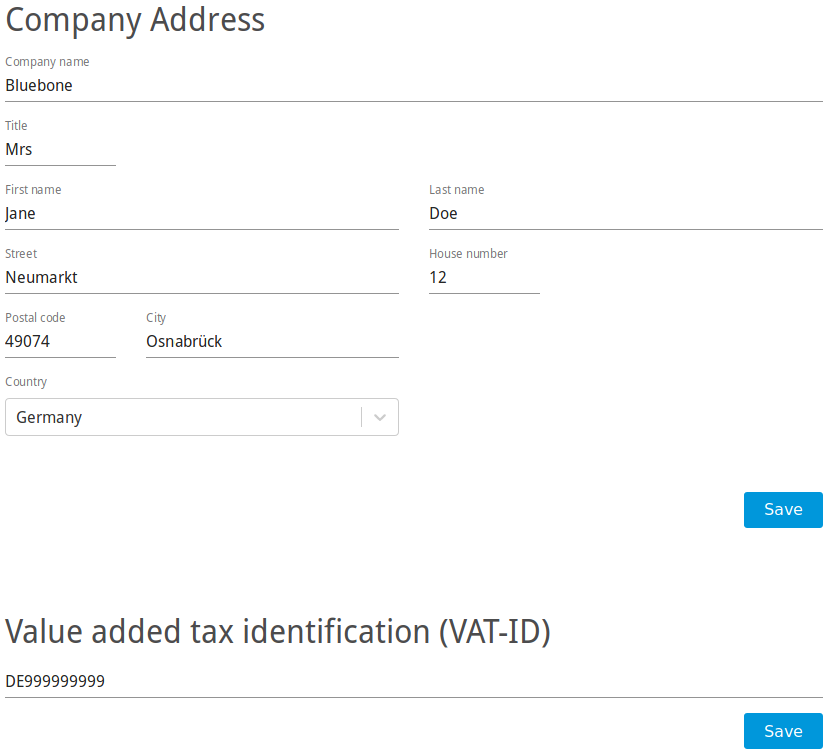
Select Billing (category Team Settings) in the menu panel.
In the section Company Address, enter the data in the according input boxes (see Fig. 4.7).
Click Save.
The VAT number can be added or changed as follows:
4.7 Downloading Invoices
Note
Downloading invoices is only available for self-service accounts and subscriptions paid by credit card.
All invoices of current and former subscriptions can be downloaded by selecting Invoices (category Team Settings) in the menu panel and clicking  in the row of the respective invoice.
4.8 Configuring the Managed-Security Settings
In case of a managed-service account, the vMSP can be granted access to some report data or full access (“Managed Security”).
Select Managed Security (category Team Settings) in the menu panel.
Click the slider for Report Access to grant the vMSP report access.
This includes access to the severity of the reports and tasks during the last two weeks and the amount of High, Medium, Low and Log results.
or/and
Click the slider for Full Access to grant the vMSP full access to the settings and reports.