3 Managing Customers
All customers can be displayed by selecting Billing in the menu panel.
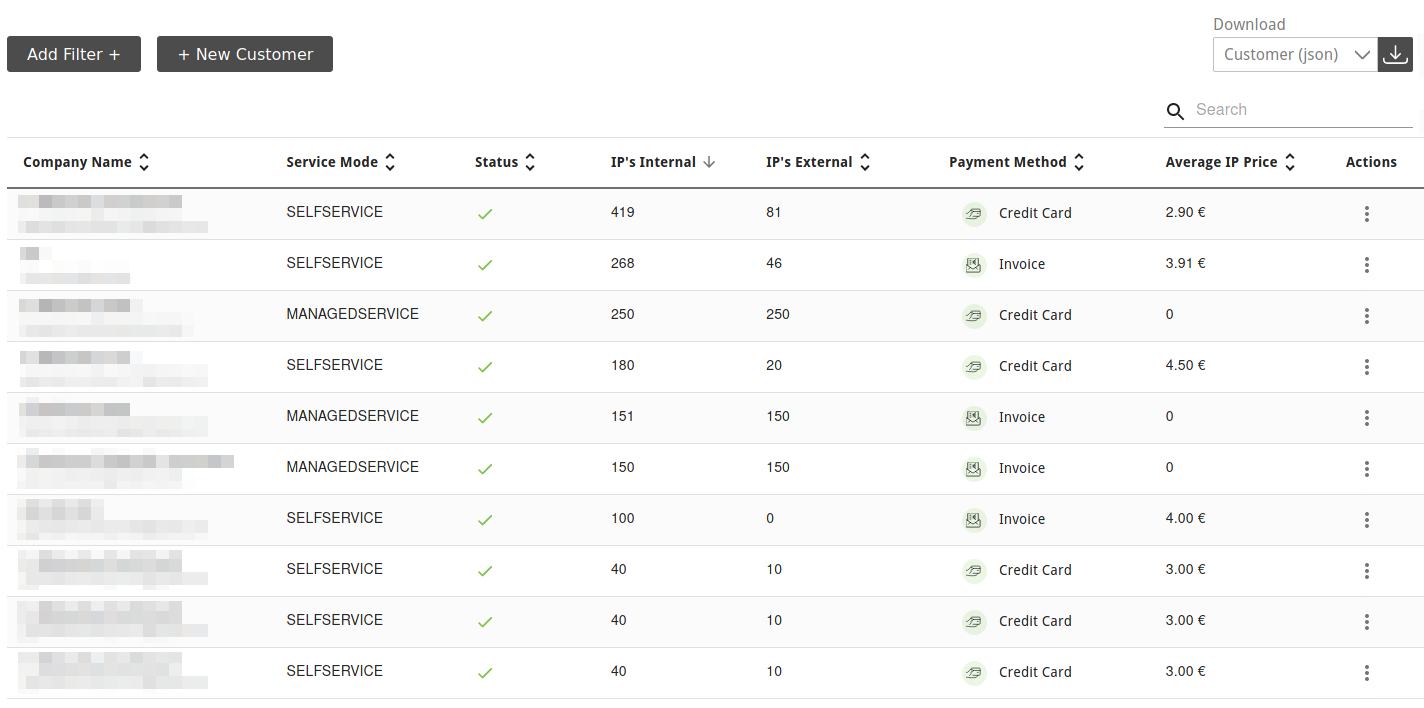
Fig. 3.1 Page Customers
For all customers the following information is displayed:
- Company Name
Name of the customer’s company and e-mail address of the company’s contact person.
- Service Mode
Service mode that is used by the customer: managed-service or self-service.
Managed-service customers are not able to manage the subscription on their own, which means changing the IP address count and distribution. This setting has to be done by the vMSP.
Self-service customers are able to manage the subscription on their own (see Chapter 3.5).
- Status
Status of the customer (active or inactive).
- IP’s Internal
Number of internal IP addresses that can be scanned with the customer’s current subscription.
- IP’s External
Number of external IP addresses that can be scanned with the customer’s current subscription.
- Payment Method
Used payment method (see Chapter 3.6).
- Average IP Price
Average price the customer pays per IP address.
For all customers the following actions are available when clicking  :
:
 Convert a self-service customer account to a managed-service customer account (only available for self-service customers, see Chapter 3.2.1).
 Change the IP address count and distribution of the customer account (see Chapter 3.2.2).
 Resend invite e-mail to a new customer (only available for customers who have been invited but did not register yet).
 Display detailed information about the customer account.
In the overlay, all subscriptions of the customer account are displayed and there are options to activate/deactivat the customer account (see Chapter 3.2.3) or to cancel the subscription (see Chapter 3.2.4).
Display detailed information about the customer account.
In the overlay, all subscriptions of the customer account are displayed and there are options to activate/deactivat the customer account (see Chapter 3.2.3) or to cancel the subscription (see Chapter 3.2.4). Add a project key (only available for managed-service customers, see Chapter 3.2.6).
 Edit the address data of the customer account (only available for managed-service customers, see Chapter 3.2.7).
 Change the main user of the customer account (see Chapter 3.2.8).
 Delete the customer account (see Chapter 3.2.9).
3.1 Creating a Customer Account
Note
New customers are invited by sending an invite e-mail. The e-mail can only be sent if the mail server is configured correctly (see Chapter 5.2.1).
When a customer account is created, the main user for whom the account is initially created can invite other users to their team. All users of a team are operating with the same permissions and use the subscription of the main user.
New customer accounts can be created as follows:
Select Billing in the menu panel.
Click + New Customer.
Enter the contact data of the customer’s company in the respective input boxes.
Enter the name and the e-mail address of the customer’s contact person in the respective input boxes.
Note
The e-mail address of the contact person is also the user name that the customer uses to log in.
Click Create.
→ An invite e-mail is sent to the new customer.
The new customer is displayed in the table on the page Customers with the status
.If the customer accepts the invite, they can register by defining a new password and log in using the e-mail address defined in step 4 and the newly created password.
Note
The invite expires after 24 hours.
If a customer does not receive the e-mail or the invite has expired, the e-mail can be resend by clicking and selecting in the column Actions.
3.2 Editing a Customer
3.2.1 Converting a Self-Service Customer into a Managed-Service Customer
A self-service customer can be converted into a managed-service customer as follows:
Select Billing in the menu panel.
In the row of the customer, click
and select Convert to Managed Customer.Note
This change cannot be undone. Managed-service customers cannot be converted into self-service customers.
Click Confirm.
→ The customer is converted into a managed-service customer.
3.2.2 Changing the IP Address Count and Distribution of a Customer
The IP address count and distribution of a customer can be changed as follows:
Select Billing in the menu panel.
In the row of the customer, click
and select IP Distribution.Enter the desired total number of IP addresses (sum of external and internal) in the input box Total IP’s (see Fig. 3.2).
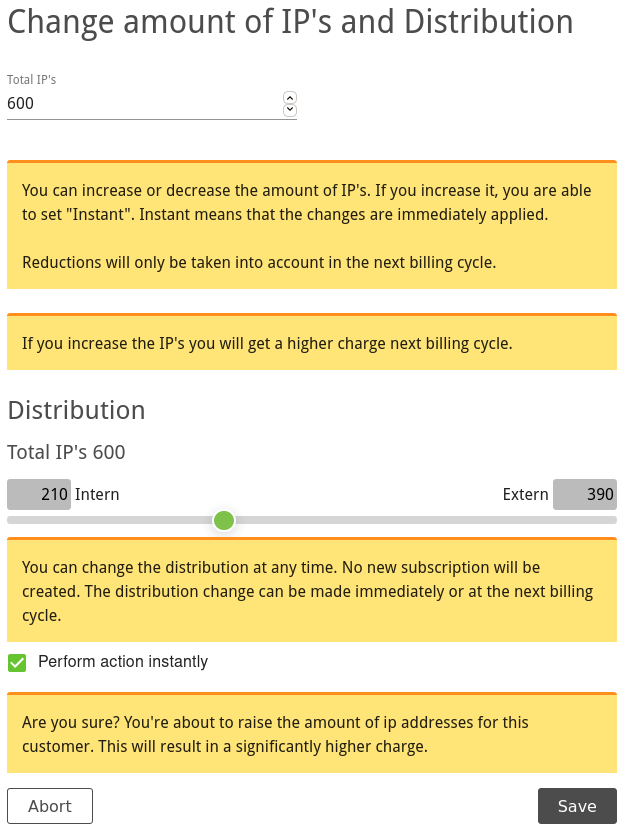
Fig. 3.2 Changing the IP address count and distribution
Move the slider to distribute the total number between internal and external IP addresses as desired.
or
Enter the desired number of internal/external IP addresses in the respective input boxes.
If the number of IP addresses is increased and the change should be applied immediately, activate the checkbox Perform action instantly.
Note
A change to a less extensive subscription is only possible at the end of the current booking month.
Upgrading to a more extensive subscription is possible immediately.
Click Save.
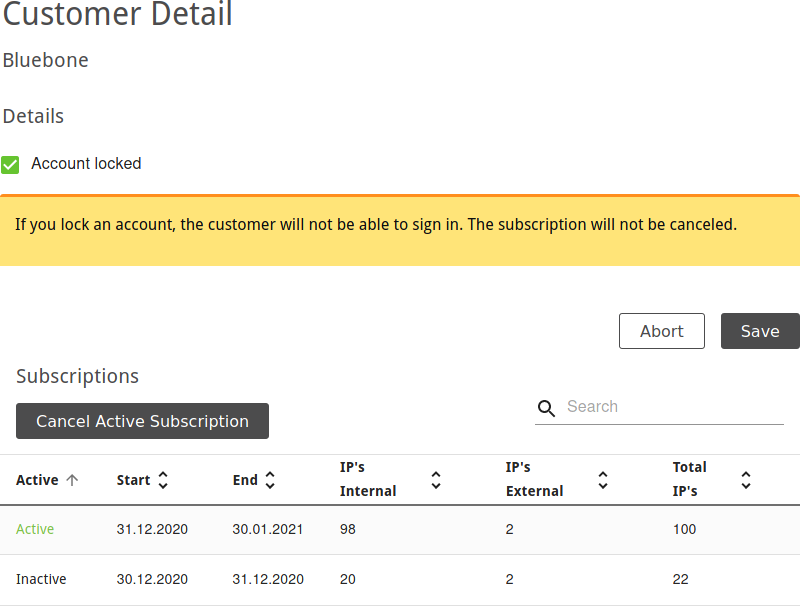
3.2.3 Locking a Customer Account
If a customer account is locked, the customer is no longer able to log in but the subscription will not be canceled.
A customer account can be locked as follows:
3.2.4 Canceling an Active Customer Subscription
An active subscription can be canceled as follows:
Select Billing in the menu panel.
In the row of the customer, click
and select Details.Click Cancel Active Subscription (see Fig. 3.3).
→ In the row of the customer,
 is displayed in the column Status.
3.2.5 Reactivating a Cancelled Customer Subscription
A cancelled subscription can be reactivated by adding the IP address count and distribution to the account as described in Chapter 3.2.2.
3.2.6 Adding a Project Key
A project key for a managed-service customer can be added as follows:
Select Billing in the menu panel.
In the row of the customer, click
and select Project Key.Enter the key in the input box and click Next.
→ An overview with the number of IP addresses, the runtime and the purchase price is displayed.
Enter the selling price in the input box and click Next.
Move the slider to distribute the total number of IP addresses between internal and external IP addresses as desired and click Next (see Fig. 3.4).
or
Enter the desired number of internal/external IP addresses in the respective input boxes and click Next (see Fig. 3.4).
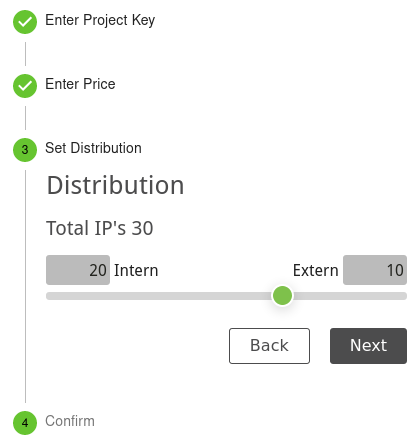
Fig. 3.4 Adding a project key
→ The summary is displayed.
If the number of IP addresses is increased and the change should be applied immediately, activate the checkbox Perform action instantly.
Note
A change to a less extensive subscription is only possible at the end of the current booking month.
Upgrading to a more extensive subscription is possible immediately.
Click Finish.
→ In the row of the customer,
Project Key is displayed in the column Payment Method.
3.2.7 Editing the Address Information of a Managed-Service Customer
The address information of a managed-service customer can be edited as follows:
Select Billing in the menu panel.
In the row of the customer, click
and select Address.In the section Company Address enter the data in the according input boxes.
In the section Value Added Tax Identification (VAT-ID) enter the VAT number in the according input box.
Note
If the country of the primary address is not Germany, a VAT-ID is required.
If a different billing address should be used, activate the checkbox Use a different billing address and enter the data in the according input boxes.
Click Save.
3.2.8 Changing the Main User
The main user of a customer, meaning the account whose subscription is used, can be changed, for example, in case the respective employee is leaving the company.
The new main user must be an active user, deactivated users cannot be set as the main user.
The main user can be changed as follows:
Select Billing in the menu panel.
In the row of the customer, click
and select Main User.Select the user who should be the main user in the drop-down list.
Note
The current main user is indicated by
 in front of the e-mail address.
Click Save.
3.2.9 Deleting a Customer Account
Deleting a customer account will result in the following:
The main user as well as all other users of the customer are deleted.
The main user as well as all other users of the customer will no longer be able to log in and use the Greenbone Cloud Service.
All user, team and customer data are deleted permanently.
All targets and reports are deleted.
Active subscriptions expire at the end of the current billing period.
The customer can be deleted as follows:
Select Billing in the menu panel.
In the row of the customer, click
and select  Delete.
Note
In case of a customer who has a registered account, continue with step 4.
In case of an invited customer who has not yet accepted the invitation and thus, has not yet created an account, continue with step 5.
Type
DELETEin the input field.Click Confirm.
→ A message is displayed, stating that the customer is marked for deletion. The deletion takes some time (approx. 30 minutes). When the deletion is complete, a confirmation e-mail will be sent.
3.3 Filtering Customers
Select Billing in the menu panel.
Click Add Filter +.
Select the desired billing method, service mode, and/or status (see Fig. 3.5).
Click Apply.

Fig. 3.5 Filtering the customers
3.4 Exporting Customers
By clicking  a JSON file of all displayed customers can be downloaded.
The customers contained in the file can be chosen by filtering the customers (see Chapter 3.3).
a JSON file of all displayed customers can be downloaded.
The customers contained in the file can be chosen by filtering the customers (see Chapter 3.3).
3.5 Configuring the Self Service
The service mode “Self Service” allows customers to change their subscription (number and distribution of IP addresses) on their own.
The self service can be activated, deactivated and adjusted.
3.5.1 Activating or Deactivating Self Service
The service mode “Self Service” can be activated/deactivated as follows:
Select Self-Service (category Billing) in the menu panel.
Activate/deactivate the checkbox Enable users to register themselves..
Click Save.
3.5.2 Configuring the Article Name and Number
The article name and number displayed to customers for their subscription can be changed as follows:
Select Self-Service (category Billing) in the menu panel.
Enter the article name and number in the respective input boxes in the section IP-Ranges.
Click Save.
3.5.3 Changing the Sales Prices
Select Self-Service (category Billing) in the menu panel. The sales prices for all IP address ranges are displayed in the table.
Note
The price of the desired total number of IP addresses is always composed of the prices for the respective IP address ranges that are necessary to obtain the total IP address number.
Example – Price for 300 IP addresses:
50 x sales price of IP address range 1 – 50 + 200 x sales price for IP address range 51 – 250 + 50 x sales price for IP address range 251 – 300
These sales prices can be adjusted individually for each IP address range as follows:
Select Self-Service (category Billing) in the menu panel.
In the row of the desired IP address range click
 .
.Enter the sales price in the input box.
Click Save.
→ The new sales price is displayed in the table.
3.6 Configuring the Payment Methods
All existing payment methods can be displayed by selecting Payment Methods (category Billing) in the menu panel (see Fig. 3.6).
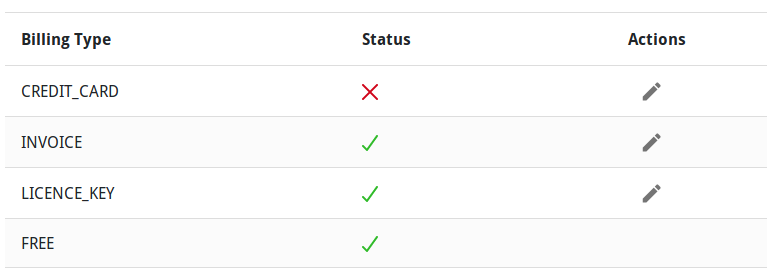
Fig. 3.6 Page Payment Methods
For all payment methods the following information is displayed:
- Billing Type
Description of the payment method.
- Status
Status of the payment method (active or inactive).
For all payment methods the following action is available:
- Edit the payment method.
3.6.1 Activating or Deactivating a Payment Method
A payment method can be activated/deactivated as follows:
Select Payment Methods (category Billing) in the menu panel.
In the row of the desired payment method click
.Activate/deactivate the checkbox is Active.
3.6.2 Configuring Payment by Credit Card
Credit card payment is handled via Stripe.
Set up the credit card payment using the following descriptions: https://docs.stripe.com
Select Payment Methods (category Billing) in the menu panel.
In the row of credit card payment click
.Enter the secret (private) API key in the input box ApiKey.
Enter the publishable (public) API key in the input box Public Access Key.
Click Save.