5 Configuring the Platform
5.1 Adjusting the Appearance of the Platform
The appearance – color, login screen and logos – of the platform can be adjusted to adapt to the vMSP’s design.
Select Configuration in the menu panel.
Edit a color by clicking the corresponding color square and selecting the color (see Fig. 5.1).
Note
The available colors depend on the selected layout of the login screen (see step 3).
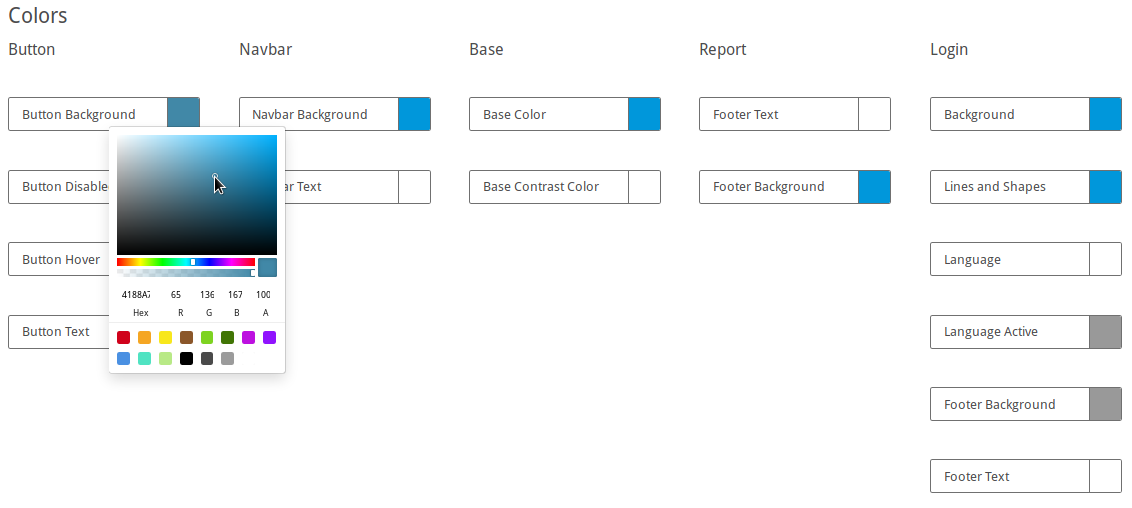
Fig. 5.1 Adjusting the colors of the platform
Select a layout for the login screen.
Edit a logo by clicking the corresponding preview and selecting an image from a file directory (see Fig. 5.2).
or
Edit a logo by clicking Upload Logo and selecting an image from a file directory (see Fig. 5.2).
or
Edit a logo by dragging and dropping an image from a file directory (see Fig. 5.2).
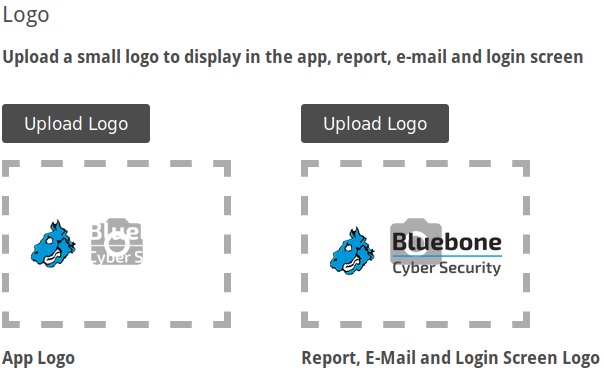
Fig. 5.2 Adjusting the logos of the platform
Edit the background image of the login screen by clicking Upload Logo and selecting an image from a file directory (only available for some login screen layouts, see step 3).
or
Select the background image of the login screen from the already available images (only available for some login screen layouts, see step 3).
Select a size for the background image of the login screen (only available for some login screen layouts, see step 3).
Click Save.
5.2 Configuring the System E-Mails
5.2.1 Setting up the Mail Server
Note
The Greenbone Cloud Service uses fixed IP addresses to communicate with the mail server in order to send e-mails to end customers. If a firewall is used, it must be configured to allow the following IP addresses:
212.132.76.189
212.132.79.77
212.132.80.117
The mail server that is used for system e-mails can be configured as follows:
Select Mailserver (category Configuration) in the menu panel.
Enter the URL of the mail server in the input box Mailserver (see Fig. 5.3).
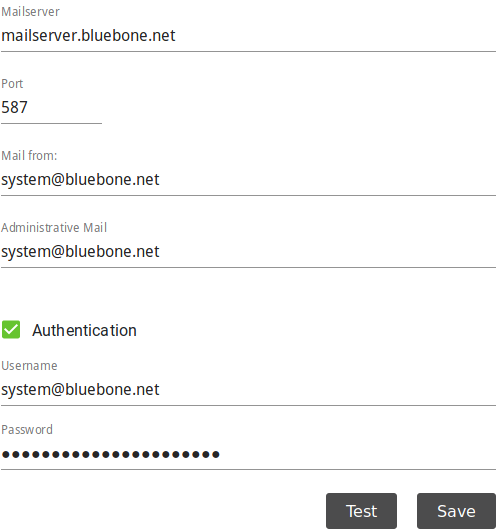
Fig. 5.3 Setting up a mail server
Enter the used port in the input box Port.
Note
The port 25/TCP must not be used.
Define the e-mail address that should be used as the sender of the system e-mails in the input box Mail from.
Define the e-mail address that should be used for receiving e-mails, for example host validation requests, in the input box Administrative Mail.
Optional: activate the checkbox Authentication and enter the credentials for authenticating on the mail server.
Click Test to send a test e-mail.
If the test e-mail is sent and received successfully, click Save.
5.2.2 Setting up an E-Mail Signature
The e-mail signature can be edited as follows:
Select Mailserver (category Configuration) in the menu panel.
Enter the text for the signature in the input box (see Fig. 5.4).
Optional: edit the font style, color, size and alignment.
Click Test to send a test e-mail with signature.
If the test e-mail is sent and received successfully, click Save.
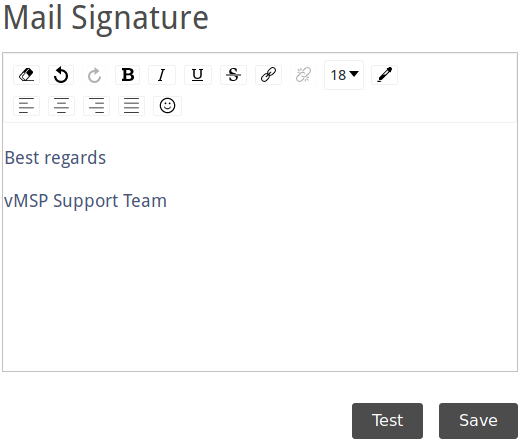
Fig. 5.4 Setting up a mail server
5.3 Adjusting the Legal Information
Greenbone’s terms of use and privacy policy are always displayed to end customers. Additionally, own terms of use and and an own privacy policy can be created and activated as follows:
Note
The imprint can be edited in the same way.
However, in contrast to the terms of use and privacy policy, the own imprint is always displayed and not the one of Greenbone.
Select Legal (category Configuration) in the menu panel.
Select the desired register Terms of Use, Privacy Policy or Imprint.
Click the slider to make the own terms of use/privacy policy visible for end customers.
Select the desired language.
Edit the text in the input box.
Click Save.
→ The terms of use/privacy policy will be displayed to end customers in addition to Greenbone’s terms of use/privacy policy.