11 Performing Compliance Scans and Special Scans
In information technology, compliance is the most important approach for organizations to protect and secure their information and assets.
Information security organizations and associations such as the Information Systems Audit and Control Association (ISACA) or the Center for Internet Security (CIS) publish IT security standards, frameworks and guidelines. Those require organizations to implement appropriate security measures to protect themselves and their information assets from attacks.
Vulnerability assessment systems such as OPENVAS SCAN can assist in evaluating the IT security arrangements by performing audits based on policies.
The Chapters 11.4, 11.5 and 11.6 show some examples for policy audits.
Note
Since the goal of most audits is to verify local security configurations on the target systems, it is generally and in case of doubt recommended to perform authenticated audits (see Chapter 9.3.2). Exceptions exist for audits that only check externally available services, for example SSL/TLS.
11.1 Configuring and Managing Policies
Policies are scan configurations with the flag policy.
All default policies by Greenbone are data objects that are distributed via the feed. They are downloaded and updated with each feed update.
If no default policies are available, a feed update may be necessary, or the Feed Import Owner may need to be set (see Chapter 6.2.1.10.1).
Default policies cannot be edited. Furthermore, they can only be deleted temporarily by the Feed Import Owner or by a super administrator. During the next feed update, they will be downloaded again.
Note
To permanently delete a default policy, the Feed Import Owner has to delete it. Afterwards the Feed Import Owner has to be changed to (Unset) (see Chapter 6.2.1.10.1).
In addition to the default policies, custom policies can be created (see Chapter 11.1.1) or imported (see Chapter 11.1.2).
11.1.1 Creating a Policy
A new policy can be created as follows:
Select Resilience > Compliance Policies in the menu.
Create a new policy by clicking
 .
.Note
Alternatively, a policy can be imported (see Chapter 11.1.2).
Enter the name of the policy in the input box Name (see Fig. 11.1).
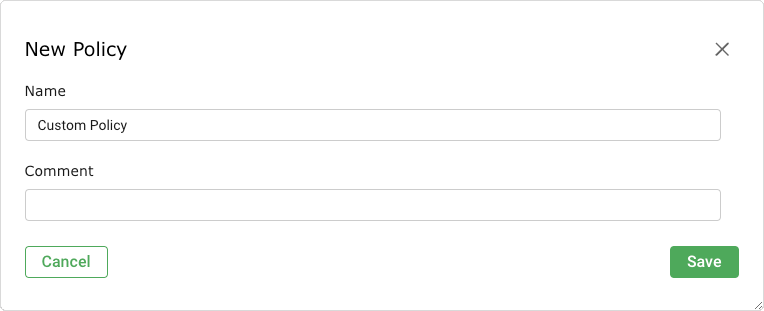
Fig. 11.1 Creating a new policy
Click Save.
→ The policy is created and displayed on the page Policies.
In the row of the policy, click
 .
.Note
The search bar in the upper part of the dialog can be used to search for VT families, scanner preferences and VT preferences.
In the sections Edit Network Vulnerability Test Families select the radio button
 if newly introduced VT families should be included and activated automatically (see Fig. 11.2).
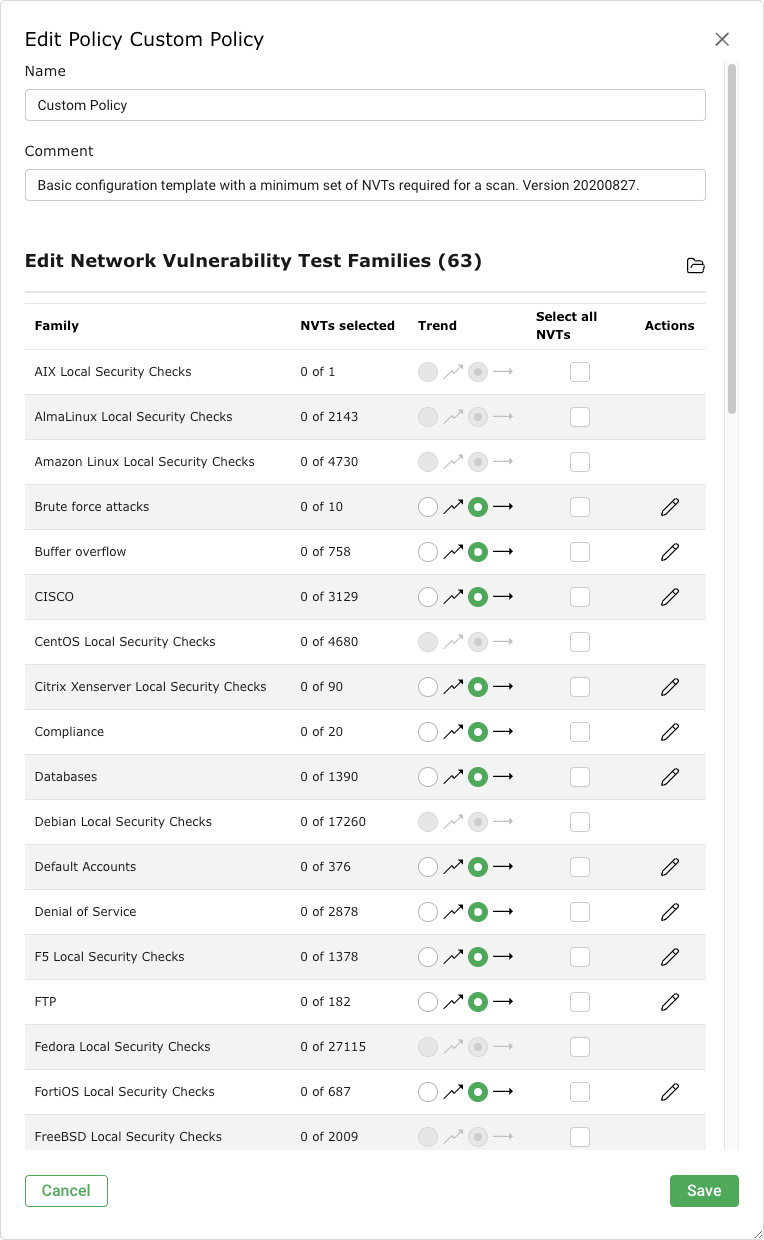
Fig. 11.2 Editing the new policy
In the section Edit Network Vulnerability Test Families activate the checkboxes in the column Select all NVTs if all VTs of a family should be activated.
Click
 for a VT family to edit it (see Fig. 11.3).
Note
The following VT families cannot be edited:
AIX Local Security Checks
AlmaLinux Local Security Checks
Amazon Linux Local Security Checks
CentOS Local Security Checks
Debian Local Security Checks
Fedora Local Security Checks
FreeBSD Local Security Checks
Gentoo Local Security Checks
HP-UX Local Security Checks
Huawei EulerOS Local Security Checks
Mageia Linux Local Security Checks
Mandrake Local Security Checks
Oracle Linux Local Security Checks
Red Hat Local Security Checks
Rocky Linux Local Security Checks
Slackware Local Security Checks
Solaris Local Security Checks
SuSE Local Security Checks
Ubuntu Local Security Checks
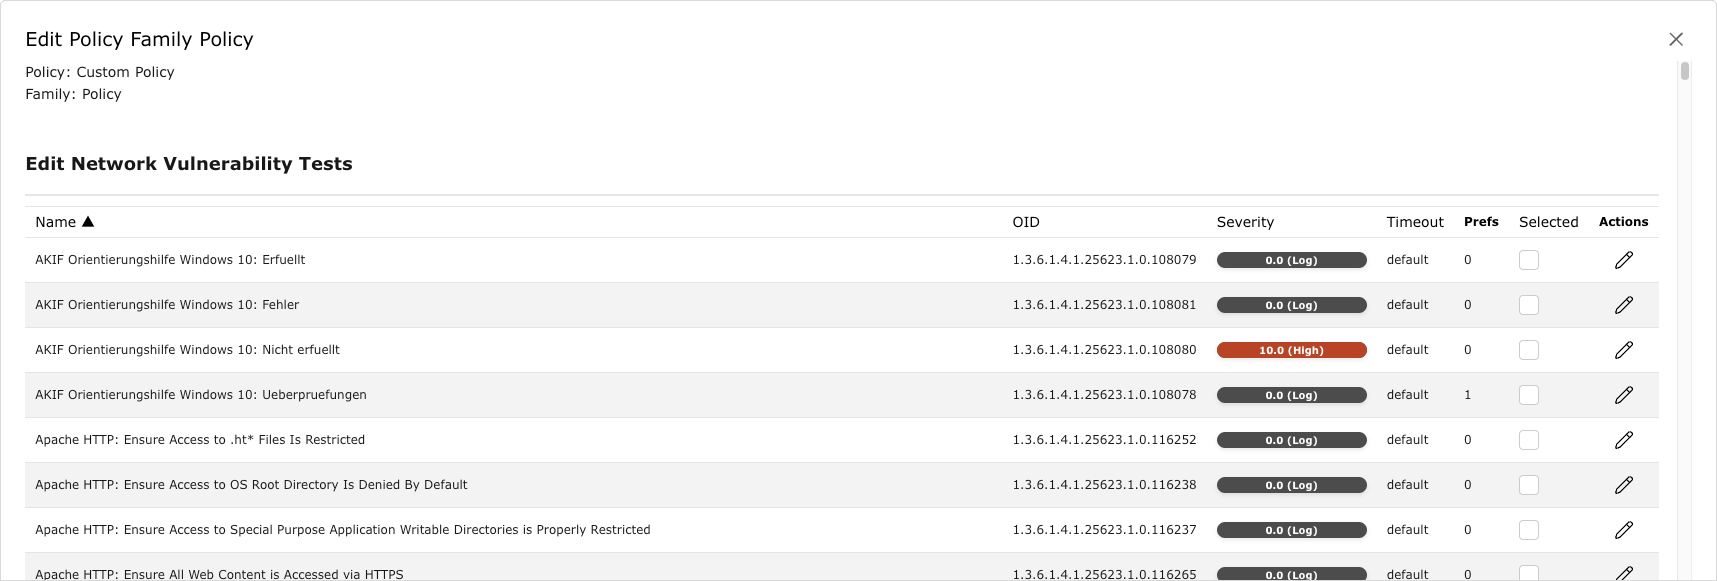
Fig. 11.3 Editing a family of VTs
In the column Selected activate the checkboxes of the VTs that should be activated.
Click
 for a VT to edit it (see Fig. 11.4).
Note
If system-specific VTs of the VT family Policy are used (for example, beginning with “Linux”, “Microsoft Windows”, “Microsoft Office”), the radio button Yes has to be selected for Verbose Policy Controls in the VT Compliance Tests (VT family Compliance).
Note
If editing the VT includes uploading a text file, the file should use UTF-8 text encoding.

Fig. 11.4 Editing a VT
Click Save to save the VT.
Click Save to save the family of VTs.
Optional: edit scanner preferences (see Chapter 9.9.4).
Optional: edit VT preferences (see Chapter 9.9.5).
Click Save to save the policy.
11.1.2 Importing a Policy
A policy can be imported as follows:
Select Resilience > Compliance Policies in the menu.
Click Browse… and select the XML file of the policy (see Fig. 11.5).
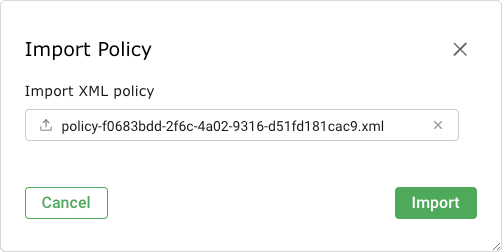
Fig. 11.5 Importing a policy
Click Import.
Note
If the name of the imported policy already exists, a numeric suffix is added to the name.
→ The imported policy is displayed on the page Policies.
Execute steps 5 to 15 of Chapter 11.1.1 to edit the policy.
11.1.3 Managing Policies
List Page
All existing policies can be displayed by selecting Resilience > Compliance Policies in the menu (see Fig. 11.6).
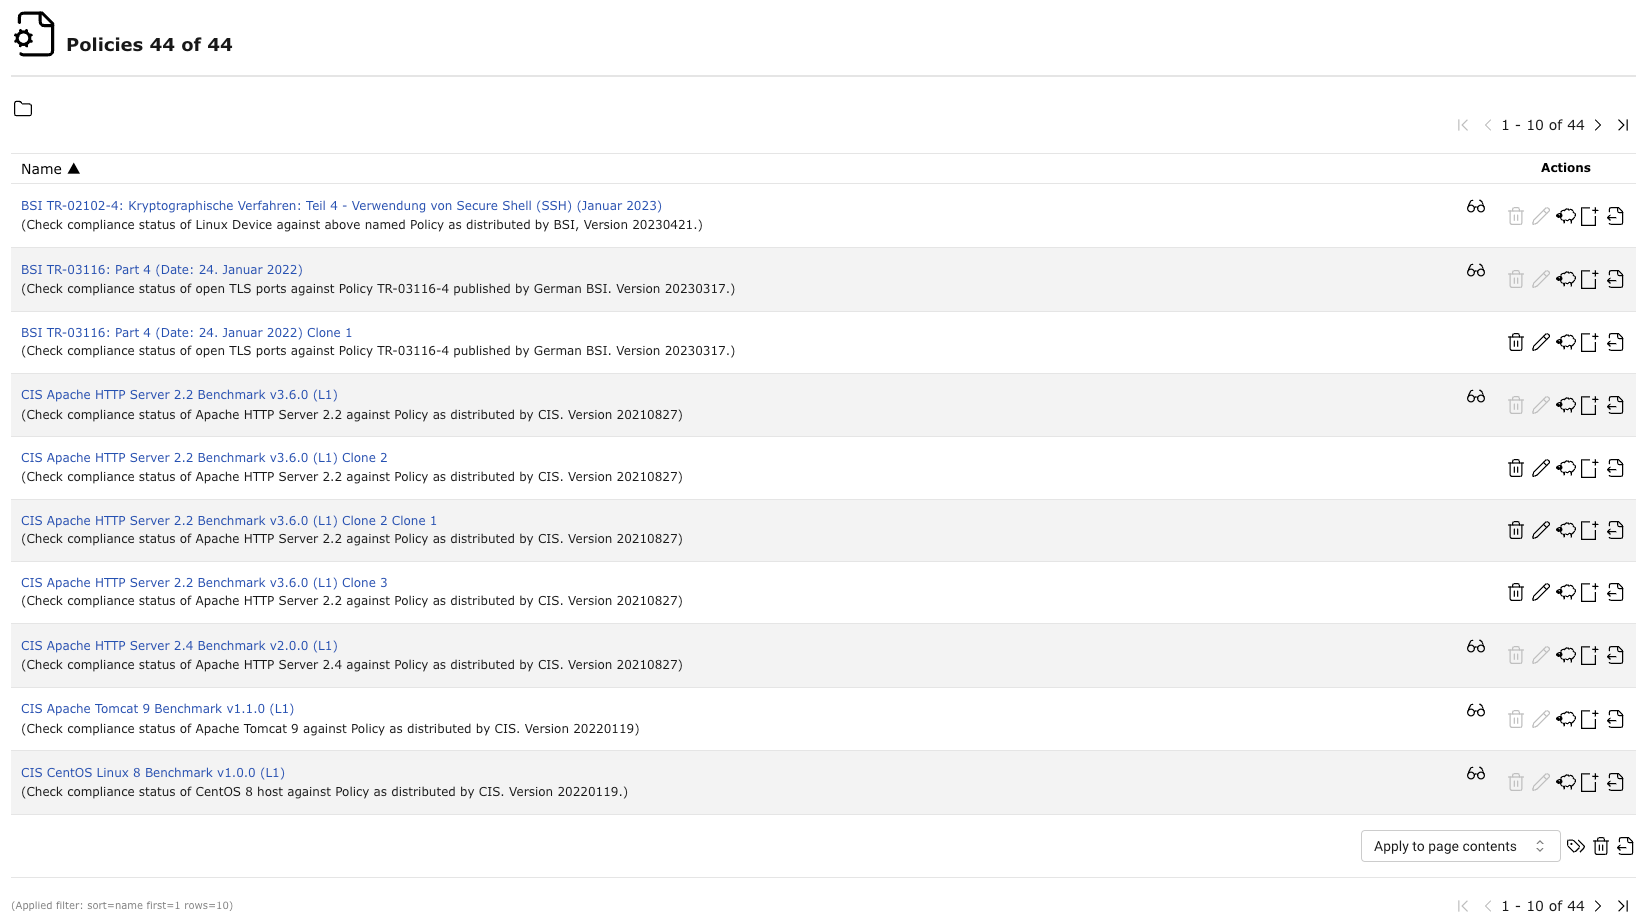
Fig. 11.6 Page Policies displaying all available policies
For all policies the following information is displayed:
- Name
Name of the policy.
For all policies the following actions are available:
 Move the policy to the trashcan. Only policies which are currently not used can be moved to the trashcan. As long as the policy is not deleted from the trashcan, it is not downloaded anew during the next feed update.
 Edit the policy. Only self-created policies which are currently not used can be edited.
 Create a new audit for the policy (see Chapter 11.2.1.2).
Note
By clicking  or
or  below the list of policies more than one policy can be moved to the trashcan or exported at a time.
The drop-down list is used to select which policies are moved to the trashcan or exported.
Details Page
Click on the name of a policy to display the details of the policy. Click  to open the details page of policy.
The following tabs are available:
- Information
General information about the policy.
- Scanner Preferences
All scanner preferences for the policy with current and default values.
- NVT Families
All VT families for the policy with the number of activated VTs and the trend.
- NVT Preferences
All VT preferences for the policy.
- Permissions
Assigned permissions (see Chapter 8.4).
The following actions are available in the upper left corner:
 Create a new policy (see Chapter 11.1.1).
 Edit the policy. Only self-created policies which are currently not used can be edited.
 Move the policy to the trashcan. Only policies which are currently not used can be moved to the trashcan. As long as the policy is not deleted from the trashcan, it is not downloaded anew during the next feed update.
 Import a policy (see Chapter 11.1.2).
11.2 Configuring and Managing Audits
Audits are scan tasks with the flag audit.
11.2.1 Creating an Audit
11.2.1.1 Creating an Audit on the Page Audits
An audit can be created on the page Audits as follows:
Select Resilience > Compliance Audits in the menu.
Define the audit (see Fig. 11.7).
Click Save.
→ The audit is created and displayed on the page Audits.
The following information can be entered:
- Name
The name can be chosen freely. A descriptive name should be chosen if possible.
- Comment
The optional comment allows for the entry of background information. It simplifies understanding the configured audit later.
- Scan Targets
Select a previously configured target from the drop-down list (see Chapter 9.2.1).
Additionally, the target can be created on the fly by clicking
 next to the drop-down list.
- Alerts
Select a previously configured alert from the drop-down list (see Chapter 9.12). Status changes of an audit can be communicated via e-mail, Syslog, HTTP or a connector.
Additionally, an alert can be created on the fly by clicking
 next to drop-down list.
- Schedule
Select a previously configured schedule from the drop-down list (see Chapter 9.10). The audit can be run once or repeatedly at a predetermined time, for example every Monday morning at 6:00 am.
Additionally, a schedule can be created on the fly by clicking
 next to the drop-down list.
- Add results to Assets
Selecting this option will make the systems available to the appliance’s asset management automatically (see Chapter 12). This selection can be changed at a later point as well.
- Alterable Audit
Allow for modification of the audits’s scan target(s) and scanner, even if reports were already created. The consistency between reports can no longer be guaranteed if audits are altered.
- Auto Delete Reports
This option may automatically delete old reports. The maximum number of reports to store can be configured. If the maximum is exceeded, the oldest report is automatically deleted. The factory setting is Do not automatically delete reports.
- Policy
The appliance comes with several pre-configured policies. Only one policy can be configured per audit.
- Order for target hosts
Select in which order the specified target hosts are processed during vulnerability tests. Available options are:
Sequential
Random
Reverse
In order to improve the scan progress estimation, the setting Random is recommended (see Chapter 16.2.3).
This setting does not affect the alive test during which active hosts in a target network are identified. The alive test is always random.
- Maximum concurrently executed NVTs per host/Maximum concurrently scanned hosts
Select the speed of the scan on one host. The default values are chosen sensibly. If more VTs run simultaneously on a system or more systems are scanned at the same time, the scan may have a negative impact on either the performance of the scanned systems, the network or the appliance itself. These values “maxhosts” and “maxchecks” may be tweaked.
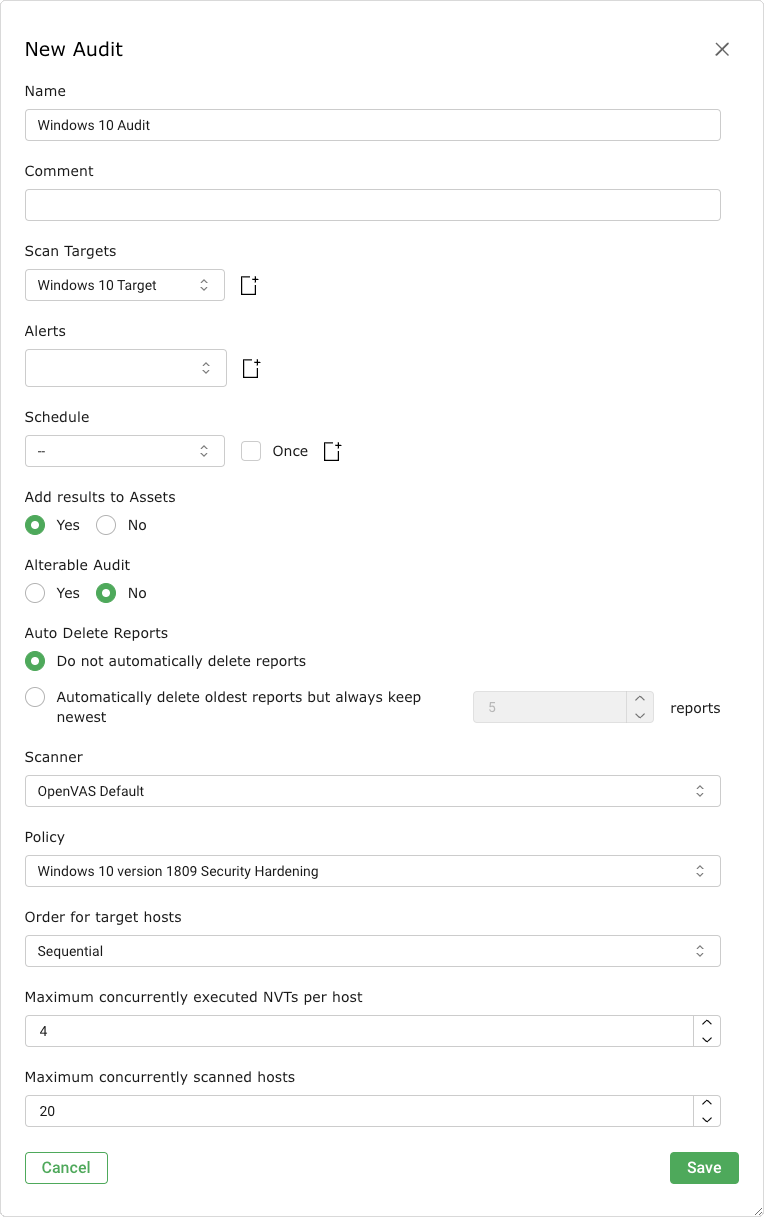
Fig. 11.7 Creating a new audit
11.2.1.2 Creating an Audit Through a Policy
An audit can directly be created for a policy as follows:
Select Resilience > Compliance Policies in the menu.
In the row of the desired policy, click
 .
.→ The policy is already selected in the drop-down list Policy.
Define the audit.
Tip
For the information to enter in the input boxes see Chapter 11.2.1.1.
Click Save.
→ The audit is created and displayed on the page Audits.
11.2.2 Starting an Audit
In the row of the newly created audit, click  .
.
Note
For scheduled audits  is displayed. The audit is starting at the time that was defined in the schedule (see Chapter 9.10).
→ The audit is added to the waiting queue. Afterwards, the scanner begins with the scan.
Note
In some cases, the audit may remain in the queue. For more information see Chapter 16.3.
For the status of an audit see Chapter 11.2.3.
The report of an audit can be displayed as soon as the audit has been started by clicking the bar in the column Status.
For reading, managing and downloading audit reports see Chapter 11.3.
As soon as the status changes to Done the complete audit report is available. At any the time the intermediate results can be reviewed (see Chapter 11.3.1).
Note
It can take a while for the audit to complete. The page is refreshing automatically if new data is available.
11.2.3 Managing Audits
List Page
All existing audits can be displayed by selecting Resilience > Compliance Audits in the menu (see Fig. 11.8).
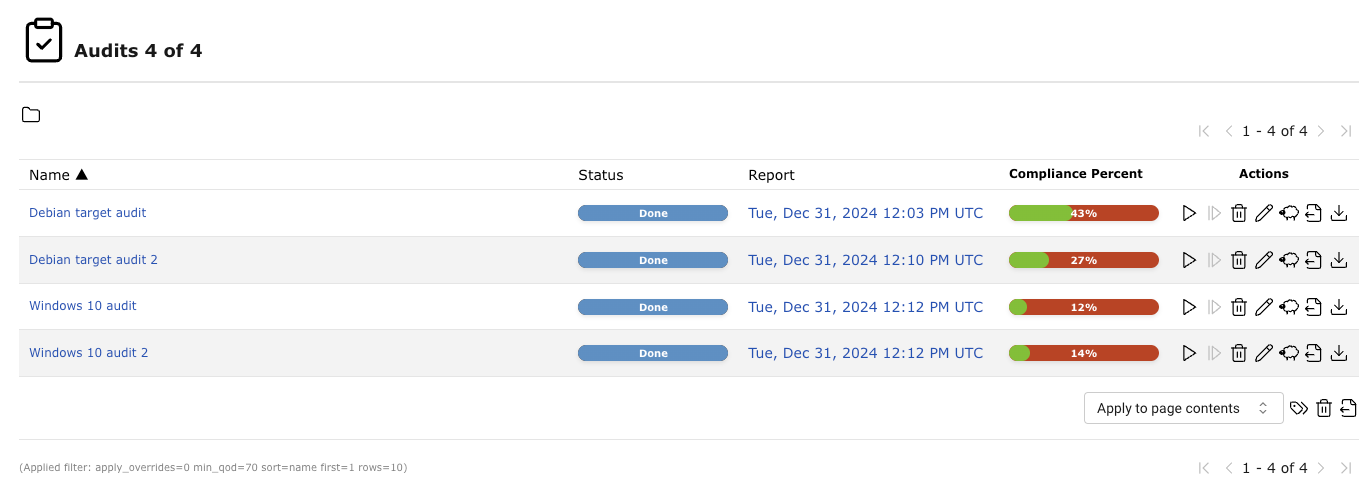
Fig. 11.8 Page Audits displaying all available audits
For all audits the following information is displayed:
- Name
Name of the audit. The following icons may be displayed:
 The audit is marked as alterable. The audit’s scan target(s) and scanner can be edited, even if reports were already created.
 The audit is configured to run on a remote scanner (see Chapter 15).
- Status
Current status of the audit. The following status bars are possible:
 There are no runs/reports for the audit.
 The audit was just started.
The appliance is preparing the scan.
Audits with this status cannot be stopped, resumed, or deleted.
 The audit was added to the waiting queue.
In some cases, it may remain in the queue.
For more information see Chapter 16.3.
 The audit is currently running.
The percent value is based on the number of VTs executed on the selected hosts.
For this reason the value does not necessarily correlate with the time spent.
 The scan is complete and the appliance is processing data.
Audits with this status cannot be stopped, resumed, or deleted.
 The audit has been completed successfully.
 The audit was requested to stop recently.
However, the scan engine has not yet reacted to this request yet.
Audits with this status cannot be stopped, resumed, or deleted.
 The audit was stopped.
The latest report is possibly not yet complete.
Other reasons for this status could be the reboot of the appliance or a power outage.
After restarting the scanner, the audit will be resumed automatically.
The audit was stopped.
The latest report is possibly not yet complete.
Other reasons for this status could be the reboot of the appliance or a power outage.
After restarting the scanner, the audit will be resumed automatically.When resuming a scan, all unfinished hosts are scanned completely anew. The data of hosts that were already fully scanned is kept.
 The audit was deleted.
The actual deletion process can take some time as reports need to be deleted as well.
Audits with this status cannot be stopped, resumed, or deleted.
 An error has occurred and the audit was interrupted.
The latest report is possibly not complete yet or is missing completely.
An error has occurred and the audit was interrupted.
The latest report is possibly not complete yet or is missing completely.- Report
Date and time of the latest report. By clicking it the details page of the latest report is opened.
- Compliance Percentage
Relation of requirements identified as compliant to the number of all results (sum of requirements identified as compliant, non-compliant and incomplete).
For all audits the following actions are available:
 Start the audit. Only currently not running audits can be started.
 Stop the currently running audit. All discovered results will be written to the database.
 Show details of the assigned schedule (only available for scheduled audits, see Chapter 9.10).
 Resume the stopped audit. All unfinished hosts are scanned completely anew. The data of hosts that were already fully scanned is kept.
 Download the report of the audit as a GCR file (Greenbone Compliance Report as PDF format).
Note
By clicking  or
or  below the list of audits more than one audit can be moved to the trashcan or exported at a time. The drop-down list is used to select which audits are moved to the trashcan or exported.
Details Page
Click on the name of an audit to display the details of the audit. Click  to open the details page of the audit.
The following tabs are available:
- Information
General information about the audit.
- Permissions
Assigned permissions (see Chapter 8.4).
The following actions are available in the upper left corner:
 Create a new audit (see Chapter 11.2.1.1).
 Start the audit. Only currently not running audits can be started.
 Stop the currently running audit. All discovered results will be written to the database.
 Resume the stopped audit. All unfinished hosts are scanned completely anew. The data of hosts that were already fully scanned is kept.
 Show the last report for the audit or show all reports for the audit.
11.3 Using and Managing Audit Reports
The results of an audit are summarized in a report. Audit reports can be displayed on the web interface and downloaded as PDF.
The appliance saves all reports of all audits in a local database. Not only the last report of an audit is saved but all reports of all audits ever run. This allows access to information from the past. The audit reports contain information about which security requirements are met on the target system.
Once an audit has been started, the report of the results found so far can be viewed. When an audit is completed, the status changes to Done and no more results will be added.
All existing reports for all audits can be displayed by selecting Resilience > Compliance Audit Reports in the menu.
Note
The latest report for a specific audit can be opened by clicking on the date in the column Report on the Compliance Audits page.
For all audit reports, the following information is displayed:
- Date
Date and time of report creation.
- Status
Status of the corresponding audit.
- Task
Corresponding audit.
- Compliant
Overall compliance assessment based on the met requirements.
- Yes/No/Incomplete
Number of found results for each compliance level.
Yes: the security requirement is met.
Incomplete: the security requirement is only met partly.
No: the security requirement is not met at all.
For all audit reports the following actions are available:
 Create a delta report (see Chapter 10.2.5).
Note
By clicking  below the list of audit reports more than one audit report can be deleted at a time. The drop-down list is used to select which audit reports are deleted.
11.3.1 Reading an Audit Report
Click on the date of an audit report to display the details of the report.
The following tabs are available:
- Information
General information about the corresponding audit.
- Results
List of all results in this audit report (see Chapter 11.3.1.1).
- Hosts
Scanned hosts with host names and IP addresses. The detected operating systems, the number of found vulnerabilities for each compliance level and the overall compliance assessment of the target system are displayed.
- Operating Systems
Scanned operating systems with system name, host name, number of scanned hosts and overall compliance assessment of the target system.
- TLS Certificates
TLS certificates found with the audit.
- Error Messages
Error messages that occurred during the audit.
- User Tags
Assigned tags (see Chapter 7.4).
The report content can be sorted by a chosen column by clicking on the column title. The content can be sorted ascending or descending:
 in the column title shows that the objects are sorted ascending.
 in the column title shows that the objects are sorted descending.
The following actions are available in the upper left corner:
 Add the audit report contents that have at least a QoD of 70 % to the assets.
 Open the page Results. A filter is applied to show only the results for this audit report.
 Open the page TLS Certificates. A filter is applied to show only the TLS certificates for this audit report.
 Open the page Performance. The system performance for the audit’s duration is displayed.
 Download a filtered audit report (see Chapter 11.3.2).
 Trigger an alert to send an audit report (see Chapter 10.2.4).
11.3.1.1 Results of an Audit Report
The tab Results contains a list of all vulnerabilities detected by the appliance (see Fig. 11.9).
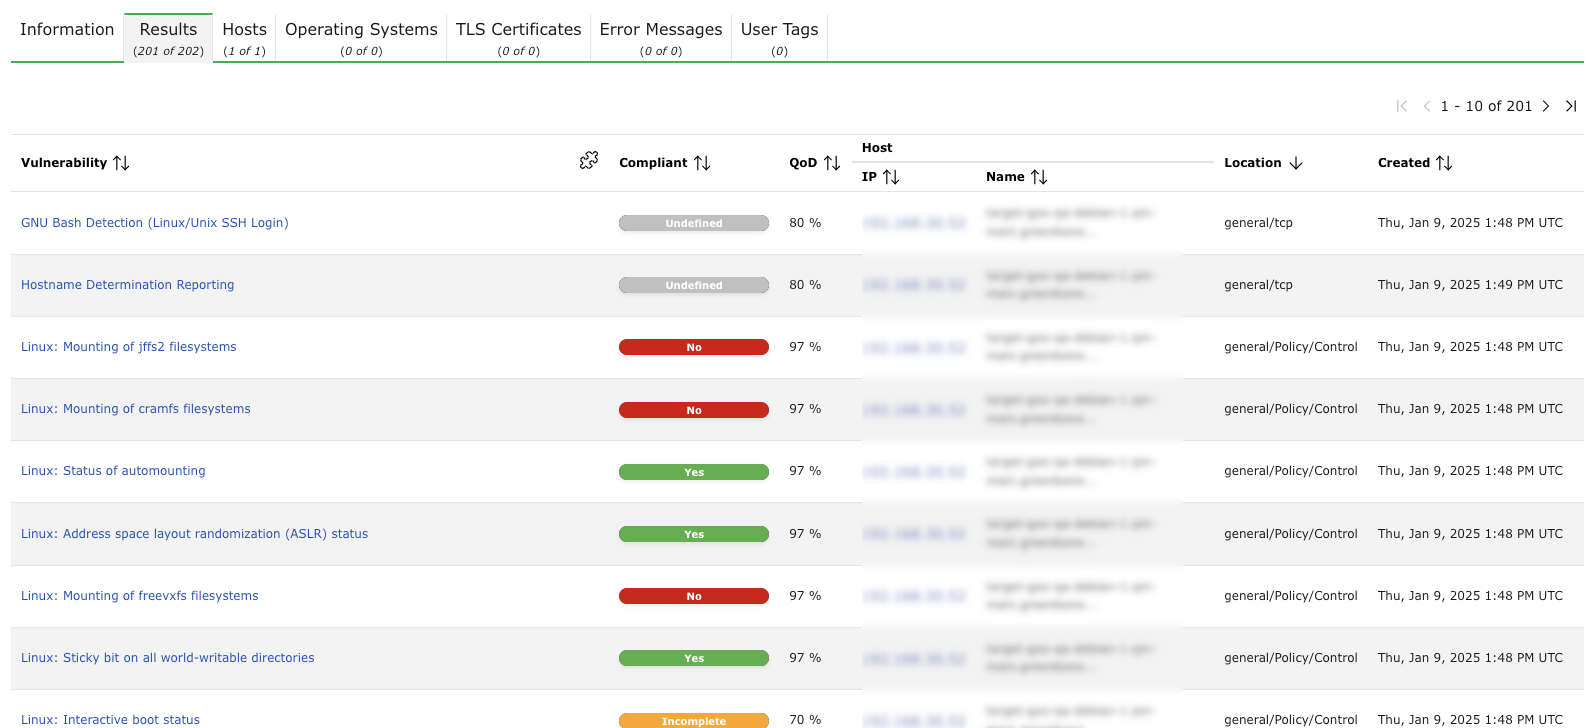
Fig. 11.9 Tab Results showing a list of discovered vulnerabilities
For every result the following information is displayed:
- Vulnerability
Name of the found vulnerability. By clicking on the name of a vulnerability details of the vulnerability are shown (see Fig. 11.10). The details page of the vulnerability is opened by clicking
 .
.Note
If the column of the vulnerability still appears empty the respective VT has not been updated yet.
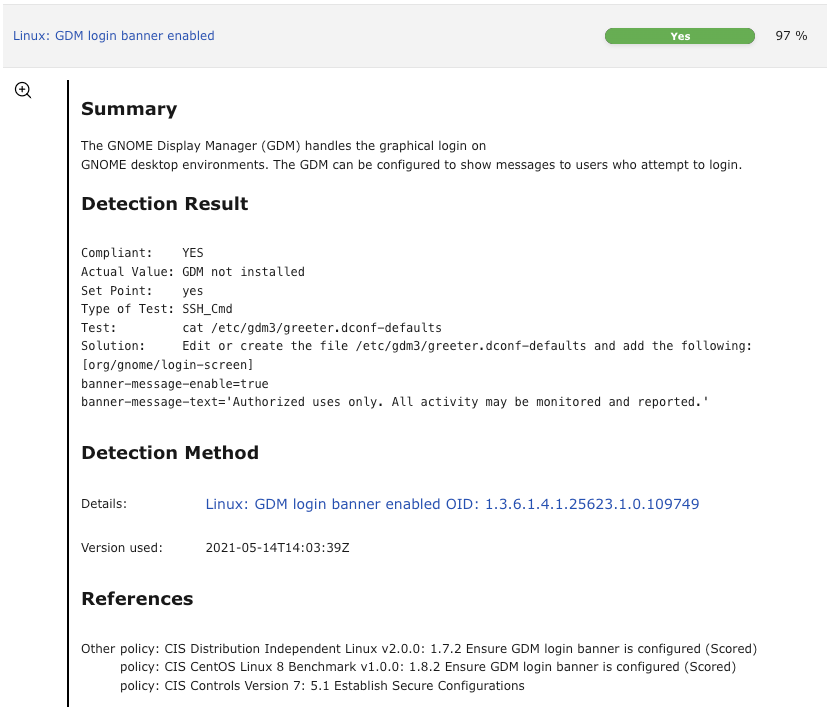
Fig. 11.10 Detailed information about the vulnerability
- Solution type

Type of measure to remedy the vulnerability. The following solution types exist:
 Vendor fix: Information is available about an official fix that is issued by the original vendor of the affected product.
Unless otherwise noted, it is assumed that this fix fully resolves the vulnerability.
 Workaround: Information about a configuration or specific deployment scenario that can be used to avoid exposure to the vulnerability is available.
This is usually the “first line of defense” against a new vulnerability before a mitigation or vendor fix has been issued or even discovered.
 Mitigation: Information about a configuration or specific deployment scenario that helps to reduce the risk of the vulnerability is available but that does not resolve the vulnerability on the affected product.
 Will not fix: There is no fix for the vulnerability and there never will be one.
This is often the case when a product has been orphaned, is no longer maintained or otherwise deprecated.
Information should contain details about why there will be no fix issued.
 None: Currently there is no fix available.
Information should contain details about why there is no fix.
- Compliant
Assessment of whether the security requirement is met.
- QoD
Short for “Quality of Detection”. The QoD describes the reliability of the executed vulnerability detection. It is a value between 0 % and 100 %, with 100 % being the most reliable.
By default, only results that were detected by VTs with a QoD of 70 % or higher are displayed. The filter can be adjusted to show results with a lower QoD (see Chapter 7.3.1).
For more information see Chapter 10.2.6.
- Host
Host for which the result was found. The IP address and the name of the host are displayed separately.
- Location
Port number and protocol type used to find the vulnerability on the host.
- EPSS
Measure of a vulnerability’s likelihood of exploitation according to the Exploit Prediction Scoring System (EPSS) (see Chapter 13.2.4).
The score indicates the probability of attempts to exploit a vulnerability being observed in the next 30 days and is a number between 0 and 1. The higher the value, the greater the probability that a vulnerability will actually be exploited.
The percentile indicates the proportion of vulnerabilities that were rated the same or lower than the vulnerability. This helps putting the score into context.
- Created
Date and time of the report creation.
11.3.1.2 Filtering an Audit Report
Since an audit report often contains a lot of findings, the complete audit report as well as only filtered results can be displayed and downloaded.
The audit report can be filtered as follows:
Enter a keyword which should be searched for in the input box Filter (see Fig. 11.11).
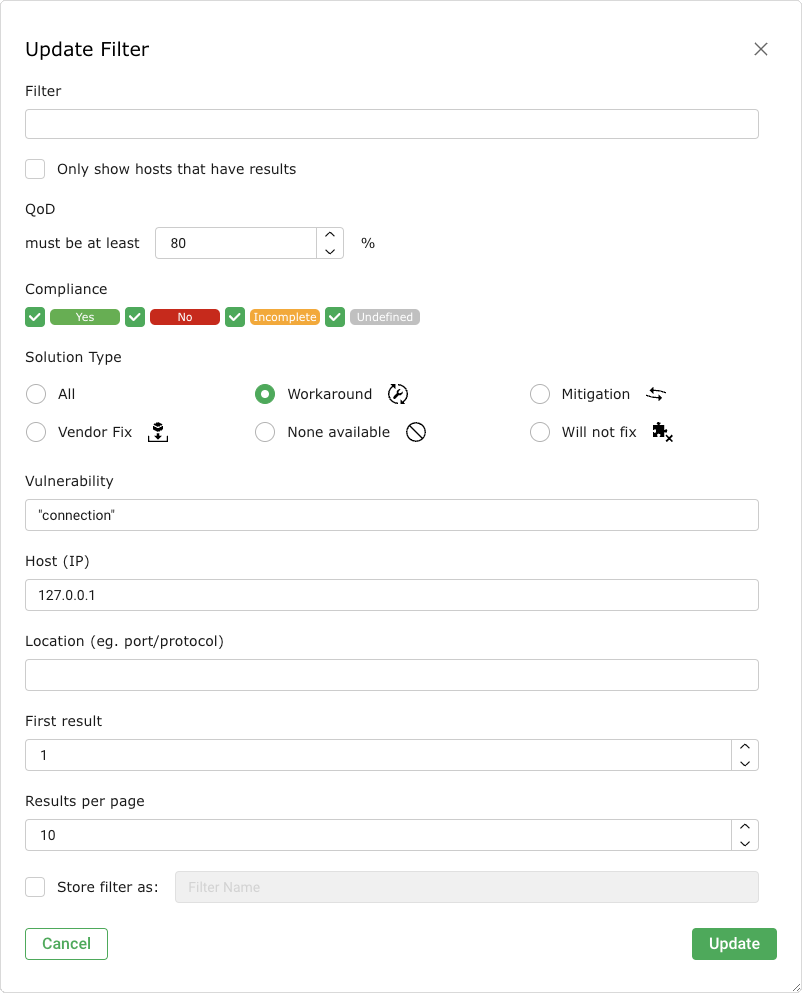
Fig. 11.11 Adjusting the filter for the audit report
Activate the checkbox Only show hosts that have results if only the hosts with results should be included.
For QoD select the desired QoD (see Chapter 10.2.6).
For Compliance activate the checkboxes of the desired compliance levels.
For Solution Type select the radio buttons of the desired solution types.
Enter the (part of a) vulnerability’s name, host or location in the according input box.
Click Update.
11.3.2 Exporting an Audit Report
Note
An audit reports must always be exported in the report format Greenbone Compliance Report PDF (GCR PDF). Exporting it in any other report format will result in an empty report.
An audit report can be exported as follows:
Select Resilience > Compliance Audit Reports in the menu.
Click on the date of an audit report to open the details page of the audit report.
-
→ The report content composer is opened.
Note
The applied filter is displayed in the input box Results Filter and cannot be changed. For changing the filter see Chapter 11.3.1.2.
Activate the checkbox Notes to include attached notes.
Select the report format GCR PDF in the drop-down list Report Format.
Note
Report configurations are not supported for the report format GCR PDF. For this reason, the drop-down list Report Config is not relevant.
Activate the checkbox Store as default to save the settings for future exports.
Click OK.
→ The audit report is downloaded as a PDF file.
11.4 Generic Policy Scans
When performing policy scans, there are groups of four VTs in the VT family Policy that can be configured accordingly.
At least the base VT and one additional VT are required to run a policy scan.
The four VT types are:
- Base
This VT performs the actual scan of the policy.
- Errors
This VT summarizes any items in which some errors occurred when running the base VT.
- Matches
This VT summarizes any items which match the checks performed by the base VT.
- Violations
This VT summarizes any items which did not match the checks performed by the base VT.
Note
The base VT must always be selected for a policy check since it performs the actual tests. The other three VTs may be selected according to the needs. For example, if matching patterns are of no concern then only a VT of the type Violations should be selected additionally.
11.4.1 Checking File Content
File content checks belong to policy audits which do not explicitly test for vulnerabilities but rather test the compliance of file contents (for example configuration files) regarding a given policy.
The appliance provides a policy module to check if a file content is compliant with a given policy.
In general, this is an authenticated scan, which means that the scan engine will have to log into the target system to perform the check (see Chapter 9.3).
The file content check can only be performed on systems supporting the command grep. Normally this means Linux or Linux-like systems.
Four different VTs in the VT family Policy provide the file content check:
File Content: this VT performs the actual file content check.
File Content: Errors: this VT shows the files in which errors occurred (for example the file is not found on the target system).
File Content: Matches: this VT shows the patterns and files which passed the file content check (the predefined pattern matches in the file).
File Content: Violations: this VT shows the patterns and files which did not pass the file content check (the predefined pattern does not match in the file).
11.4.1.1 Checking File Content Patterns
Create a reference file with the patterns to check. Following is an example:
filename|pattern|presence/absence
/tmp/filecontent_test|^paramter1=true.*$|presence
/tmp/filecontent_test|^paramter2=true.*$|presence
/tmp/filecontent_test|^paramter3=true.*$|absence
/tmp/filecontent_test_notthere|^paramter3=true.*$|absence
Note
This file must contain the row filename|pattern|presence/absence.
The subsequent rows each contain a test entry.
Each row contains three fields which are separated by |.
The first field contains the path and file name, the second field contains the pattern to check (as a regular expression) and the third field indicates if a pattern has to be present or absent.
Select Resilience > Compliance Policies in the menu.
In the row of the desired policy, click
 .
.→ The cloned policy is displayed on the page Policies.
In the section Edit Network Vulnerability Test Families click
 for the VT family Policy.
→ All VTs that allow special configuration are listed (see Fig. 11.12).

Fig. 11.12 Editing the family of VTs
Activate the checkbox Upload file (see Fig. 11.13).
Tip
If a reference file was already uploaded, the checkbox Replace existing file is displayed instead. The possibility to change the reference file is only available if the policy is currently not used.
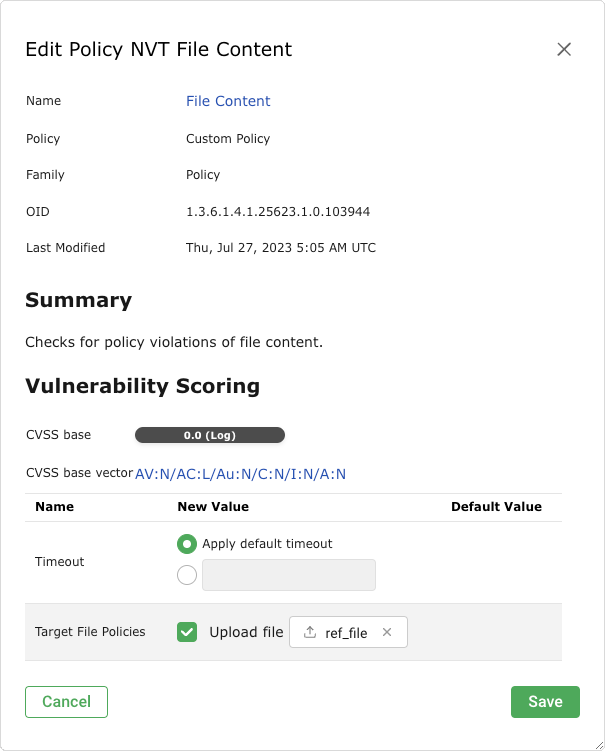
Fig. 11.13 Uploading the reference file
Click Browse… and select the previously created reference file.
Click Save to save the VT.
Click Save to save the family of VTs.
Click Save to save the policy.
11.4.1.2 Changing the Severity
The VTs of the type Violations have a default severity of 10.
This default severity can be changed using overrides (see Chapter 10.8).
By sectioning into three different VTs, it is possible to create distinct overrides for the severity according to the needs.
In the following example the severities of File Content: Violations and File Content: Errors have been changed which will be shown in the reports accordingly (see Fig. 11.14).

Fig. 11.14 Overrides changing the severity
11.4.2 Checking Registry Content
The registry is a database in Microsoft Windows containing important information about system hardware, installed programs, settings and user accounts on the computer. Microsoft Windows continually refers to the information in the registry.
Due to the nature of the Microsoft Windows registry every program/application installed under Microsoft Windows will register itself in the Microsoft Windows registry. Even malware and other malicious code usually leave traces within the registry.
The registry can be utilized to search for specific applications or malware related information such as version levels and numbers. Also, missing or changed registry settings could point to a potential security policy violation on an endpoint.
The appliance provides a policy module to verify registry entries on target systems. This module checks for the presence or absence of registry settings as well as registry violations.
Since the registry is unique to Microsoft Windows systems, this check can only be run on these systems.
To access the registry on the target system an authenticated scan has to be run.
Four different VTs in the VT family Policy provide the registry content check:
Windows Registry Check: this VT performs the actual registry content check on the files.
Windows Registry Check: Errors: this VT shows the files in which errors occurred (for example registry content not found on the target system).
Windows Registry Check: OK: this VT shows the registry settings which passed the registry check (right registry content).
Windows Registry Check: Violations: this VT shows the registry content which did not pass the registry check (wrong registry content).
11.4.2.1 Checking Registry Content Patterns
Create a reference file with the reference registry content. Following is an example:
Present|Hive|Key|Value|ValueType|ValueContent
TRUE|HKLM|SOFTWARE\Macromedia\FlashPlayer\SafeVersions|8.0|REG_DWORD|33
TRUE|HKLM|SOFTWARE\Microsoft\Internet Explorer
TRUE|HKLM|SOFTWARE\Microsoft\Internet Explorer|Version|REG_SZ|9.11.10240.16384
TRUE|HKLM|SOFTWARE\Microsoft\Windows\CurrentVersion\Policies\
 System|LocalAccountTokenFilterPolicy|REG_DWORD|1
FALSE|HKLM|SOFTWARE\Virus
TRUE|HKLM|SOFTWARE\ShouldNotBeHere
TRUE|HKLM|SOFTWARE\Macromedia\FlashPlayer\SafeVersions|8.0|REG_DWORD|*
Note
This file must contain the row Present|Hive|Key|Value|ValueType|ValueContent.
The subsequent rows each contain a test entry.
Each row contains six fields which are separated by |.
The first field sets whether a registry entry should be present or not, the second the hive the registry entry is located in, the third the key, the fourth the value, the fifth the value type and the sixth the value content. If a star * is used in the last column any value is valid and accepted for existence or non-existence.
Select Resilience > Compliance Policies in the menu.
In the row of the policy Microsoft Windows Registry Check, click
 .
.→ The cloned policy is displayed on the page Policies.
In the section Edit Network Vulnerability Test Families click
 for the VT family Policy.
→ All VTs that allow special configuration are listed (see Fig. 11.15).

Fig. 11.15 Editing the family of VTs
Activate the checkbox Upload file (see Fig. 11.16).
Tip
If a reference file was already uploaded, the checkbox Replace existing file is displayed instead. The possibility to change the reference file is only available if the policy is currently not used.
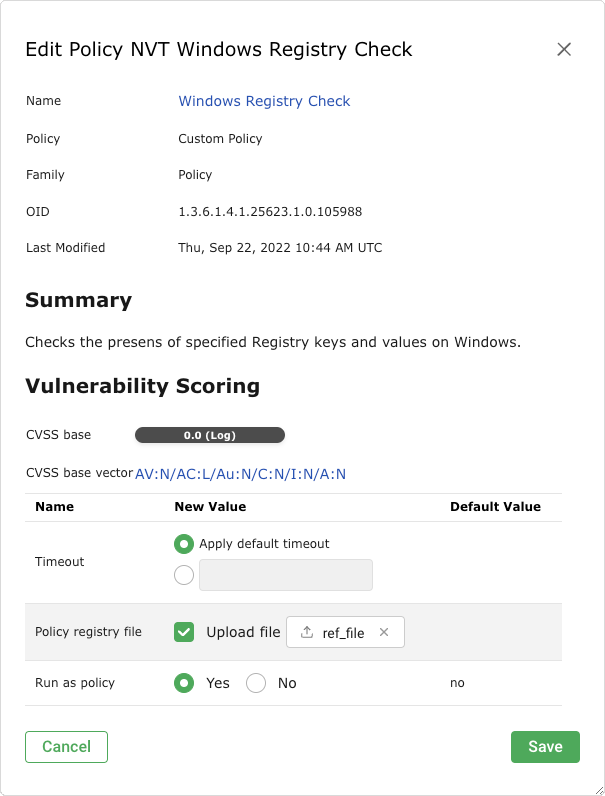
Fig. 11.16 Uploading the reference file
Click Browse… and select the previously created reference file.
Click Save to save the VT.
Click Save to save the family of VTs.
Click Save to save the policy.
11.4.2.2 Changing the Severity
The VTs of the type Violations have a default severity of 10.
This default severity can be changed using overrides (see Chapter 10.8).
By sectioning into three different VTs, it is possible to create distinct overrides for the severity according to the needs.
In the following example the severities of Windows Registry Check: Violations and Windows Registry Check: Errors have been changed which will be shown in the reports accordingly (see Fig. 11.17).

Fig. 11.17 Overrides changing the severity
11.4.3 Checking File Checksums
File checksum checks belong to policy audits which do not explicitly test for vulnerabilities but rather for file integrity.
The appliance provides a policy module to verify file integrity on target systems. This module checks the file content by MD5 or SHA1 checksums.
In general, this is an authenticated check, which means that the scan engine will have to log into the target system to perform the check.
The file checksum check can only be performed on systems supporting checksums. Normally this means Linux or Linux-like systems. However, the appliance provides a module for checksum checks for Microsoft Windows systems as well (see Chapter 11.4.3.3).
Four different VTs in the VT family Policy provide the file checksum check:
File Checksums: this VT performs the actual checksum check on the files.
File Checksums: Errors: this VT shows the files in which errors occurred (for example file not found on the target system).
File Checksums: Matches: this VT shows the files which passed the checksum check (checksum matches).
File Checksums: Violations: this VT shows the files which did not pass the checksum check (wrong checksum).
11.4.3.1 Checking File Checksum Patterns
Create a reference file with the reference checksums. Following is an example:
Checksum|File|Checksumtype
6597ecf8208cf64b2b0eaa52d8169c07|/bin/login|md5
ed3ed98cb2efa9256817948cd27e5a4d9be2bdb8|/bin/bash|sha1
7c59061203b2b67f2b5c51e0d0d01c0d|/bin/pwd|md5
Note
This file must contain the row Checksum|File|Checksumtype.
The subsequent rows each contain a test entry.
Each row contains three fields which are separated by |.
The first field contains the checksum in hex, the second field the path and file name and the third field the checksum type. Currently MD5 and SHA1 checksums are supported.
Important
Checksums and checksum types must be lowercase.
Select Resilience > Compliance Policies in the menu.
In the row of the desired policy, click
 .
.→ The cloned policy is displayed on the page Policies.
In the section Edit Network Vulnerability Test Families click
 for the VT family Policy.
→ All VTs that allow special configuration are listed (see Fig. 11.18).

Fig. 11.18 Editing the family of VTs
Activate the checkbox Upload file (see Fig. 11.19).
Tip
If a reference file was already uploaded, the checkbox Replace existing file is displayed instead. The possibility to change the reference file is only available if the policy is currently not used.
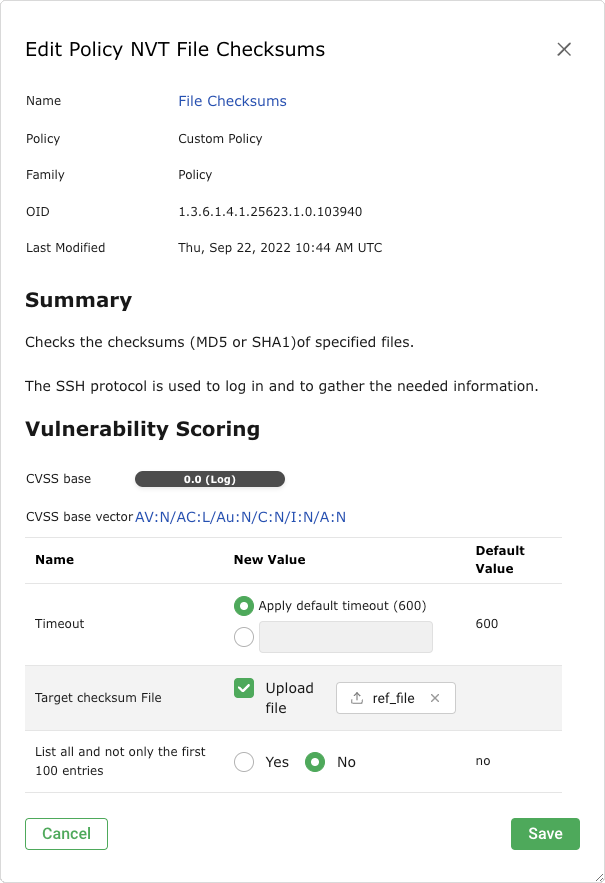
Fig. 11.19 Uploading the reference file
Click Browse… and select the previously created reference file.
Click Save to save the VT.
Click Save to save the family of VTs.
Click Save to save the policy.
11.4.3.2 Changing the Severity
The VTs of the type Violations have a default severity of 10.
This default severity can be changed using overrides (see Chapter 10.8).
By sectioning into three different VTs, it is possible to create distinct overrides for the severity according to the needs.
In the following example the severities of File Checksum: Violations and File Checksum: Errors have been changed which will be shown in the reports accordingly (see Fig. 11.20).

Fig. 11.20 Overrides changing the severity
11.4.3.3 Checking File Checksum Patterns for Microsoft Windows
The appliance provides a similar module for Microsoft Windows systems for file checksum checks.
Since Microsoft Windows does not provide an internal program for creating checksums it has to be installed one either manually or automatically by the VT. The appliance uses ReHash for creating checksums on Microsoft Windows systems.
Note
There are two operating modes for these checks:
Using a tool that was installed on the target system manually.
The tool ReHash will automatically be installed and deinstalled as well if requested on the target system during the checking routine.
As for Linux systems the VTs for checksum checks are located in the VT family Policy.
Create a reference file with the patterns to check. Following is an example:
Checksum|File|Checksumtype
6597ecf8208cf64b2b0eaa52d8169c07|/bin/login|md5
ed3ed98cb2efa9256817948cd27e5a4d9be2bdb8|/bin/bash|sha1
7c59061203b2b67f2b5c51e0d0d01c0d|/bin/pwd|md5
In the section Edit Network Vulnerability Test Families click
 for the VT family Policy.
→ All VTs that allow special configuration are listed (see Fig. 11.21).

Fig. 11.21 Editing the family of VTs
For Delete hash test Programm after the test select the radio button Yes if the checksum program ReHash should be deleted after the check (see Fig. 11.22).
Tip
The program can be left on the target system, for example to speed up recurring tests and therefore does not have to be transferred each time.
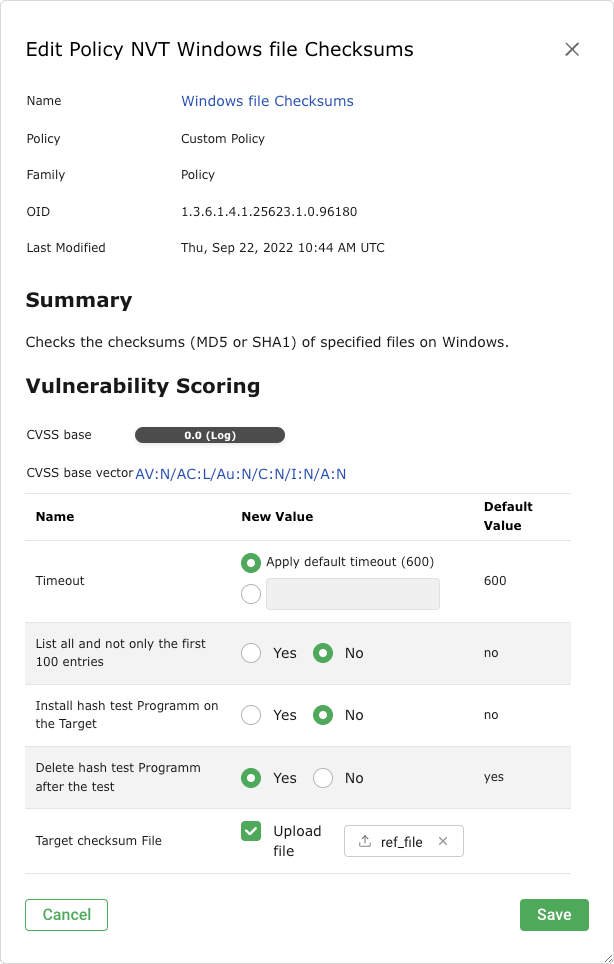
Fig. 11.22 Uploading the reference file
For Install hash test Programm on the Target select the radio button Yes if the checksum program ReHash should be installed on the target system automatically.
Note
If it is not installed automatically, it has to be installed manually under
C:\Windows\system32(on 32-bit systems) orC:\Windows\SysWOW64(on 64-bit systems) and has to be executable for the authenticated user.Activate the checkbox Upload file.
Tip
If a reference file was already uploaded, the checkbox Replace existing file is displayed instead. The possibility to change the reference file is only available if the policy is currently not used.
Click Browse… and select the previously created reference file.
Click Save to save the VT.
Click Save to save the family of VTs.
Click Save to save the policy.
11.4.4 Performing CPE-Based Checks
For detailed information about Common Platform Enumeration (CPE) see Chapter 13.2.2.
11.4.4.1 Simple CPE-Based Checks for Security Policies
With any executed scan, CPEs for the identified products are stored. This happens independently of whether the product actually reveals a security problem or not. On this basis it is possible to describe simple security policies and the checks for compliance with these.
With OPENVAS SCAN, it is possible to describe policies to check for the presence as well as for the absence of a product. These cases can be associated with a severity to appear in the scan report.
The examples demonstrate how to check the compliance of a policy regarding specific products in an IT infrastructure and how the reporting with the corresponding severity can be done.
The information about whether a certain product is present on the target system is gathered by a single Vulnerability Test (VT) or even independently by a number of special VTs. This means that for a certain product an optimized policy that only concentrates on this product and does not do any other scan activity can be specified.
11.4.4.2 Detecting the Presence of Problematic Products
This example demonstrates how the presence of a certain product in an IT infrastructure is classified as a severe problem and reported as such.
Select Resilience > Compliance Policies in the menu.
Define the name of the policy.
Click Save.
→ The policy is created and displayed on the page Policies.
Either a single CPE or multiple CPEs can be searched for at the same time.
Enter a single CPE in the input box Single CPE, for example
cpe:/a:microsoft:ie:6(see Fig. 11.23).or
Activate the checkbox Upload file, click Browse… and select a file containing a list of CPEs.
Note
The file must be a text file in which the CPEs are separated by commas or line breaks.
The problematic product should not be present, which means that the condition must be set to missing. However, if the product is discovered, this is evaluated as critical.
Select the radio button missing.

Fig. 11.23 Editing CPE Policy Check
Click Save to save the VT.
Activate the checkbox Selected for the following VTs: CPE Policy Check, CPE-based Policy Check Error, CPE-based Policy Check OK and CPE-based Policy Check Violations.
Click Save to save the family of VTs.
Activate the checkbox Selected for the VT family Product Detection (see Fig. 11.24).
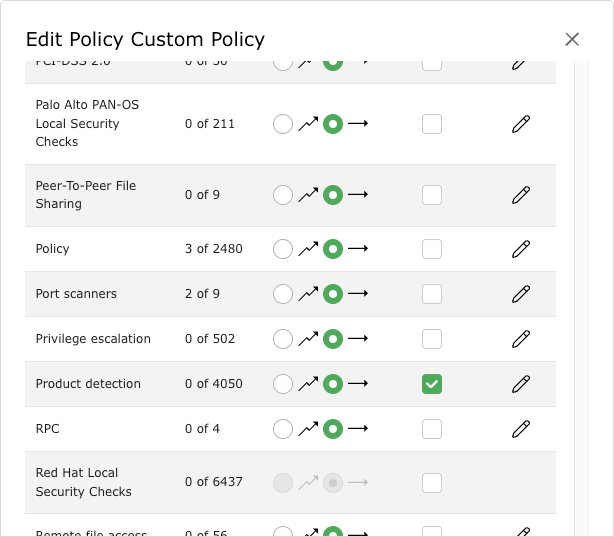
Fig. 11.24 Activated VT families
Click Save to save the policy.
Note
In case the mere availability of a product should be considered, it is required to configure remote access using credentials to apply local security checks (see Chapter 9.3.2). If just running network services should be searched, it normally does not help but rather increases the number of false positives.
Create a new target (see Chapter 9.2.1), create a new audit (see Chapter 11.2.1.1) and run the audit (see Chapter 11.2.2).
When creating the audit, use the previously created policy.
When the scan is completed select Scans > Reports in the menu.
Tip
To show only the results of the CPE-based policy checks, a suitable filter can be applied.
Enter
cpein the input box Filter.→ The reports for CPE-based policy checks are displayed.
Click on the date of a report.
→ The report for CPE-based policy checks is displayed.
The report can be used as described in Chapter 10.2.1.
Note
The VTs of the type Violations have a default severity of 10.
This default severity can be changed using overrides (see Chapter 10.8).
If the problematic product is found on one of the target systems, it is reported as a problem.
11.5 Checking Standard Policies
11.5.1 IT-Grundschutz
The German Federal Office for Information Security (BSI) publishes the IT-Grundschutz Compendium, which replaced the IT-Grundschutz Catalogs in 2017 and provides useful information for detecting weaknesses and combating attacks on IT environments.
Greenbone provides a policy for testing the compliance with the following modules of the IT-Grundschutz Compendium:
SYS.1.2.2 Windows Server 2012
SYS.1.3 Server on Linux and Unix
SYS.2.2.2 Clients on Windows 8.1
SYS.2.2.3 Clients on Windows 10
SYS.2.3 Clients on Linux and Unix
An IT-Grundschutz scan can be carried out as follows:
Create a new target (see Chapter 9.2.1), create a new audit (see Chapter 11.2.1.1) and run the audit (see Chapter 11.2.2).
When creating the audit, use the policy IT-Grundschutz Kompendium.
When the scan is completed select Scans > Reports in the menu.
Click on the date of the report.
→ The report for the IT-Grundschutz scan is displayed.
The report can be used as described in Chapter 10.2.1. The report contains detailed information about compliant, not compliant and incomplete requirements.
For Include activate the checkbox Notes to include attached notes and the checkbox Overrides to label enabled overrides and include their text field (see Chapter 10.2.2).
Select GCR PDF in the drop-down list Report Format.
Click OK and download the PDF file.
11.5.2 BSI TR-03116: Kryptographische Vorgaben für Projekte der Bundesregierung
The German Federal Office for Information Security (BSI) published a technical guideline TR-03116: Kryptographische Vorgaben für Projekte der Bundesregierung. Part 4 of this guideline describes the security requirements for services of the federal government using the cryptographic protocols SSL/TLS, S/MIME and OpenPGP.
The requirements are based on forecasts for the security of the algorithms and key lengths for the next years.
Greenbone provides a policy for testing the compliance of services with the technical guideline “TR-03116”.
The policy tests if the scanned hosts and services use SSL/TLS. If this is the case, the compliance with the guideline is tested.
The policy states three main requirements:
- TLS version
TLS versions lower than 1.2 are not allowed.
- Supported ciphers
If TLS 1.2 is enabled, one of the following ciphers has to be supported:
TLS_ECDHE_ECDSA_WITH_AES_128_CBC_SHA256
TLS_ECDHE_RSA_WITH_AES_128_CBC_SHA256
TLS_ECDHE_ECDSA_WITH_AES_128_GCM_SHA256
TLS_ECDHE_RSA_WITH_AES_128_GCM_SHA256
If TLS 1.3 is enabled, cipher TLS_AES_128_GCM_SHA256 has to be supported.
- Allowed cipher suites
If TLS 1.2 is enabled, only the following cipher suites are allowed:
TLS_ECDHE_ECDSA_WITH_AES_128_CBC_SHA256
TLS_ECDHE_ECDSA_WITH_AES_128_GCM_SHA256
TLS_ECDHE_ECDSA_WITH_AES_256_CBC_SHA384
TLS_ECDHE_ECDSA_WITH_AES_256_GCM_SHA384
TLS_ECDHE_ECDSA_WITH_AES_128_CBC_SHA
TLS_ECDHE_ECDSA_WITH_AES_256_CBC_SHA
TLS_ECDHE_RSA_WITH_AES_128_CBC_SHA256
TLS_ECDHE_RSA_WITH_AES_128_GCM_SHA256
TLS_ECDHE_RSA_WITH_AES_256_CBC_SHA384
TLS_ECDHE_RSA_WITH_AES_256_GCM_SHA384
TLS_DHE_RSA_WITH_AES_128_CBC_SHA256
TLS_DHE_RSA_WITH_AES_256_CBC_SHA256
TLS_DHE_RSA_WITH_AES_128_GCM_SHA256
TLS_DHE_RSA_WITH_AES_256_GCM_SHA384
TLS_ECDHE_RSA_WITH_AES_128_CBC_SHA
TLS_ECDHE_RSA_WITH_AES_256_CBC_SHA
TLS_DHE_RSA_WITH_AES_128_CBC_SHA
TLS_DHE_RSA_WITH_AES_256_CBC_SHA
If TLS 1.3 is enabled, only the following cipher suites are allowed:
TLS_AES_128_GCM_SHA256
TLS_AES_256_GCM_SHA384
TLS_AES_128_CCM_SHA256
A BSI TR-03116 scan can be carried out as follows:
Create a new target (see Chapter 9.2.1), create a new audit (see Chapter 11.2.1.1) and run the audit (see Chapter 11.2.2).
When creating the audit, use the policy BSI TR-03116: Part 4.
When the scan is completed select Scans > Reports in the menu.
Click on the date of the report.
→ The report for the BSI TR-03116 scan is displayed.
The report can be used as described in Chapter 10.2.1. The report contains detailed information about compliant, not compliant and incomplete requirements.
For Include activate the checkbox Notes to include attached notes and the checkbox Overrides to label enabled overrides and include their text field (see Chapter 10.2.2).
Select GCR PDF in the drop-down list Report Format.
Click OK and download the PDF file.
11.5.3 BSI TR-02102: Kryptographische Verfahren: Empfehlungen und Schlüssellängen
The German Federal Office for Information Security (BSI) published a technical guideline TR-02102: Kryptographische Verfahren: Empfehlungen und Schlüssellängen. Part 4 of this guideline describes the recommendations for the use of the Secure Shell (SSH) cryptographic protocol.
Greenbone provides a policy for testing the compliance of services with the technical guideline “TR-02102”.
The following SSH settings in the file /etc/ssh/sshd_config are tested in the policy:
Protocol (OID: 1.3.6.1.4.1.25623.1.0.150066): SSH version 2 has to be used.
KexAlgorithms (OID: 1.3.6.1.4.1.25623.1.0.150077): the following algorithms are allowed for key exchange during SSH connection establishment: diffie-hellman-group-exchange-sha256, diffie-hellman-group14-sha256, diffie-hellman-group15-sha512, diffie-hellman-group16-sha512, rsa2048-sha256, ecdh-sha2-*
ReKeyLimit (OID: 1.3.6.1.4.1.25623.1.0.150560): the key material of a connection must be renewed after 1 hour or 1 GiB of transferred data.
Ciphers (OID: 1.3.6.1.4.1.25623.1.0.150225): the following encryption methods are allowed: AEAD_AES_128_GCM, AEAD_AES_256_GCM, aes256-cbc, aes192-cbc, aes128-cbc, aes128-ctr, aes192-ctr, aes256-ctr
MACs (OID: 1.3.6.1.4.1.25623.1.0.109795): the following MACs are allowed: hmac-sha1, hmac-sha2-256, hmac-sha2-512
HostKeyAlgorithms (OID: 1.3.6.1.4.1.25623.1.0.150559): the following methods for server authentication are allowed: pgp-sign-rsa, pgp-sign-dss, ecdsa-sha2-, x509v3-rsa2048-sha256, x509v3-ecdsa-sha2-
AuthenticationMethods (OID: 1.3.6.1.4.1.25623.1.0.150561): the public key authentication (publickey) has to be used.
PubkeyAuthentication (OID: 1.3.6.1.4.1.25623.1.0.150222): the public key authentication (publickey) has to be allowed.
A BSI TR-02102 scan can be carried out as follows:
Create a new target (see Chapter 9.2.1), create a new audit (see Chapter 11.2.1.1) and run the audit (see Chapter 11.2.2).
When creating the audit, use the policy BSI TR-02102-4.
When the scan is completed select Scans > Reports in the menu.
Click on the date of the report.
→ The report for the BSI TR-02102 scan is displayed.
The report can be used as described in Chapter 10.2.1. The report contains detailed information about compliant, not compliant and incomplete requirements.
For Include activate the checkbox Notes to include attached notes and the checkbox Overrides to label enabled overrides and include their text field (see Chapter 10.2.2).
Select GCR PDF in the drop-down list Report Format.
Click OK and download the PDF file.
11.6 Running a TLS Map Scan
The TLS (Transport Layer Security) protocol ensures the confidentiality, authenticity and integrity of communication in insecure networks. It establishes confidential communication between sender and receiver, for example web server and web browser.
With OPENVAS SCAN, it is possible to identify systems that offer services using SSL/TLS protocols. Additionally, the appliance detects the protocol versions and offers encryption algorithms. Further details about the service can be achieved in case it can be properly identified.
11.6.1 Checking for TLS and Exporting the Scan Results
For an overview on TLS usage in the network or on single systems, Greenbone recommends using the scan configuration TLS-Map. This scan configuration identifies the used protocol versions and the offered encryption algorithms. Additionally, it tries to identify in-depth details of the service.
Select Configuration > Port Lists in the menu to have a look at the pre-configured port lists.
Note
By clicking
 own port lists can be created (see Chapter 9.7.1).
Choose a suitable list of ports that should be scanned.
Note
Pay attention that all ports of interest are covered by the list.
The more extensive the list, the longer the scan will take but this may also detect services at unusual ports.
The TLS protocol is mainly based on TCP. A port list with UDP ports will slow down the scan without benefits. If any TCP ports should be covered All TCP should be selected.
Create a new target (see Chapter 9.2.1), create a new task (see Chapter 9.2.2) and run the task (see Chapter 9.2.3).
When creating the task, use the scan configuration TLS-Map.
When the scan is completed select Scans > Reports in the menu.
Click on the date of the report.
→ The report for the TLS-Map scan is displayed.
The report can be used as described in Chapter 10.2.1.
For Include activate the checkbox Notes to include attached notes and the checkbox Overrides to label enabled overrides and include their text field (see Chapter 10.2.2).
Select TLS Map in the drop-down list Report Format.
Click OK and download the CSV file.
→ The report can be used in spreadsheet applications.
The file contains one line per port and systems where an SSL/TLS protocol is offered:
IP,Host,Port,TLS-Version,Ciphers,Application-CPE
192.168.12.34,www.local,443,TLSv1.0;SSLv3,SSL3_RSA_RC4_128_SHA;TLS1_RSA_RC4_128_SHA,
  cpe:/a:apache:http_server:2.2.22;cpe:/a:php:php:5.4.4
192.168.56.78,www2.local,443,TLSv1.0;SSLv3,SSL3_RSA_RC4_128_SHA;TLS1_RSA_RC4_128_SHA,
  cpe:/a:apache:http_server:2.2.22
Separated by commas, each line contains the following information:
- IP
The IP address of the system where the service was detected.
- Host
The DNS name of the system in case it is available.
- Port
The port where the service was detected.
- TLS-Version
The protocol version offered by the service. In case more than one is offered, the versions are separated with semicolons.
- Ciphers
The encryption algorithms offered by the service. In case more than one is offered, the algorithms are separated with semicolons.
- Application-CPE
The detected application in CPE format. In case more than one is identified, the applications are separated with semicolons.


